Welcome Commander, to my sixth episode in my Supreme Commander Forged Alliance Tutorial series.
Todays topic is March and Attack Formations.
You might think, that formations do not matter. You are used to just grouping units together and just move them towards the enemy, and they do the job. This might work fine for small groups, and you might be even able to kite in small encounters, but once you commit to attacking a heavily defended position, the first units to arrive will be long dead, before the last units get into firing range.
To avoid this, you should move large groups of units always in line formation towards the enemy position to reduce the time the unit will need to be under enemy point defense and artillery fire, before they can bring all of their weapons to bare.
To do this you have to select your group of units, which shall attack the enemy. Homogenous groups work best, because all units have the same movement speed, mixed unit groups move at the speed of the slowest unit. Small platoons are most maneuverable. Before marching towards the next waypoint, units group up first
Press and hold control while right clicking and holding on the desired point on the map, the group should move to. A holographic representation of the formation will appear under your mouse cursor.
To switch between Line and Column formation you hold control and right mouse button and press the left mouse button.
Line formation is best for concentrating maximum firepower at the target. In mixed unit groups the stronger units will be put in the front and middle, weaker ones, especially artillery and missile units in the rear and scouts on the flanks. Shield units and Stealth are spread to cover the formation. Commanders and engineers will be put in the back.
How tight these formation look, depends on unit composition. If no experimentals are in the group, the formation is very tight. With experimental units, file and ranks are far spread out.
Column formation will arrange the units in an elongated rectangle, which allows units to march through bottlenecks as quickly as possible. Transports unload units already in columns. When marching in column, the tactical unit is vulnerable to frontal attacks, because it can't bring the units in the rear to shoot at the enemy. Forged Alliance tries to counter that by putting long range weapons, engineers and important units like commanders in the rear of the column.
Line formations arranges the units in an attack line, maximizing firing power towards the target, while sacrificing maneuverabilty and making the unit more vulnerable towards enemy breakthroughs with heavy mobile units like assault bots and heavy tanks. In this formation units are far spread out so they come into range of static defensive structures all at the same time, and give them too many targets to shoot at, therefore casualties are kept at a minimum. Move the line towards the target if you assessed it weaker than your attack force.
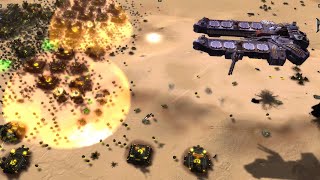
When attacking strongly defended positions, Missile launchers and mobile artillery units should weaken the shields from afar and fire on defensive structures prioritizing dangerous long range defense like missile launchers and artillery as soon as possible. Once the long range fire starts, select the assault bots and heavy tanks and some shield units, click behind the target location, if long range bombardment is ineffective because of strong shielding, and your units get decimated, you can choose to charge issuing a move order behind the target. All units will start charging at their maximum speed and break formation, towards the enemy position. Order tanks and assault bots to shoot shield generators, once they are under the shield dome or they shields go down. Issue also direct attack orders to long range units and concentrate fire on defensive structures like point defense towers, tactical missile launchers, and nuclear missile silos and artillery. Volatile buildings like tier 2 and 3 reactors and mass extractors are priority targets if important buildings are close by.
If this attack fails, try again, and again, and again. Change attack vector, unit composition, and keep up the pressure or your enemy will recover.
I hope this video helped you understanding the mechanics of formations and basic tactics of attacking fortified positions. Thank you for watching this video, like it, comment, and subscribe.
See you on the battlefield! CulChullein signing off!


![[SupCom FAF] How to engage in an ASF battle properly without micro (Attack vs Patrol vs Stop).](https://i.ytimg.com/vi/3JYe6DrXi3s/mqdefault.jpg)


Информация по комментариям в разработке