English:
The following video is the journey of the RC QD with the Qili® brand which I bought around 2002, at that time the RC QD was still booming with prices of IDR 200,000 to IDR 300,000, after playing for about 1 year there was a problem with the steering, at that time there was no problem at all. I found a place to repair this RC QD and was constrained by costs because at that time I was still in high school, and finally this kit ended up in the warehouse.
At the end of 2022, while cleaning the warehouse, I found this RC QD again, and based on video tutorials on YouTube, I slowly learned about all kinds of RCs, as well as the parts used in RCs, both RC QDs and RC Hobby which apparently require more electrical parts. complex and various models, types and prices. Initially, after finding it in the warehouse, I only thought about how to revive this RC QD so that it could live and run again. Learn how to modify the steering section using the Servo Tower Pro MG996R, Use New Rain 480A brand Electronic Speed Control (ESC) supporting 2S-3S LiPo Batteries, buy cheap Propo Transmitters and Receivers, and Use 3S 11.1 Volt 2200 mah 25 C LiPo Batteries and LiPo Balance Charger.
After playing for about 1 year and 4 months, it turned out that the QD Gearbox finally fell out, even though it had been using Alloy material (maybe because it was getting old, especially when I played so extremly), I had to jack it up again for about 2 months, finally I thought about replacing the QD RC Kit. using a more appropriate kit, namely the VRX RH1026 Kit which is usually used for On Road (now even widely used for RC Rally)
Don't stop there, Now think creatively about how to install the QD RC Body on the VRX RH1026 Kit. For the front bracket, I collaborated the VRX RH1026 default bumper bracket with the QD bumper which I cut to fit the QD body and drilled holes in the bolts so that it could be installed on the VRX RH1026 bumper and the QD bumper could be bolted to the QD hardbody. For the rear body bracket I used Number Plate Material which I adjusted so that it can be installed on the VRX RH1026 Shock Tower and QD Hardbody. Indeed, the bracket is still a bit complicated because I still use 2 bolts at the front and 2 bolts at the back.
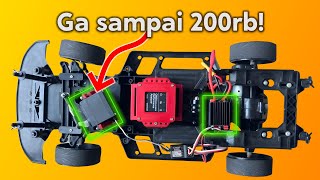
For the VRX RH1026 electrical specifications, I detail them as follows :
1. My servo uses a 12 Kg SPT Low Profile Servo
2. The ESC still uses the New Rain 480A ESC which supports 2S-3S batteries.
3. For motor I used the Type of Brushed Motor 550 belonging to WLToys Buggy, For the Transmitter and Receiver, I used TX &RC from RGT 3 Channel, used 2S battery (because i think it's fast enough). The rims have been replaced several times, but most recently I used Tamiya rims, which look similar to Subaru Rally rims. For my own tires, I use Rally Tarmac tires made in China. I also installed an after market Dummy Discbrake which is widely sold on the market.
I also installed several parts such as the dummy shark fin antenna and Dummy exhaust. That's a little picture that I can explain in this description. Hopefully this can provide useful information for RC QD colleagues who want to build their RC QD into an RC Hobby.
Thank You and Don't forget to follow and subscribe to my YouTube channel.


Информация по комментариям в разработке