Click for more info and reviews of this etrailer Trailer Hitch:
https://www.etrailer.com/Trailer-Hitc...
https://www.etrailer.com
Don’t forget to subscribe!
/ etrailertv
Full transcript: https://www.etrailer.com/tv-install-e...
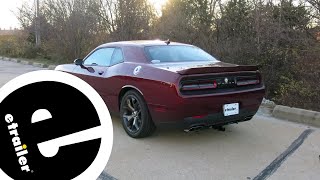
Hello, neighbors. It's Brad here at etrailer. And today, we're taking a look and installing the etrailer trailer hitch receiver on a 2017 BMW X5. Now, this is what the hitch is gonna look like when it's installed and the great part about it is it's gonna stay looking pretty nice because it's a hidden crosstube. And even the receiver is pretty tucked back so you get a nice, clean look and still the utility of the two-inch-by-two-inch receiver tube opening. And that's gonna be a great option for a hitch because most of your accessories do come in that two-inch configuration.
So this is really gonna open it up for ball mounts, bike racks, cargo carriers, or whatever you might throw on your vehicle throughout the lifespan of the hitch. Now, when you put those accessories in place, you're gonna need a 5/8 pin and clip. Now, this is going to not come with the hitch, but a lot of your accessories will have them included. So it's something to look for when choosing those accessories. And if you wanna pick up a locking version where you can actually put this in place, lock it, and know that your accessories will stay on the vehicle, you can pick one of those up here at etrailer.
We have a rolled style safety chain loop here, so if you are planning on towing, it's gonna be nice and easy to hook up. It's plenty big enough too for a larger clevis-style hook. Now, if you do plan on towing, this actually has pretty good weight capacities. The gross trailer weight rating is coming in at 6,000 pounds, which is gonna be the weight of the trailer plus the accessories loaded up. Now, that also has a tongue weight rating of 600 pounds, so that's pretty good.
That's gonna be the downward pressure on the inside of the receiver tube opening, so your bike racks or cargo carriers or anything that's really suspended, and I don't really worry too much that you're gonna overdo that weight. Now, this can be used with weight distribution, but the numbers do stay the same. And before hooking up and trying to tow that 6,000 pounds, you're gonna wanna check the vehicle's owner's manual to see what it's rated at and compare that with the hitch rating and take the lower of the two numbers. That way, you stay safe. Now, when choosing accessories, it's nice to know where you might need to actually get one as far as length.
And we're measuring from the center of the hitch pin hole to the furthest point of the rear fascia, and that's gonna be three inches. So when choosing that ball mount or any of your accessories, you can actually determine how far out it's gonna be. And also, some of your folding accessories, you wanna make sure that it's not gonna make contact with the rear of the fascia. But this one is pretty far out, so you should be pretty good as far as options out there. Now, as far as ground clearance, you're looking at about 14 inches, so that's pretty good. And I don't worry about this making contact with the ground, but when you do have your accessories loaded up, especially your suspended ones, as you go on an incline, those can actually dip down. So just something to keep in mind when you have those loaded up and you're driving on inclines or any rough or rocky terrain. Now, as far as install goes, BMWs by nature are a little bit trickier than other vehicles, and it's gonna require the whole rear fascia to come off. And it can get a little bit tricky on some of the clips to get that fascia off. But I'm gonna walk you through all of it to make sure that you get yours installed. So let's take a look at the installation, and we'll get yours figured out. Now, in order for our hitch to go in place, we are gonna need to remove the rear fascia. And to begin the steps to remove it, we're gonna be taking off these two plastic rivets. So there's two ways you can do this. You can simply pry on them. It's gonna take a little bit of force to get these, so having a trim panel tool is really handy. The other way is to drill out the center. So whichever works best for you. If you are drilling, just go in that center portion, and you should be able to pry that out. I'm gonna go ahead with my trim panel tool and see if we can't get this one out. We are gonna need to get kinda underneath it, so it can be a little bit tricky here. You might need to get a pick or something with a sharp point to really get under there. But if we can get just a little bit of gap here, we can get underneath it and pry it out. Now, these will not be going back in, so if you do mangle them in the process or break them as I just did, not to worry, it does come with new rivets. So with these two rivets out, we're gonna need to p


Информация по комментариям в разработке