Click for more info and reviews of this CURT Custom Fit Vehicle Wiring:
https://www.etrailer.com/Custom-Fit-V...
Check out some similar Custom Fit Vehicle Wiring options:
https://www.etrailer.com/fitguidet1.htm
https://www.etrailer.com
Don’t forget to subscribe!
/ etrailertv
Full transcript: https://www.etrailer.com/tv-Demo-Curt...
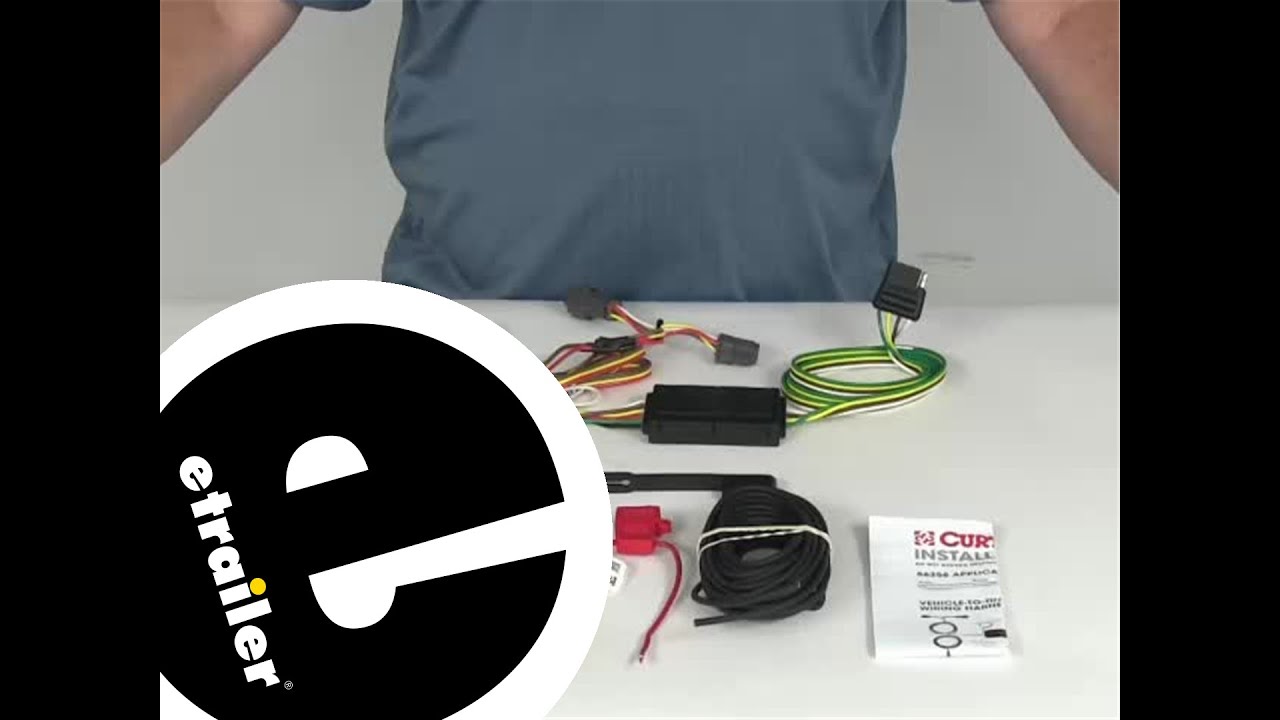
Today we're going to review part number C56256. This is the Curt T-Connector Vehicle Wiring Harness with the 4-Way Flat Trailer Connector. This is a custom fit part. It is designed to fit the Kia Sorento vehicle starting in 2014. Now on a custom fit part what I'd always recommend to do is go to our website, use our Fit Guide, put in your year and model vehicle and it'll show you if this will work for your application. Now this part will provide this 4-way flat trailer connector at the back of your vehicle to power your trailer's signal lights. Does connect quickly and easily.
Basically you just locate the connection points which are usually behind the tail lights, plug in these t-connectors, ground the wire, run the hot lead to the battery, and you should be ready to go. I am going to through this a little bit later to show you how it all connects. Now this part does include this tail light converter to ensure that your vehicle's wiring will match that of your trailer. It is a powered module, that's why you'll connect it directly to your battery to avoid overloading the vehicle's electrical system. Now this converter is constructed using SMT technology, which is Surface Mount Technology. Gives you a consistent, reliable performance, maximizes your trailer light yield and intensity while producing minimal heat.
Does ensure superior operation in rough road condition. Also comes with this nice dust cap for the 4-way. Basically when you have your 4-way all hooked up and your not connected to your vehicle yet, you just put your dust cap over the terminals and that will protect it from any damage or from the elements. Now this part is made in the USA. Few specs on this, the stop and turn light. The maximum amperage on the stop and turn light circuit is 3 amps per circuit, on the tail light circuit is 6 amps. Now it comes with everything shown here on the table.
I'm going to show you where they all connect here. It also has a nice set of detailed instructions that will show you how to install it and where all the connection points are. Basically what you would do is go to the rear cargo area of your vehicle and again access behind the tail lights. What you'll do is you want to start on the driver side here and you'll pick the t-connector that has the yellow wire in it, that's for the driver side. What you'll do is disconnect behind your tail lights, plug this in to the tail light, plug the wiring harness back in. Then you'll take the white wire, has an eyelid on it, this white wire, you need to connect this to a good clean ground.
If there's one nearby go ahead and use that. If you need to make one, they include this grounding screw that you can drill a hole and make a good clean ground. Then what you want to do is take this double face sticky tape, apply it to the back of the converter, and you want to attach the converter to a nice flat surface so it doesn't move around. Then what you'll do is you take your green wire, you can see there's a length of it, this will run over to the passenger side. The same thing, you'll access behind the tail lights, unplug it, plug this in and the wiring harness in. Then your last wire, again, is going to be your power wire, that's the black wire right here. This will need to run to the battery at the front of your vehicle so what you'll do is they include some length of wire to do that and the butt connector. What you'll do is put a butt connector on the end here, connect it to one end of this length of wire, and then you'll go ahead and run this length of wire up to the front of the vehicle. You can use these cable ties that are included to take up any wire that might be hanging down or if you need to attach it to the vehicle better. Once this other end is up towards the vehicle, you don't want to connect this to the battery yet. What you're going to want to do is run it through this in-line fuse holder. What you'll do is take the other butt connector, put it on, connect it to one side of your in-line fuse holder. Then what you'll do with the other side, this is what will connect to your battery, just use the eyelid connector, attach that, and this will connect to the positive post side of your battery. Then what you'll need to do before you use, go ahead and take the included 10 amp fuse, go ahead and install it into the fuse holder, there we go, just like that. Once the fuse is installed, put the cap back over it. Now your system should be all hooked up, ready to go. You can run your bonded wire right here, out the back and plug into th

Информация по комментариям в разработке