UPDATE: ZipUP Installation now requires pitch rails to be installed with a slope of 1/2 inch every 3 feet, rather than the 4 feet listed in this video.
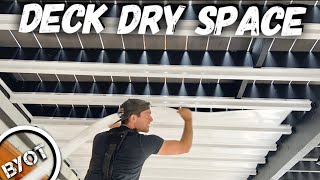
Learn how to install the innovative Zip-Up UnderDeck Drainage system on your home today! Expand your family's living space out into the great outdoors with the polished look of Zip-Up UnderDeck Panels finishing the roof above you. With only 5 components creating the entire system, gaining an outdoor living room can be done within an afternoon.
Adding an Under Deck Drainage System is a genius way to update an older home, or to maximize the living space in a new build. Creating a dry, waterproof lower-level patio that allows you to keep the party outside no matter the weather, Drainage systems have really become a dream come true.
Crafting the deck, patio, or pergola you've always wanted is a big, exciting process, and we're happy to be a part of it. Give one of our talented deck designers a call at 1-888-824-5316 or send us an email at [email protected]. We'd love to hear about the vision you have for your outdoor space and find you the products you need to create it.
You can find this product at DecksDirect.com: https://www.decksdirect.com/more-deck...
#DecksDirect
Get Your Project Started Today HERE: https://www.decksdirect.com
Subscribe to the "DecksDirect" Channel HERE: https://goo.gl/vEB4K2
DecksDirect; helping people build better decks.
---------------------------------------------------------------------------------------------------------------------------------------------------------------
Tools: power drill, hack saw, safety glasses, mini pry bar, right angle speed square, tin snips or utility knife, pencil, and 1-1/2 inch wood binder screws.
Optional Tools: miter saw and oscillating multi-tool
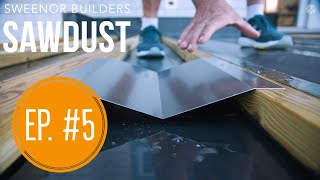
System Components: panels, main rails, pitch rails, wall trim, and seam trim
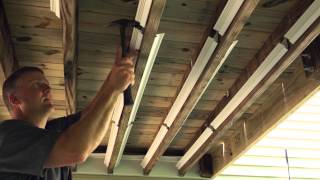
Attach the pitch rails to your joists. Pitch rails are offered in ½ inch and 1-inch profiles and are stacked together every 3 feet to create the proper pitch needed.
Wall trim will be mounted along all the sides of your deck except for the side where you will be attaching your gutter. Measure your wall length and trim the pieces to fit. At corners where two wall trims meet, miter the wall trims to 45-degree angles. They will be attached with wood binder metal roof screws every 2 to 3 feet.
Turn your panels upside down and mark 1 inch in from the ends of your panels. Do not trim any more than the 1 inch of material, as it could lead to leakage. Make this mark on the bead itself. Use an oscillating multi-tool to score on the mark and remove one inch of beading. This can also be removed with a utility knife. Cut your first panel to size. Trim using a utility knife. Cut your first panel. Mark this distance along the panel and score down using a utility knife. With the panel notched, simply press the outer edges up and down to split.
For your first panel, start at the wall and tuck one corner into the wall trims lower channel. Slide until the opposite corner enters the adjacent wall trim, creating an open triangle of space continue sliding inwards until the entire edge of the first panel is inserted into the wall trim's channel and that triangle of space has disappeared, tap the outside edge of the panel to ensure it is fully inserted along the wall trim.
Install your first main rail. Turn the main rail sideways and insert the end as far as possible into the wall trim opening. Curl the piece upwards into place until you hear a snap. Then along the length of the outside edge of the main rail snap the beading of the panel into place. Pull the top of the main rail up slightly to flatten the panel and attach with screws at every pitch rail. Do not to over-torque the screws.
To install the remaining panels and main rails, simply insert the trimmed end of the panel into the lower channel of the wall trim and snap the beading into place along the already installed main rail. Install the second main rail the same way you did the first. Continue installing panels and main rails the same way.
At the final opening, measure the opening and trim your panel widthwise to fit. Install just like you did your first panel. Gutters are sold separately. Make sure that the ends of the panels and rails on the open side are even and then measure and cut a piece of wall trim to fit your opening. Install the wall trim upside down so that the ends of the panels are captured by the lip of the wall trim, while the flat backside of the wall trim faces toward the gutter. This creates a waterfall effect and ensures that the water does not run backward. To remove a panel, push up in the center. Then using a mini pry bar or the claw end of your hammer, pry the exposed panel edge down one side at a time, once the seal is broken, the panel will unzip. Always remove panels from the center.


Информация по комментариям в разработке