I do not speak English very well, I apologize for this.
microprocessor and microcontroller diagnostics, circuit check.
How to check any microcontroller?
For what reasons does the microcontroller not work?
We will talk about this and much more today!
This video is not a call to action.
Remember!
For all your actions, only you are responsible!
Microcontrollers, processors, integrated circuits.
For what reasons can a microcontroller fail?
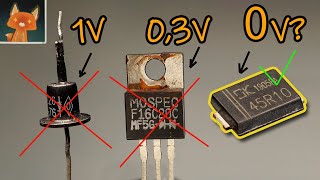
1. Overheating during operation.
2. Overheating during soldering.
3. Overload of conclusions.
4. power supply to the wrong poles.
5. Static electricity.
6. Power surges.
7. Mechanical damage.
8. Exposure to moisture.
9. life time.
The microcontroller is a complex device.
There are many multifunctional nodes in it:
power circuits-registers-inputs-outputs-interfaces and other
It makes no difference what equipment you are repairing.
In the age of electronics, microcontrollers are used everywhere.
Well, since the channel is dedicated to the repair of washing machines, the HD64F36079LFZ microcontroller, which is installed on the ARCADIA2 board from the Hotpoint-Ariston / Indesit washing machine, will be an example.
But I assure you, any microcontroller is checked in the same way.
Start with an external examination: the case should be free of cracks and chips, soldering the leads should be perfect, without microcracks and oxides. Microscopes and powerful magnifiers will help you with this.
1. you need to find the datasheet of your microcontroller.
The instruction may consist of 250 pages.
Here is the key.
It indicates the direction for installation and, in order to navigate, where the first conclusion originates.
1.for verification, we need the pin assignment of the microcontroller.
2.schematic
3. Now we look at where the power pins of the microcontroller are located.
And what voltage is necessary for its operation.
We need conclusions
AVss, Vcc, Vcl is a plus
and the conclusions of GND or Vss are common or minus.
In my case, these are conclusions-number 3, AVcc + 3.3V.
Number 6, Vcl + 3.3V
Number 12, Vcc + 3.3V.
Number 9, VSS - minus.
Now let's start checking.
You need to check if voltage is coming to the power pins.
If the voltage does not come, you need to check for a short circuit in the power circuit and on the other terminals of the microcontroller.
To do this quickly,
turn off the power to the board.
Turn on the closed circuit mode.
Set one probe to minus.
Put the second probe on each pin of the microcontroller.
If it gives a signal, check what kind of output it is.
possibly low impedance resistors.
It is necessary to remove the microcontroller and check again.
Now you need to check
Is there a short circuit between the terminals plus and the other terminals of the microcontroller.
And you must also check each pin with respect to the other pins for a short circuit.
If the voltage is supplied to the microcontroller within the normal range,
you need to check the temperature of the microcontroller.
If you put your finger, then the temperature should be such that you can tolerate. if you cannot hold your finger.
this indicates that the microcontroller has a short circuit.
such a microcontroller needs to be replaced.
The next step is to measure the current that your microcontroller consumes, for this you need to cut the track leading to the Vcc output, this is necessary so that other elements do not take on the load.
connect the laboratory power supply to the microcontroller.
need to measure current consumption.
If it consumes 20% more than normal, this is bad.
Such a controller does not need to be used.
Checking the ongoing processes.
If you take the example of my electronic module.
Let's say water is boiling in a washing machine and the heating element does not turn off.
The first thing to do is to find the circuit of the electronic module and the circuit of the pin assignment of the microcontroller.
We look according to the scheme.
The signal from the temperature sensor receives the microcontroller to the first output.
And now we need to check whether this signal arrives at pin number one of the microcontroller.
We turn on the measurement of direct current, we put one probe on the common minus, and the second one on pin number one.
If there is no voltage, then we look for where the break is, if there is voltage, then this indicates that the signal from the temperature sensor has arrived at the first terminal and now we need to find the terminal that supplies the signal to the on relay by the heating element. we look according to the scheme.
this is 58 conclusion.


Информация по комментариям в разработке