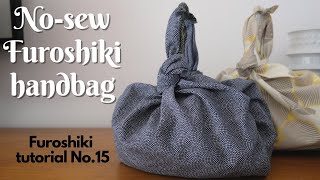
I saw this super cute bag from The Row on Pinterest and realized it retails for about $1,000. I couldn't believe it because my first thought was- "Oh cute, it's a square scarf with knots, I can do that." I tried to look up a tutorial to see if anyone else tried to recreate it but surprisingly came up without anything. I hope you enjoy my tutorial for this quick and easy bag! You could even use a large square scarf instead of cutting out a piece of cloth. This is based on a traditional Japanese cloth folding method called Furoshiki. Also check out my video below to learn how to wrap presents with this method! I now do this exclusively as it eliminates paper waste and I can reuse fabric scraps :) • ECO FRIENDLY/ DIY GIFT WRAPPING YOU S...
==SUPPLIES==
Large square scarf or cloth
Sewing machine/ serger and thread
==SIMPLE STEPS==
1. Cut out a square
2. Finish off edges
3. Tuck in thread
4. Steam out wrinkles (okay this should have been first....)
5. Fold and knot bag
==EXTENDED STEPS==
Actual #1- Steam your cloth here, but I was using a scrap piece of fabric I bought that was already cut into a square. But if I was cutting out the cloth myself I would steam it before cutting.
1. Cut out a square of your desired size. The small satin bag was 26" x 26" and the large cotton bag was 36" x 36." Or you can skip straight to the folding in step 5 if you are using a scarf.
2. Finish off the edges with a serger or a sewing machine. I used a Brother Serger 1034D with 3 threads to finish off the edges of my cloth. It goes super quickly. I bought it from amazon when they had a sale. You could also use a straight stitch on the sewing machine. I would fold and tuck in the raw edge so that it wasn't showing. You can iron the fold, or use a rolled hem presser foot.
3. The threads that are hanging off of the corners need to be tucked in. Because the serger threads are twisted around each other, I try to untie them so it is a thinner bunch of thread getting tucked in.
4. I steamed out my wrinkles after I made the edges, however I would recommend steaming before cutting.
5. The folding process! It's easier than it looks- just folding the corners to the center several times. This is required so that the handles aren't bulky.
Happy folding!
Serger: https://www.brother-usa.com/products/...
Somehow I got mine on a flash sale for $80 on Amazon...
Rolled hem presser foot- tucks the raw edge in while you're running the cloth through the sewing machine
Sew Green, a cloth store in Ithaca: http://www.sewgreen.org/
One of my favorite cloth stores in NYC: https://www.moodfabrics.com/
Where to find me:
+BLOG - https://dagnyarizona.com
+PERSONAL INSTAGRAM -@dagnyarizona / dagnyarizona
+MY SHOP- https://www.etsy.com/shop/DesignedByD...
+TANGO WEBSITE- https://www.tangofit.nyc/
----------
The row, DIY, ascot bag, the ascot bag, easy sewing project, no sew project, scarf bag, brother serger, brother 1034D, furoshiki handbag, handbag, satin, satin bag, the row ascot bag in satin, easy sewing projects for beginners, fun project, quick sewing project, fabric scrap project, sewing projects to make under 10 minutes, diy bag, diy handbag, diy bags, satin bags, furoshiki bag, dupe, juxury, gift, diy gift, easy gift, handmade gift, holiday gift


Информация по комментариям в разработке