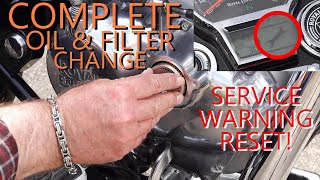
Hello and welcome, today I'm performing the 310 mile first service on my wife's 2022 Royal Enfield meteor 350. I will be covering tappet adjustment and oil and oil filter change. I have time stamped each process. I do encourage owners to work on there machines because it gives you a better connection of the motorcycle, however I cannot guarantee this will not effect your warranty, but please proceed at your own risk.
Remove the rear back rest screws using a 6mm hex bit
remove the side rails with a 9mm hex bit
slide the rear set off
with a 10mm socket remove the rider seat
remove the tank bolt with a 8mm and 10mm socket
its a good idea to do this with an empty tank
gently lift the tank and slide back, get an assistant to hold the tank up
un plug the main fuel line, it has push clips either side
remove the rubber cover around the fuel pump plug, with your finger push the tab inwards and pull the plug
go to the right side and remove the 2 breather hoses, one is bigger than the other
lift the tank and put it in a safe place
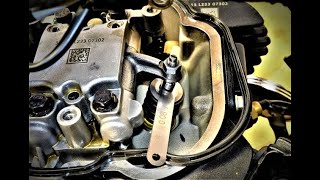
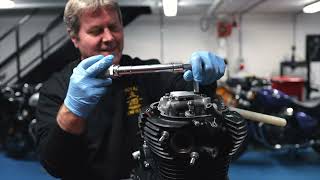
remove the rocker bolts with a 10mm socket, start from left to right
remove the coil unit by unscrewing the 3 bolts, use a 10mm socket, there are 2 earth wire the go through 2 bolts
gently lift the rocker cover, leave the gasket on the cylinder block
grab a 14mm hex bit and unscrew the crank screw cap
make sure the seal stays in the screw cap
remove the spark plug with a 16mm socket
check spark plug gap, it should be between 0.7mm and 0.8mm
you dont have to do this but for illustration purpose im double checking im at top dead centre, here I place a clean screw driver into the park plug hole, here I can see when it lifts to the top the piston is then at top dead centre ready for adjustment, turn the crank anti clock wise
the camshaft gear will have a T on the top this should face plat with the rocker arm clamp
you can also check the valves have free play, if the dont, turn another rotation and try again
here are the valve gap measurements, 0.18mm for the exhaust and 0.08mm for the inlet
both valves were too tight, to adjust unscrew the 10mm lock nut and use a flat screw driver to turn, as you tighten keep the centre still it will take some trial and error but you will get there, once done turn the engine over twice and re check
install the spark plug
check there is no debris in the engine
slide on the rocker cover, gently place the seal into the groove with your fingers, you shouldn't need to replace the seal at your first service, no sealant is required if you have left it on the engine side. Once you are happy and you can see the rubber seated all the way around then tighten the rocker bolts to 10nm
clean the engine
screw the crank cap back on, just nip it up
install the coil pack and dont forget the 2 earth wires here
install the tank, make sure the hoses are not pinched, check the cables that run along the frame are not getting caught at the front of the tank locaters
install the bolt
start the engine and leave running for ten minutes checking for any leaks
while its running install the rider seat
then install the passenger seat
and finally the rear grab rails and back rest
leave the rails loose until you screw the back rest in
clean all the areas you have touched
now we are ready to change the oil and filter
here is the oil I use, it exceeds manufactures specifications, they recommend semi synthetic but im switching to fully as this is the brand I always use and its vastly available
start by turning off the engine
allow to stand for ten minutes
remove the oil filler cap
place a drain bowl underneath
unscrew the filter plate underneath the engine using a 10mm socket
loose the bolts and allow to drip for 5 minutes
fully loosen the screws
pull out the plastic filter
place on a rag
unscrew the crank case drain bolt with a 17mm socket
unscrew the oil filter cover with a 6mm allen socket
remove the filter and not orientation of the filter, spring facing outwards
clean the area with parts cleaner, this cleaner is rubber safe
grab the new filter and soak it in clean oil
clean all the parts
keeping the filter dirt free place in the filter hole with spring facing out
firmly push the plate and even screw the bolts in working around as you tighten
tighten to 10nm
tighten the 17mm drain bolt
place the plastic filter in and tighten the bolts, only nip these to 8nm
clean the area
fill the jug with 900ml of oil
slow pour it into the engine
grab the 1 litre bottle and pour 700ml in
check the oil level inspection glass as you go along, make sure its above the minimum mark
start the engine, idle for 2 minutes, turn off wait one minute and re check level, put the rest of the oil in, this bike takes 1.7 to 1.9 litres of oil
Help the channel and Buy Me A Coffee: https://www.buymeacoffee.com/nicksepi...
Clear Intercom Systems: https://www.fodsports.com/ (use code NICK12 for 12% discount)


Информация по комментариям в разработке