How To Remove Iron Contamination From Your Paint
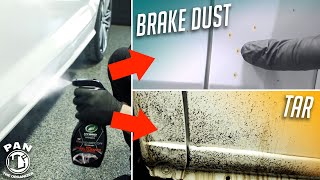
In a previous video, Adam and Joe demonstrated the process of using a Clay Mitt after washing a vehicle to remove bonded contamination like paint overspray, tree sap, road films, and more; however, using clay is not always the best solution for targeting and removing a specific type of contamination in the form of iron deposits and iron fallout. Iron contamination most commonly results from brake dust particles that come off of the brake pad or rotor when braking, which then travel backwards onto painted areas of your vehicle. These hot, metallic iron particles essentially melt into the clear coat and then cool off, becoming embedded into the top layer of the clear coat. They will look like tiny black or orange dots of rust, and stand out most on lighter colored paints like white, silver, and light gray. You can try to remove these orange dots of contamination with a clay bar or clay mitt, but you will find that you have to scrub very hard to remove them, and you could end up scratching the surface in the process. There is an easier way to decontaminate iron particles than mechanical decontamination though, and that by using chemical decontamination with Iron Remover.
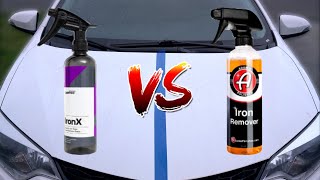
A product like Adam's Iron Remover contains an ingredient called thioglycolate, which specifically targets ferrous (iron) deposits and fallout embedded into the paint. As the chemical dwells and interacts with the iron deposits, you will begin to see these dots turn into a reddish-purple color as the chemical melts the deposits out of the clear coat. It will look as if the paint is bleeding as the iron contamination then streaks down the panel. Iron Remover will work best on a clean panel and dry panel as Joe demonstrates. If the panel is heavily wet, the water or soap may dilute the chemical too much and it may not be as effective at removing the contamination, so make sure to dry the majority of the water first before spraying Iron Remover. Joe uses the Adam's Jumbo Plush Drying Towel in this example, but our Ultra Plush Drying Towel will work just as well here. Also, it's best to do this process in the shade if possible. You do not want Iron Remover to fully dry on any surface, as it could cause staining on some plastics, so this is a process that you will want to perform panel-by-panel or section-by-section - do not spray down the entire car all at once.
With the panel or section clean and mostly dry, spray Iron Remover generously to cover the surface. Make sure to do full-pull sprays of the trigger sprayer in order to atomize the chemical into a nice even mist. In this video, Joe shows a very effective way to cut down on your decontamination time by combining our Visco Clay Bar in with this Iron Remover process. The Iron Remover acts as the lubricant for the clay bar in this case, so as you glide the clay bar back and forth over the surface, you are doing mechanical decon of things like tree sap, overspray, and road tar at the same time that the Iron Remover does chemical decon of the iron particles. Once you finished decontaminating a panel or section, make sure to very thoroughly rinse all of the Iron Remover chemical and clay residue from the area, then quickly do a quick dry of that panel or area to remove the majority of the water to avoid water spots before moving onto the next section.
Make sure to decontaminate the glass as well, especially the rear window or rear hatch. Iron particles will not embed into the glass in the same way as the clear coat, but iron fallout can still develop on glass, so make sure not to skip the exterior windows. For very heavy contamination, i.e. if the vehicle has gone through a year of driving or more without using Iron Remover, you may have to spray an area a second time and allow the chemical to melt away even more iron deposits, then make sure to very thoroughly rinse the panel a second time and dry it quickly, again to avoid any water spots from forming. You should see significantly less red-purple "bleeding" on the second go-around, and once you see no color change, you know you have removed all iron deposits from the surface. One last thing to mention, is that like our Wheel Cleaner, Iron Remover has a fairly potent smell, so you may want to wear gloves or wash your hands after you complete this fallout removal.
For more in depth content and education, subscribe to our channel. Leave a comment or question to engage with one of our Adam's Team Members.
•••Become a subscriber to Adam's Polishes Youtube Channel
/ @adamspolishes
•••Adam's Polishes Website
http://www.adamspolishes.com
•••Adam's Polishes Instagram
/ adamspolishes
•••Adam's Polishes Facebook
/ adamspolishes
•••Adam's Polishes Youtube Channel Homepage
/ @adamspolishes


Информация по комментариям в разработке