Here is a flawless run of yet another rare mount drop in 7min 30sec (if you exclude the beginning and end). This time it's the Reins of the Vitreous Stone Drake epic flying mount that drops off the 2nd of 4 bosses found in the level 84-87 Cataclysm 5man dungeon, Stonecore. According to the database @ wowhead.com, this mount has a drop rate of 0.8%. It will drop in both Normal & Heroic modes, so this is definitely a mount that should be solo-able by any Lv85 with decent gear and the know-how on what to do to maximize your time.
There are already plenty of videos and guides out there explaining how to farm Slabhide. Some are different than others, but it really all comes down to your class and iLevel. I chose what I consider to be the easiest and most consistent strategy, at least for those of you who have some way of feigning death, vanishing, etc.
What I did was quite simple actually. The whole idea is to get Millhouse all the way down to the bottom so he transforms into the 1st boss, which allows you to walk right on by and head on down to Slabhide. I found that the easiest way, and most importantly the quickest, to get to Slabhide was to first burn Millhouse to 50% so that he flees on down to the 2nd of 3 groups of trash mobs. As you can see, there is no need to kill the first group, because after Millhouse flees you can just skip them.
After you've burned him to 50%, just walk past the 1st and 2nd group taking note that Millhouse is now chillin' with the 2nd group of trash. Ignore him for the time being and head down to the 3rd group. Do what you need to do to kill these 4. The only threat you actually want to pay attention to is the Earthshaker. He will start casting a buff that looks like a tornado and turns him into a nasty AoE dude. Kill him first, obviously, and I suggest you interrupt his tornado. It's the 2nd thing he will be casting and you have a good 5 seconds to interrupt him. If you can't interrupt, just burn him as fast as you can and you'll still be fine or feel free to CC him so you can finish him last. Your choice.
After the Earthshaker, you'll want to take out the Berserkers. Sometimes you only have to kill 1, but occasionally you will have 2 spawn. No big deal, just burn 'em down. The last dude(s) you'll be killing are the Warbringers. They look big, but they don't really do much damage even when they go into rage. I still shot 'em with a tranq just to make things easier. No matter what order you do this, you shouldn't have a problem as long as you have a plan on when and how you're going to deal with the Earthshaker.
Now that you've kill the 3rd group, run back up to the 2nd group where Millhouse is at. He'll be in the center, hiding behind his entourage, but ignore them and just burn him to 50% the same way you did at the 1st group. After you get him to 50%, he flees down further, but this time goes past the 3rd group (because they're dead.....) and transforms into the 1st boss.... who you're going to be skipping anyway.
For you MM Hunters out there with Silencing Shot, I used a simple macro that deselects Millhouse, targets the Earthshaker, casts Silencing shot, and then re-targets Millhouse.
/target Stonecore Earthshaker
/cast Silencing Shot
/target Millhouse Manastorm
It's as simple as that. Use this when you see the tornado start spinning, but don't get anxious because you have a good 5 seconds to interrupt him. It's not completely necessary that you interrupt him if you can burn Millhouse to 50% fast enough, but it just made things easier in the long run for me. Honestly, none of this is that difficult, most of which you can clearly see in the video, but I figured I'd explain anyway.
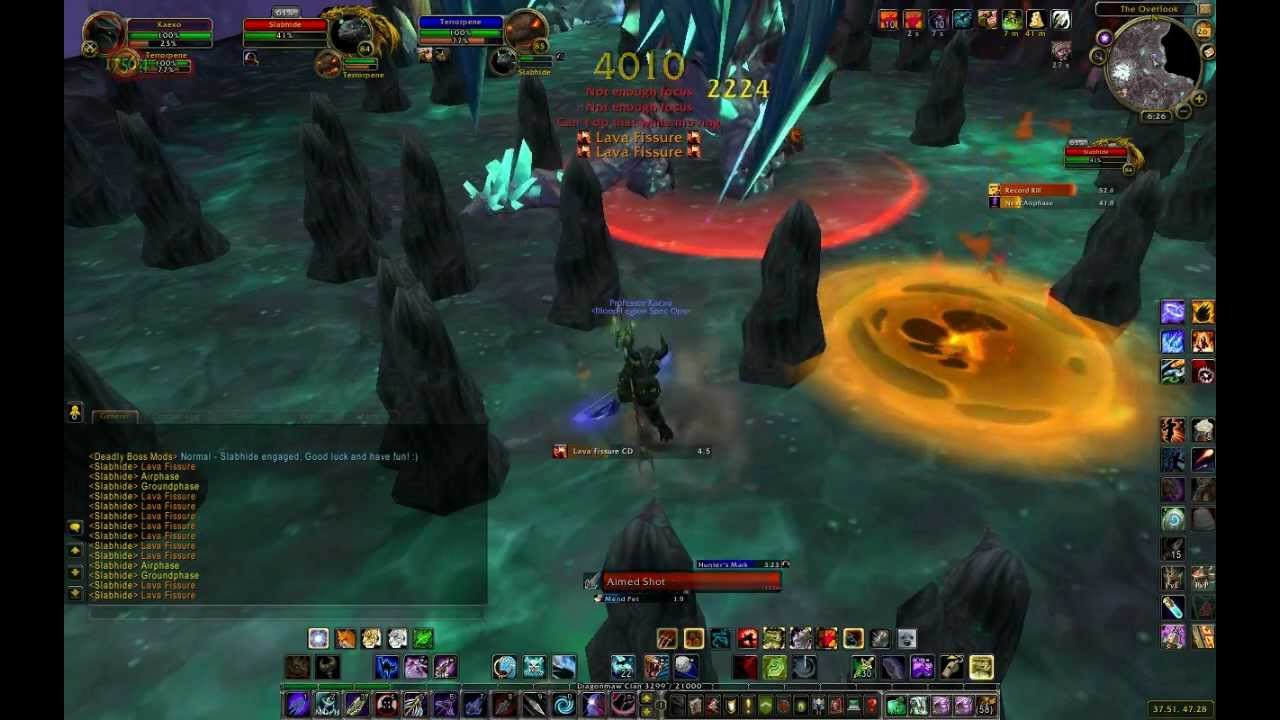
Once you get to Slabhide, it's really just a tank and spank. It's an easy encounter to predict what's happening next and as you can see in the video, I didn't even bother moving out of the way of some of the pools because they don't do much damage. The ONLY thing you need to worry about is your pet. Make sure you throw up Mend Pet each time you have a Ground Phase, or try to maneuver your way over to your pet so you're not out of Line of Sight. The Air Phase can be glitchy and you might find yourself unable to mend your pet if the spikes are in the way, regardless of whether you are right next to it or not. That's why I suggest you cast Mend Pet every chance you get in case this does happen. Also, it's unlikely that you will aggro Slabhide during the fight, except for possibly the very end, but I still suggest casting Misdirection each time you cast Mend Pet just to be sure.
I have a macro bound to a key that first casts Mend Pet on the 1st press and then Misdirection on the 2nd press. If you have the Misdirection Glyph, you can pretty much spam Mend Pet/Misdirection every 5 to 10 seconds and you won't have to worry about your pet dying or gaining aggro on yourself. It's really very simple.

Информация по комментариям в разработке