‣ You can help support this channel by buying me a coffee!
https://www.buymeacoffee.com/theautochap
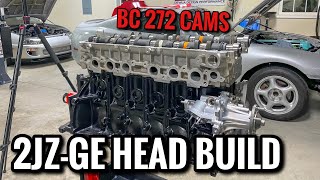
Part 1 of a new series: COMPLETE engine & transmission rebuild/refresh on the 2JZ-GE engine and A650E transmission! We’ll be replacing the head gasket, ALL timing belt components, oil pump, ALL seals like the rear main, front crank - basically refreshing the engine to give it a second breath of life.
Also great for those of you who are going NA-T/ supercharged and building your motor internals/transmission as I will be completely disassembling the drivetrain!
In today's video I will be showing you step by step how to remove the cylinder head on the inline-6 2JZ-GE engine. Every bolt, every nut, how to set the timing - I’ll cover every step of the way.
If you're new to the channel - welcome and do consider hitting the like and subscribe button! If you're already a subscriber, I really appreciate the support - it means the world to me!
In this video I'll be working on a 2004 Lexus GS 300, but it should work for most Toyota/Lexus models with the 2JZ-GE engine, with of course a few changes depending on the chassis.
2nd gen. Lexus GS 300 (1998-2005)
1st gen. Lexus IS 300 (2001-2005)
1st gen. Lexus SC 300 (1992-2000)
Naturally Aspirated (NA) Toyota Supra (1993-1998)
How to repair electrical connectors - • How to repair coil pack connectors on...
If you like the video and would like to see more of my content, don’t forget to hit the like and subscribe button!
Support the channel on Patreon:
/ theautochap
Make a one time donation to the channel:
https://www.buymeacoffee.com/theautochap
For business inquiries, please contact:
Email: [email protected]
---------
Contents:
00:00 Intro
00:39 Leaks everywhere after 221k miles!
01:41 Draining and removing radiator
03:44 Removing exhaust manifold
04:33 Disconnecting throttle body, removing serpentine belt
06:53 Timing the engine
09:08 Disconnecting timing belt from camshaft pulleys
10:10 Removing drive belt tensioner, misc. hoses
10:41 Removing coil packs/boots
11:23 Removing noise filter, injector connectors and throttle body from engine bay
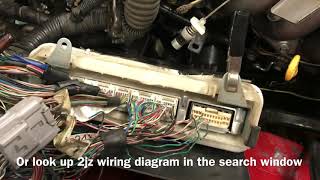
12:29 Removing oil dipstick guide, wiring harness nuts, noise filter bracket and VVT-i solenoid
13:23 Removing Air intake chamber
14:55 Removing fuel rail
15:55 Removing vacuum valve set for ACIS
17:02 Removing many connectors!
19:24 Removing valve covers
19:55 Removing camshaft pulleys, no. 4 timing cover
21:54 Removing no.1 oil pipe union bolt, no. 3 camshaft bearing caps
23:18 Removing camshafts
25:37 Removing water bypass pipe, no. 1 oil pipe bolt
26:05 Removing intake manifold
29:00 Removing ground cable, heater hose
29:17 Removing head bolts
30:58 Pulling head off the block
31:30 Removing old head gasket and inspecting block
31:57 Importance of setting engine at 60° BTDC instead of TDC
32:30 Conclusion and what's next in the series!
---------
Tools required:
Safety gloves
Jack
Jack stands
Ratchet
Breaker bar
Cheater bar for extra torque eg: your jack handle
Long extensions
Socket set - regular + deep - 10, 12, 14, 17, 22 mm
Hex socket set - 5, 10, 14 mm
Plier set - Needlenose, 90 degree, channel locks, sharp cutters
Screwdriver with Philips, flat-head bits
Wrench set - 10, 12, 14 mm
Allen key set - 5 mm
Adjustable wrench
Rubber mallet
Pry bar
Magnetic pick-up tool
10 mm bi-hexagon bit -https://www.amazon.com/dp/B08VZX7JRH/...
---------
Parts Required:
None - we're only disassembling today.
_____
Disclaimer:
Due to factors which are beyond my control, I i.e. the creator of this channel, ‘The Auto Chap’, cannot guarantee against misuse of the information I supply in this video or anywhere on my channel. No information in this video or anywhere on my channel shall imply any warranty or guarantee a result. Any loss, including but not limited to property or injury are the sole responsibility of the user and not me.
I assume NO liability for any kind of injury, including but not limited to, property damage or injury suffered due to information in this video or anywhere on my channel.
I recommend you follow all necessary and proper safety practices while working on any project. Use the information supplied this video or anywhere on my channel AT YOUR OWN RISK.
I am NOT a professional mechanic and the information in this video is NOT a substitute for information from a qualified professional automotive repairer. The information in this video or anywhere on my channel is NOT advice. If I supply any wrong information and something breaks/malfunctions, I will NOT reimburse or pay in any way for the costs associated.
Please do not work on your car if you are not comfortable doing so.


Информация по комментариям в разработке