Click for more info and reviews of this Hydrastar Brake Actuator:
https://www.etrailer.com/Brake-Actuat...
Check out some similar Brake Actuator options:
https://www.etrailer.com/dept-pg-Brak...
Search for other popular Jayco Pinnacle Fifth Wheel parts and accessories:
https://www.etrailer.com/vehicle/2020...
https://www.etrailer.com
Don’t forget to subscribe!
/ etrailertv
Full transcript: https://www.etrailer.com/tv-full-disc...
Connor: Hey guys, how's it going Connor here today at etrailer.com. We're going to be showing you how to convert your trailer from electric drum brakes to hydraulic disc brakes. So in order to complete the swap, we're actually going to need a number of components. The first main component here is going to be our electric-over-hydraulic actuator. Our hydraulic actuator here is going to take an electrical input signal from the tow vehicle, and it's going to transfer that into a hydraulic pressure to our braking assemblies.So in regards to our electric-over-hydraulic actuator here, we're going to have a few different options to choose from. And within each of those options, we have a couple of different types.
The couple of different types includes one for drum brakes and one for disc brakes, so we need to make sure we choose the correct one. Now, the reason for this is, disc brakes require a higher PSI rating, typically around 1,600, whereas drum brakes require a lower pressure rating, typically around 1,000 to 1,200 PSI. So it is important we choose the right actuator based on what kind of brakes we're installing.So if you haven't decided on which electric-over-hydraulic actuator you're going to be using, I definitely prefer the Hydrastar option that we have in front of us here. I would say the number one thing I really like about this actuator in regards to the ease of installation is going to be the thin profile. But what this thin profile means is, it's going to be very narrow.
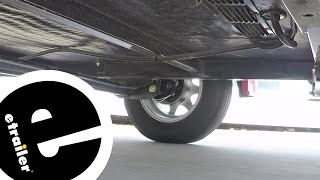
We're not going to need a lot of space to mount this on the vehicle. It's not going to take up a bunch of room, but we're still going to have plenty of other space for our additional cargo.The next main component we're going to need in order to convert our trailer is the brake kit. Now, we see we have disc brakes included, laid out in front of us here, but there's also the option of drum brakes. However, if you're deciding between the two, I definitely recommend going for disc brake mount. For the disc brake option, because there's going to be fewer moving components, maintenance is going to be a lot easier.
So within the disc brake category, we're going to have two different options again.Number one, you see here, we have the integrated hub and rotor. What this essentially means is our hub is already going to be permanently affixed to the rotor, as opposed to the separate hub and rotor, which we see here. Now, the benefits of the separate hub and rotor is, if you we're to have any issue with your hub here, you could replace this separately from the rotor or vice versa. Whereas this package here is a little bit more integrated, seamless, easier to install, but we do have the downside of not being able to replace either component if one fails.So in order to choose the correct disc brake kit for our trailer, the number one thing we need to know is our axle capacity. Our axle capacity is going to verify that we have the correct brake mounting flange, as well as the bolt pattern and size rotor.
So we do need to verify this beforehand. And this can be done one of two ways. We can simply look on the axle tube, there's generally going to be a sticker there with our axle capacity, or we can reach out to the trailer manufacturer with the R VIN, and there'll be able to tell us this.Now, if you haven't already decided on a disc brake kit, the Kodiak kit, which you see in front of us here, is going to be an excellent option. We have a very powerful single-piston caliper, which is going to allow us our brakes to have that nice grip biting feeling, so we're going to be able to stop relative to the proportional braking on our tow vehicle. Now, another thing I really like about the Kodiak kit here is a Dacromet finish. This Dacromet finish here is going to last a long time, it's going to withstand any dirt, corrosion or rust issues so we don't have to worry about the brakes wearing down, the coating wearing off, and our components rusting.So our next component here, is going to be our brake lines. Now, in regards to brake lines, you have a couple of different options. As you can see here, we have the hard line option in front of us, but there's also an option with all flexible lines. Now, there's going to be benefits to having all flexible, there's also going


![DIY Disc Brake RV Upgrade [Prepping for Alaska RV Living]](https://i.ytimg.com/vi/UTiO_S11NCc/mqdefault.jpg)


Информация по комментариям в разработке