10 More Brompton Bike Hacks: • 10 Bike Hacks for your Brompton
10 Brompton Bags (from $1 to almost $500): • 10 Brompton Bags (from $1 to almost $...
7 Brompton Accessories: • 7 Brompton Accessories | Brompton Fol...
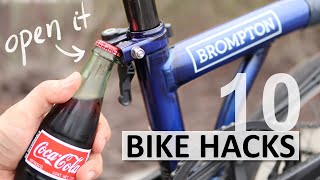
Here are 10 easy-to-implement bike hacks to get the most out of your Brompton folding bike.
I hope you enjoy!
Check out how Chris packs her Brompton!
Chris by Bike: • Unpacking My Brompton
In the last video, I showed you six accessories you can get for your Brompton. Some of those really make your ride more convenient, but still, cost you some money. Today I will do something a bit different and share 10 Brompton hacks that will make your life easier, for free. Most of them, you can do with supplies you probably have at home.
When going for a bike ride, people usually carry a pack of tools, in case they get a flat tire, or the brakes run out of adjustment. These packs usually consist of tire levers, a patch kit, an extra tube, a pump, a multi tool and some cash. Carrying this tool bag every time you go out for a ride can be quite inconvenient. But well, you do not need that on the Brompton. This bike has an air pump that sits attached to the rear triangle and a toolkit that is stored inside of the bike frame. The only piece that is missing here is an extra inner tube. We can, however, store a spare tube on the other side of the top tube. To do that, first grab a new Brompton inner tube and remove it from its packaging. We are going to have to fold it in half, but we do not want to do it like this. We want to keep it laterally symmetric when it is folded, so the result should look something like this. Make sure you keep the valve pointing straight out, and not to the side. Then, use some PVC film you may have in your kitchen to press it as tight as possible. It may help to have an extra pair of hands here if anyone is around to assist you. Once you are done with that, use some tape to prevent the film from unrolling. Finally, we are going to insert it into the frame. Notice how the inner tube has a curvature that kind of matches the curvature of the frame. This is the orientation we want to insert it into the top tube. If we flip it vertically, the curvature of the inner tube will not match the curvature of the frame, and the inner tube can get stuck in there. Now, insert the tube into the bike with the valve pointing outwards. If you’re afraid the tube will slide in or get stuck in there, you can also use a string to connect it to the clamp bolt, like this, and prevent the tube from going too deep into the bike frame. I personally do not use a string myself, since I can just tilt the bike and the valve will stick right out. The inner tube actually slides quite easily inside of the frame if you tilt the bike back and forth. You may be concerned about the inner tube getting damaged, but it has not happened to me, and my last inner tube was in perfect condition after over a year of being kept inside of the frame like this.
The second hack is for those of you who do not own the Brompton toolkit, and are willing to accept an improvised solution. Just grab two tire levers, a cheap small multi tool, a patch kit and a small Ziploc bag. Put everything in the Ziploc bag as tight as possible. Now put it in front portion of the frame, where the original Brompton toolkit would go. Keep in mind that it may fall out while transporting the bike with the frame open, so you can use a piece of electrical tape to prevent the tools from falling out. It does not look good but, well, you have got yourself a hack.
Now, since we are talking about storing stuff inside of the bike, there is a bit more we can do. Zip ties can come quite handy when improvising solutions on the bike. And so is some duct tape and some electrical tape. So, let us keep them in the bike as well. Grab an old pen you will not need anymore, remove the cap and the cartridge. Now, wrap some tape around it. You can use different kinds of tape if you want. If you ever need a piece while on the road, you just have to unroll the amount you need. You can also stick some zip ties in it. Again, put it in a Ziploc bag, along with some extra, larger zip ties. Now, lower the seat post and remove the lower cap and shove it all in there. Fit the cap back into place. If you ever need a zip tie or some extra strong tape, you know where to find it.
You may be curious to know why I have a wire running across the seat post. Well, both my front and rear lights are powered by my dynamo hub, and I decided to install a second rear light closer to the saddle. It is connected to the main rear light in parallel, and the cable runs from underneath the bike, up the seat post and into the rear light. I attached the light to the telescopic seat post clamp using, you guessed it, a zip tie.
Char. limit reached.


Информация по комментариям в разработке