Revit complete house design!!New Design house plan !!Revit project tutorial In Hindi
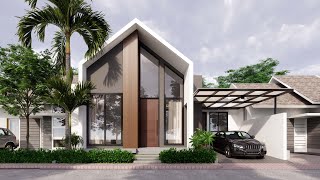
Designing a complete house in Revit involves several steps, from creating the basic structure to adding details like furniture and fixtures. Here's a general outline of how you can approach it:
Start with a Template: Open Revit and choose a template that fits your project requirements. You can select a template for architectural design that includes basic walls, doors, windows, and other building elements.
Set up Levels and Grids: Define the levels (floors) of your building and establish grids to help you align elements accurately. This will provide a framework for your design.
Create Walls: Use the wall tool to draw the exterior and interior walls of your house. You can adjust wall heights, thickness, and materials as needed.
Add Doors and Windows: Place doors and windows in the appropriate locations on your walls. Revit allows you to choose from a variety of styles and sizes to suit your design.
Build Roofs: Construct roofs over your building using the roof tool. Revit offers different roof types, such as flat, gable, hip, and shed roofs, which you can customize to fit your design.
Include Floors and Ceilings: Create floors and ceilings for each level of your house to complete the basic structure.
Design Interior Spaces: Divide the interior space into rooms using walls and partitions. Consider the layout of each room and how it will be used.
Furnish the House: Add furniture, fixtures, and appliances to each room to bring your design to life. Revit provides a library of objects that you can use or customize to fit your preferences.
Add Detailing: Enhance your design with additional details such as stairs, railings, trim, and moldings. These elements contribute to the overall aesthetic and functionality of the house.
Apply Materials and Finishes: Assign materials and finishes to the various elements of your design, including walls, floors, ceilings, and furnishings. This will give your model a realistic appearance.
Create Views and Sheets: Generate 2D views and sheets to document your design, including floor plans, elevations, sections, and schedules. You can annotate these views with dimensions, notes, and other information.
Review and Iterate: Review your design to ensure that it meets your requirements and make any necessary revisions. Revit's parametric modeling capabilities allow you to easily make changes and explore different design options.
Coordinate with Consultants: If necessary, collaborate with structural engineers, MEP (mechanical, electrical, plumbing) consultants, and other professionals to integrate their input into your design.
Prepare for Construction: Once your design is finalized, you can use Revit to generate construction documentation, including drawings and specifications, to communicate your design intent to contractors and builders.
By following these steps, you can create a complete house design in Revit that is both visually appealing and technically accurate. Remember to save your work regularly and take advantage of Revit's features to streamline the design process.


![PySpark Full Course [2024] | Learn PySpark | PySpark Tutorial | Edureka](https://i.ytimg.com/vi/sSkAuTqfBA8/mqdefault.jpg)


Информация по комментариям в разработке