Watch more How to Tie Dye videos: http://www.howcast.com/videos/510697-...
I'm going to show you how to do ombre gradient tie-dye now. For that you'll just prepare a normal immersion vat. I prepared this one by mixing my dye, which I choose a blue color in water with my dye activator, which is washing soda.
For the ombre you want to prepare a dye vat that is a little bit more concentrated than usual, and you'll see why in a few. I started my fabric just wet in fiber and I made these marks in the salvage of the fabric that will sort of guide me through the ombre, marking the changes from dark to medium, and from medium to light.
Those are just like guidelines marks, and if you make them on the salvage you will be able to cut them. After you dyed, if you're ombreing a shirt and you don't want the marks in there, you can just put safety pins or threads or something that will allow you to identify.
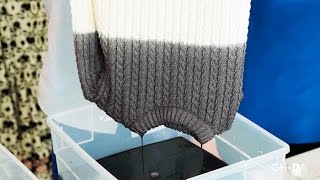
So I start with my fabric wet as it should be, before any dying technique, and I'm just going to start dipping it into the dye bath. First I'll go as high as my medium color, maybe a little bit above the line trying to keep a pretty straight front line, and then I'm going to start raising it and dipping it, and raising it constantly.
What you're doing here, you're pretty much making gravity work for you. So keeping the fabric in a vertical position, the weight of the fabric will start pulling the dye out, making this line here that still appears pretty solid, sort of like fade through.
At the same time, you always want to keep the bottom of your fabric, which is going to be your darker color, immersed into the dye solution, so the dark shades can start building. The reason why I keep pulling it up and down is to avoid building up very rigid horizontal lines. So by pulling it up from the bath and putting it into the bath, I'm just changing where the line is happening.
This process is very basic and beginning way to make an ombre. You can get great results out of it, but it also involves a lot of physical work. You have to be here working it out for at least half an hour. There's more complicated processes to do in ombre that will allow you to get also get better results.
One of them would be by making at least three different dye baths, all with different concentrations, and then dipping your fabrics. First in the lighter one, moving it to the medium, to the darker, and then you sort of build gradient by-lines.
Another way you could do the gradient is by painting the dye into a wet fabric and really like push the dye with the brush full of water. Those are all more advanced techniques I feel like you should try after you try this one. Or maybe after you try a couple of times this one, so you get a good feeling of how the gradient is done.
You can see that my gradient is appearing. I have a pretty light stop and my medium is happening to here at the bottom. I have it darker and I've only been working it for a couple of minutes.
You should continue to do this for at least a half an hour and then at some point
I like to just hang it. So if you're doing this by a place that has a shelf you could just even put two clothes pins, and then just hang it from a shelf. So you don't have to be physically here for a half an hour. Your arms can get tired, so that's a trick that I sometimes do. Or even one of those clothes hangers that are circular and you're just able to hang the fabric from it.
And this is how you do ombre dying with fiber reactive dyes.


Информация по комментариям в разработке