Click for more info and reviews of this Bulldog Camper Jacks,Trailer Jack:
https://www.etrailer.com/Accessories-...
Check out some similar Camper Jacks,Trailer Jack options:
https://www.etrailer.com/dept-pg-Acce...
Click for more info and reviews of this Bulldog Camper Jacks,Trailer Jack:
https://www.etrailer.com/Accessories-...
Check out some similar Camper Jacks,Trailer Jack options:
https://www.etrailer.com/dept-pg-Acce...
Click for more info and reviews of this Bulldog Camper Jacks,Trailer Jack:
https://www.etrailer.com/Accessories-...
Check out some similar Camper Jacks,Trailer Jack options:
https://www.etrailer.com/dept-pg-Acce...
https://www.etrailer.com
Don’t forget to subscribe!
/ etrailertv
Full transcript: https://www.etrailer.com/tv-review-bu...
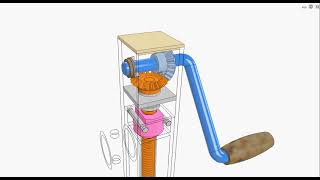
Today we're going to be taking a look at the rebuild process on the Bulldog 190 Series Square Jack, and the Fulton 5000-pound lift capacity Square Jack. This has an 8000-pound static capacity just like the Bulldog jack does here. These are going to have the 2 inch outer tubes, of course, square. The 2 inch inner tube on both of them there, and the metal cap is going to look like that. It has two bolts that hold it in place. Now, to rebuild our jack we're going to have a few components here.
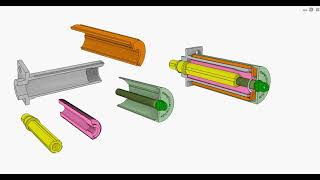
First, we'll start off with part number BD500156. This is going to be our gear kit. Now, this is kind of a universal gear kit for a lot of the Fulton and Bulldog jacks. Its going to come with two base gears. We'll be using the one with the larger diameter hole in it, and I have a new pin for that to ride on.
Got a new shear pin here for our handle gear. Its what turns that base gear, rotates it, and that what runs our screw up and down, and makes our jack work. We also have a metal bearing. Now, this is kind of an enclosed bearing. You see its got a cap on the top thats going to help keep out any moisture that comes down, and then the bottom, thats going to rotate on our thrust washer there, or on the thrust bearing. That eliminates any of the friction, and its going to help our jack last for a good long time.
Now, the bushing with the larger diameter opening you see here is going to go around the screw in a downward fashion. The bearing kit, that is part number BD500224. You want to get the handle kit, which is part number BD500171. Thats going to have the handle, a new shear pin, and then the flange bushings for either side there. Then if your caps been damaged this is a pretty integral part of the jack. This is whats going to keep the moisture and the dirt out of our gear kit.
Its going to keep it from running down into the inner tube of the jack. This is going to be part number BD500205. Now, the toolkit youre going to need is pretty simple here. Weve got a ratchet. This has an 11-mm socket on it. We also have a hammer. We got a 1/8 inch, and a 5/32 punch, and also a pair of needle nose. It's really all we're going to need to get this done with the exceptions of a little bit of grease. It doesnt have to necessarily be high temp or high load grease, but you do want a quality grease, and some shop towels. Now, the two bolts that pass through the cap, you can see theyve got lock nuts on the end of them there. You can see that ones not even really tightened down. You want to tighten it down at least till it makes contact. We're going to loosen these up. Get those bolts removed. Then our cap should just lift straight off of there. If we rotate it well see our gears there. Got our handle gear there, and you can see its just going to turn that base gear that turns the screw, which causes it to go up and down. Now, lets wipe that grease out of there so we can see where our pins are located. If we rotate our handle, you can see right here theres a little indention in that gear. Thats where that shear pin passes through. What well do is take our hammer. We're going to start to drive that out. Lets bring that out. Well set that aside. Then we can just gently pull back on that handle and it will slide right out of our gear, and thats the hole our shear pin went through, so thats what ties the handle and the gear together. Lift our gear up. Then with the handle kit, these are those replacement bushings. Now, for the base gear all we have to do there is just lift up. You can see thats going to come right off the pin. Then again we've got that larger diameter hole in the gear, so well be using that one. Now, we're going to, of course, just clean these parts up and put them back in. These dont need to be rebuilt. You get the idea of where the replacement parts will come into play. You can probably slide it out by hand, but just grab that pin with needle nose you can pull it right out


Информация по комментариям в разработке