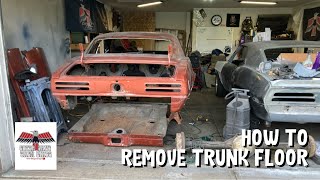
HOW TO Camaro Full Floor Replacement. We modify our frame jig and roll out the entire floor assembly including the trunk pan, frame rails and even the tail panel.
#floorpanreplacement #framejig #1967camarobuild
YouTube: / @paradisebaycustoms
Instagram: / paradise_bay_customs
Buy Me a Coffee: https://www.buymeacoffee.com/nzpT4XRLGO
#carbuild #carbuildproject #projetcar #carproject #projectcarbuild #carestorationproject #1969camaro #1967camaro #1968camaro #firstgencamaro #protouring #restomod #holley #detroitspeed #protouringbuild #customcar #musclecar #classiccar #chevrolet #chevy #chevycamaro #rustrepair #howto #diy
repair, floor pan replacement, trunk pan replacement, frame rail replacement, tail panel replacement, Camaro frame jig,
1967 camaro restoration, 1967 camaro restomod, 1967 camaro pro touring #camaro #framerails replace frame rails, how to replace frame rails, trunk floor pan, trunk floor replacement, replacing trunk floor pan, frame jig, camaro frame jig,f irst gen camaro build, first gen camaro restoration, first gen camaro pro touring, first gen camaro restomod, f body mods, f body, f body rust repair, DIY, autobody, grinding, cutting, metal fabrication, panel replacement, make it custom, metal shaping, welding, wheel tubs, mini tubs, trunk close out panels, JamesFreddys, MrFireman164, hand built cars, car build
How am I going to go about doing this, or more importantly, in a very concise manner, explain to you my thinking, in a somewhat entertaining and engaging way, so that you can follow along? Now very quickly. What are the couple, a couple of the issues we're trying to resolve one big, heavy panel going into a tight, restrictive space.
Okay. The tolerances are equally as tight after all it's metal. A lot of great examples on how to do it online. I think I've searched and watched them all. Let's give a shout out to a couple of them. Jeff, from the James Freddys channel, you're a rock star, buddy!
You were able to bring that big panel in through the windshield, wrestle it into place all by yourself. A couple of different times fit it in place, weld it in your garage by yourself. Kudos to you. That's one example, uh, sheer will and determination. You can make it work.
Another way of doing it... Let's give a shout out to Roger at Mr. Fireman 164. He had access to a lift. So he raised his body up off the frame jig, with his frame jig, he was able to locate his frame rails, trunk, floor, DSE stuff, all accessible, easy to get to, away from the tight spaces of the car. Then he brought that back under the car and lowered it down.
Okay. That's not without its challenges as well. From what I gather, the floor still has to fit above the toe board and the firewall. So you have to fan-dangle it in place and twist and contort the floor in order to bring the body down and get the floor above those points.
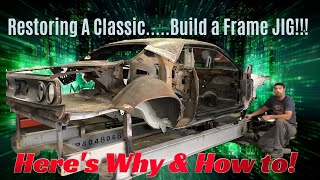
And then the floor even has to fit into the tight tolerance here between the rocker and the like. It has to come down. So there's some challenges that way as well. So what do I got? I got my frame jig.
This is what I plan to do. So the car was originally supported on the outside rails, the outside wheels. Okay. I have leveling screws that I was able to precisely level all four corners on that jig and did much of my work up to now in that fixed position.
I've since welded on two additional rails in the middle, that pickup, the back three quarters of the car. So the support that's under the rear leaf spring,[00:03:00] the front leaf spring at the torque box, the rear sub-frame Mount the front sub-frame mount will remain fixed on the existing outside rails of the jig, the back three quarters are supported on those new internal rails. So I am going to cut these cross-members you see the white line, I'm going to set free the back three quarters and let it rest on those internal rails.
Moment of truth. I'm going to Jack the outer frame up with the screw Jack, pull it out. Let's see if it works.
Out with the old goodbye rust. Wow it worked!.
Yay. Take a look inside the car,
Bye-Bye Ugly, Now I got to come in here and clean all this up. Take the, trunk drop-offs the remanent of the wheel tubs, anchor my trunk lid supports, both sides, clean prep and in with the new, huge milestone. Come back and see how it all goes in


Информация по комментариям в разработке