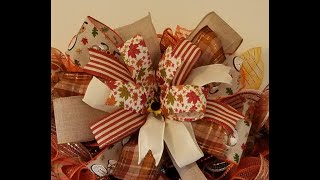
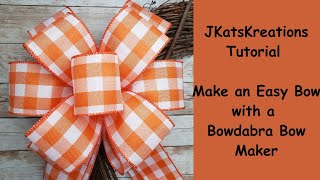
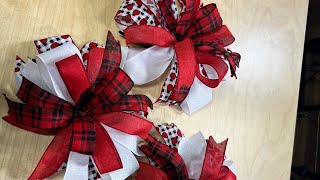
Here is a tutorial on How to Make a DIY Double Ribbon Bow with Bowdabra.
www.bowdabra.com
www.bowdabrablog.com
/ bowdabra
/ bowdabra
Materials:
Bowdabra
Bowdabra Bow Wire
1.5” x 11.5” Pink/White Swirl for the tails
1.5” x 63” Pink/White Swirl for the bow
1.5" x 11.5" pink ribbon for the tails
1.5" x 11.5" pink ribbon for the bow
"Hi, I’m Sandy Sandler, the creator of the Bowdabra Bowmaker. Today, I’m going to show you how to make this double-ribbon bow super simply in your Bowdabra. So, let’s get started.
So, the first thing that I’m going to do is take my two ribbons. I’m going to fold them in half and I’m going to cut from the corner to the fold, and that way, I have my dovetailed ends. And I’m just going to take my Bowdabra Bow Wire, I’m going to fold it in half. Now, I always do fold it in half and cut it long enough so I can tuck the ends underneath my Bowdabra to keep them out of the way. Then now, what I’m going to do is take these two pieces, fold them in half, and I’m just going to push those down, because these will be my tails, into my Bowdabra. Then, you have, this is the right side of the ribbon, because it’s the right side of my Bowdabra Swirl Ribbon, and I’m going to twist it. Then, I’m going to fold it back over, twist it, and push it in. And I’m going to keep twisting, because I want to keep the swirls on the outside of my bow. So, I’ll twist it and fold it in. And so, each step, all we’re doing is we’re folding and twisting. So, it’s super simple. So, and this is a really nice wired ribbon, so it’s very easy to work with. So, we’re going to twist it and scrunch it in. And what’s nice with the Bowdabra is there’s springs here. So, that’s what’s keeping everything in place and holding it down so I’m not struggling. So, it’s really almost like a third hand. So now, I’m going to fold this back over. Whoops, somehow, oh no. It’s hard in the light to see these swirls. So now, I’m going to fold this back over, twist. I’m going to make one more loop here and twist. And then, I’m going to fold this back and make like a half a loop and scrunch that. So, that will be our center loop. So, I’ll take my Bowdabra wand, I’m going to just scrunch everything down in here. And then, I’m going to pull this up, I’m going to pull this through my slipknot, pull it tight while it’s still in the Bowdabra. Then, I’m going to take it out. I’m going to separate my ends, bring it around to the back, tie it off, and I’ll knot it, and then I’m going to double-knot it to make sure it stays together. And now, I’m going to shape my bow. And I’m going to start by taking the center loop, and then, I’m just going to twist out all of my loops. One thing to remember, when you’re shaping, as it’s never the same until you put it on the package, otherwise, you’re going to shape forever. Like it’s 3D, and you can see how I’m just separating my loops so you can see both of the ribbons. So, it’s really pretty. And how simple was that?
So please, do me a favor. Follow us on Facebook, subscribe to our YouTube channel, and check out Bowdabra.com for lots of tutorials on ways to use your Bowdabra and your Mini Bowdabra.”


Информация по комментариям в разработке