When it comes to handling those annoying bounced contacts, you have choices at your disposal. You can use the traditional approach and create a timeless static list of hard bounces directly from the email tool.
Alternatively, if you're up for some adventure, you can take a detour and create an Active list of those bounces using the lists tool. After that, you can review the associated contacts and permanently delete them.
Let's see how we can do that:
To create a static list of bounced contacts:
Step 1- Go to Marketing and Click on Emails
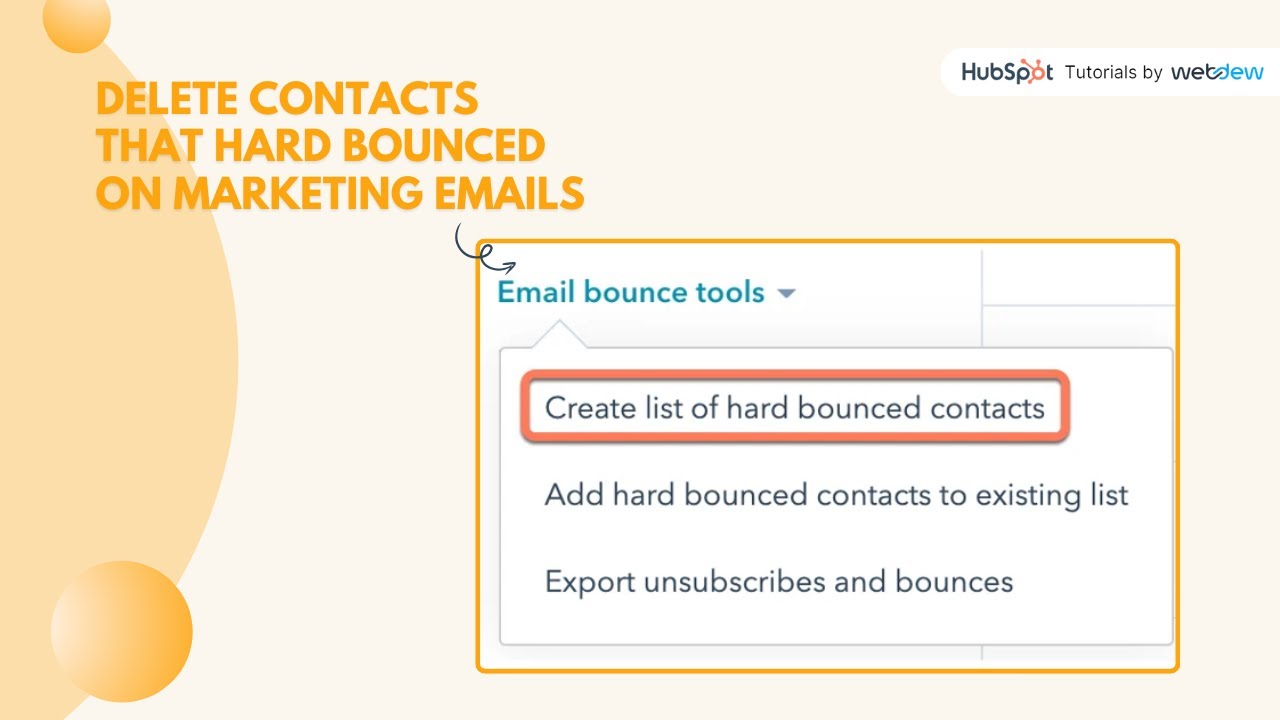
Step 2- Look for the left sidebar menu and click on the dropdown menu for Email bounce tools.
Step 3- To create a fresh list of contacts that have hard bounced, choose the option "Create list of hard bounced contacts."
Step 4- If you have an existing list of contacts that you wish to delete, select "Add hard bounced contacts to the existing list."
Step 5- For creating a static list of contacts who have opted out of all marketing emails, create a new static list where the contact property "Unsubscribed from all email" is set to True.
Step 6- In the dialogue box, enter the name of the list.
Step 7- In the Hard bounce reasons section, click the dropdown menu to modify the bounce types included in this list. By default, all hard bounce types are selected.
Step 8- In the Time period section, select the time frame for the sent marketing emails included in your list.
Step 9- Click on Create list
Step 10- After the processing is complete, you can select the checkbox in the header row to choose all contacts on the first page of your list. If you want to select all contacts in the list, click "Select all."
Step 11-Click the More dropdown menu, then select Delete to delete these contacts.
Step 12- Enter the number of contacts you're deleting, then click Delete.
To create an active list of bounced contacts:
Step 1- Go to Contacts and Click on Lists.
Step 2- Click "Create list" in the upper right corner.
Step 3-Enter a name for your list.
Step 4-Choose Active list and click on Next.
Step 5-Click on Add Filter on the left panel.
Step 6-Select "Contact properties, and select the criteria.
Step 7-Search for and select "Email hard bounce reason."
If you want to include bounced contacts of all types, choose "is known." If you only want to view bounced contacts for specific reasons, select "is any of" and use the dropdown menu to select the desired reasons.
Step 8- Click "Save" in the upper right corner.
Step 9- Once the list populates with bounced contacts, you can delete them, as shown before.
And voilà, you can now review and delete those contacts with ease!
-----------------------------------------------------------------------------------------------------------------------
Follow HubSpot Tutorials by webdew: / @hubspottutorials
With webdew's HubSpot account setup tutorials, you will learn about General, Security, Notifications, Website, Inbox settings, and much more. All the videos that are shared on this Youtube channel will make you run through the HubSpot tool effortlessly.
Moreover, you will learn more about the HubSpot CRM, Marketing Hub, Sales Hub, Service Hub, Reporting, and Dashboards through our videos and see how you can use these tools to leverage HubSpot to benefit your business.
To get access to Webdew’s Weekly Newsletter with tips and tricks for using HubSpot, follow the steps below: https://www.webdew.com/hubspot/newsle...
1. Go to the Webdew website and find the newsletter sign-up form.
2. Enter your email address in the designated field.
3. Click the “Subscribe” button to submit your subscription request.
4. You should receive a confirmation email shortly after, which will ask you to confirm your subscription. Follow the instructions in the email to complete the process.
Once you’ve successfully subscribed to the newsletter, you’ll receive weekly updates and tips on using HubSpot. Keep an eye on your inbox for the latest information and helpful advice.
Get Started with HubSpot with the Free CRM Sign-up:
https://www.hubspot.com/products/get-...

Информация по комментариям в разработке