Click for more info and reviews of this CURT Weight Distribution Hitch:
https://www.etrailer.com/Weight-Distr...
Check out some similar Weight Distribution Hitch options:
https://www.etrailer.com/dept-pg-Weig...
Search for other popular Ford F-250 and F-350 Super Duty parts and accessories:
https://www.etrailer.com/vehicle/2003...
https://www.etrailer.com
Don’t forget to subscribe!
/ etrailertv
Full transcript: https://www.etrailer.com/tv-install-c...
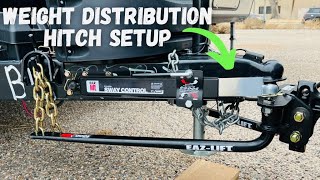
Today, we're going to take a look at and also show you how to install the Curt Round Bar Weight Distribution System. This is part number C17051. It's going to offer up to an 8,000-pound gross trailer weight rating and an 800-pound tongue weight rating. Now, before we get our weight distribution setup installed, we're going to take a quick lap by the camera, so you can see where we've got that rear end of the truck pitching down as well as the camper pointing down. This will be alleviated once we have the weight distribution setup installed. Here's what the weight distribution setup looks like when we get it installed and ready to head down the road. We've got the nice heavy duty round forged spring bars here.
These are going to transfer the weight going through the head back up into our tow vehicle and also back into our trailer to give us a nice level, smooth ride. Now, that's going to improve handling, and it's also going to improve stability while we're going down the road. As an added feature, we have better braking on the front because the pressure is pushed back down on our front tires from this transfer of weight, and we're also limiting the amount of wear and tear and excessive force that we'll put on that rear axle. Now, we're going to have everything we need to get this set up with the exception of the ball. You'll need an 1-1/4-inch ball that matches your trailer coupler, is going to be the only requirement there. We've got our powder coated shank that comes out, goes into our head assembly and powder coated springs bars here, so we know we're going to get a lot of good service out of it.
We're not going to have to worry about rust and corrosion. We've got 2 bolts here on the side. These can easily be backed out to change our head position to tune in the head, so we have an appropriate downward angle as you see here, downward towards the trailer or downward towards the ground towards our trailer. Right in here on the top, we're going to have a stack of washers that go onto a little pin that slides in. That's going to keep that spacing, so we won't have to worry about adjusting it every time we want to hook up our trailer. Once we've established how many we need here, then we'll tighten up our set bolt at the bottom.
It just keeps everything held in place. That way we won't have to worry about it coming loose or moving on us in between hookups. Now, here you can see our chain that comes up from the spring bars. We're going to have several links there. Each link is going to help us fine-tune the system. Now, when we get into the install portion, you'll see how all this goes together nicely and how we have a bar that's actually going to aid us in our lift brackets here to get some good tension put on our chain.
Now, here you can see we're going to have 1 here on the passenger side and in the same spot on the driver side our grease inaudible 00:02:43, so we can easily service our arms and keep the proper amount of lubrication in there, so we don't have to worry about it drying up. Now, we're going to get a few measurements with our system hooked up here without the weight distribution. Get one right off the rear bumper of the truck. It's going to be about 26-1/2 inches, and I'd also like to measure right down here on the bottom of the frame. That gives use about 12-3/4. Now, we're also going to get a measurement right here where that chrome meets the black on our front bumper here. That's about 25-1/8 of an inch. Now, to being our installation, we're going to go ahead and uncouple the trailer and move the truck forward a few feet to give us some room to work there in the ball mount area. Now, we're going to place a level on the bottom of our trailer here so we can level it up. Now, you can use a level up on the tongue. Just make sure your tongue doesn't have a little bit of a pitch to it or that it doesn't rise up or have any adjustments. You can see right now we're just a little bit off, so we'll use that jack to adjust it. We want our trailer sitting perfectly level. Let's get another measurement here, and we'll discover that we're right at about 15 inches, so we actually had about 2-1/4 inches worth of drop just here at the tongue of the trailer. Let's go ahead and measure up the truck and see what kind of differences we had there. Again, about 2 inches.


Информация по комментариям в разработке