For more behind-the-scenes content and to support the channel: / hwdesigns
Next up on what is quickly becoming the Summer of Shop Upgrades, a quasi-proper woodworking bench! I've wanted a vise and more hand tool versatility for a while now, and with the state of my last bench being basically just a source of frustration, it was time to upgrade.
Hope you enjoy!
To support "the show:"
- Like
- Subscribe
- "Ring the Bell"
- Follow me: / honestworkdesigns
Music Credits:
Your time to soar
Cody Decker
https://player.epidemicsound.com/
Everything Changes
Cody Decker
https://player.epidemicsound.com/
Staring at the sun
Cody Decker
https://player.epidemicsound.com/
One of the good ones
Cody Decker
https://player.epidemicsound.com/
Don't wait no more
Cody Decker
https://player.epidemicsound.com/
*Transcript of voice over*
How I upgraded to a more traditional, European/English style inspired workbench
Let’s get into it.
If you’ve been around for a while, you’ll remember these workbenches I made when I first moved into this new shop space.
Since then, they’ve seen more than a few projects, and frankly quite the beating.
Not to mention, the drawers have basically become just a source of frustration.
So I’m using the need to revamp to add a little more hand tool utility and a little more durability across the board.
I started by measuring, marking and cutting 24 2x4” down to 48”
Then used the jointer and planer to square them
It was at this point that I realized 48” does not 4.5’ make, so I put some of the off cuts through the same process to now serve as breadboard ends
Then, it was time to laminate them together
I got kind of lucky not using cauls on this in - post glue up, only a little clean up was needed.
After cutting the end grain square with a beam saw (not pictured), I measured and marked the cut lines for the tongues of the breadboard ends.
With a homemade edge guide and a straight, plunge cutting bit, I got to work taking many passes to clear the tongues for the ends.
Using a combination of plane and chisel, I cleaned up the machine cuts.
Then, I trimmed the ends down to size to match the width of the benchtop
Using a marker to mark the outer edge of the groove, though it was easier to see, was a bad call. I wanted a little bit of expansion space, but this imprecision would come back to bite me a little. Oh well. It’s only a workbench.
With what I’ll call a decent fit, i turned to the dowel pins that will hold the two piece together.
I marked the placement for 3 pins
Then used a half inch forstner bit to sink mortises in just the end piece.
I then lined the piece back up with the bench top and marked mirroring center points on the tongue.
Then, to achieve the drawing mechanism commonly used for these ends, I sank my mortises just inside of this mark.
And used a regular bit to loosen the openings
With those ready, I added a little glue at the center point, not the full distance of the board (though the way these will expand, I’m not sure how crucial this was)
Aligned the ends
Then sank the dowels - it was cool to see the drawing mechanism at work.
Using a pull saw, I cut the dowels down
Then got to work on a finishing level sand down
I used a water based polyurethane to finish the top.
Now, time to address these dang drawers.
I started by deconstructing the old bench
In the existing side panels, I sank a few pocket holes to use to create the cabinet frame
Then using the old ply bench tops, I cut out an additional, back and top panel for the cabinet frame to better hold the drawers in alignment - doesn’t pay to cut corners the first time. When will I learn.
I sank some more pocket hole, the anchored everything together.
With the box done, I screwed it into place.
To ensure the new table top would still sit at 36” and still be able to serve as half of the miter station, flipped the bench on its side, and used a beam saw to cut a little excess from the height of the legs.
Then, added cross stretchers to either end
Time to add the bench top!
With the top in place, I set about replacing the drawer hardware with some sturdier, soft close tracks.
To tidy it up, I used some off cuts to trim the gap between the drawers and top
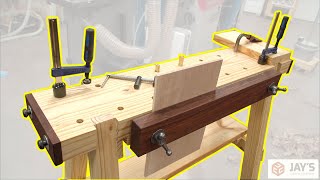
Time for the main event, the addition of a 12” Rockler end vise… that I actually chose to use as a face vise.
I started by squaring 4 2x4’s for the wooden vise jaws
I laminated 2 pairs of 2
Then trimmed them to 20” each
Before a final finishing pass through the planer
Then, I temporarily secured one to the face of the work bench, predrilling and counter sinking before adding the screws.
Then, I removed the rear plate
To free the vise plate.
After marking and predrilling some screw holes, I anchored the vise plate against the wooden jaw
Then marked where the guide rods and vise screw ports aligned with the jaw.
con't


![DIY Jigs Workbench [MicroJig Compatible] | HW|Designs](https://i.ytimg.com/vi/lOF0fXfMX8g/mqdefault.jpg)


Информация по комментариям в разработке