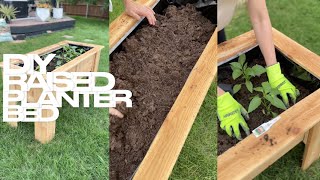
Here is a low-cost, easy-to-build 𝐫𝐚𝐢𝐬𝐞𝐝 𝐩𝐥𝐚𝐧𝐭𝐞𝐫 𝐛𝐨𝐱 with legs or without for your vegetable garden! Everyone knows that one of the best ways to have a successful vegetable garden is by using raised planter boxes.
A raised garden bed (also known as a garden planter box) like the one on this video at the Cuban Redneck DIY Channel is fantastic for growing vegetables, flowers, and even herbs. They keep lane weeds from your garden soil, prevent soil compaction, provide good drainage. But most importantly, a well build raised planter box will serve as a barrier to pests such as slugs and snails. Even though the price of wood is up to 80% and gas prices are not far behind at almost 40%, there is no better time to build a raised planter box and start a vegetable garden. Many YouTubers chose to make these planting boxes out of exotics woods such as teak and even cedar. I don’t think that is necessary. When I posted pictures of the raised planter boxes I build last year in spring, many people criticized the move. Some ever left a comment saying that it makes no sense to spend $100 to get $10 worth of groceries. However, the reality is the complete opposite. Although our vegetable garden efforts were minimal, we managed to yield about $100 - $150 worth of groceries.
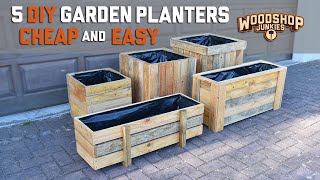
We even grew things that are not commonplace at our local grocery stores, like okra, purple peppers, and turmeric - all from organic non-GMO seeds. This year our goals are more ambitious. W are looking for crops adding up to $1500 to $2000. To accomplish this, we are building five raised planter boxes, three measuring 19X71 inches and two measuring 19X36 Inches. We have taken our experience from making only two raised planter boxes last year to another level and expecting great returns.
I am tired of people telling me that they don’t have space, that raised planter boxes are too expensive. Those are nothing but excuses. As I said earlier, it is all about ROI for my raised planter boxes are I am going to be using fence board. These are the same fence boards I used for not only my Wood American Flag project ( • Wood American Flags | How to Make a D... ), the Wood Planter Box ( • Wood Planter Box | Easy DIY $12 Woode... ) as well as the Bottle Cutting Tool ( • How to Cut Beer and Wine Glass Bottle... ). I use and love to use these fence boards as wood for my project because they are not only affordable but also pressure treated. On average, fence board wood will last up to 10 years out here in the Florida weather. Because of the thickness, they are not very good as structural wood, but they are great for a facade or as siding.
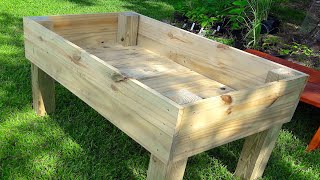
M𝐌𝐚𝐤𝐢𝐧𝐠 𝐚 𝐑𝐚𝐢𝐬𝐞𝐝 𝐏𝐥𝐚𝐧𝐭𝐞𝐫 𝐁𝐨𝐱 𝐰𝐢𝐭𝐡 𝐋𝐞𝐠𝐬 𝐨𝐫 𝐖𝐢𝐭𝐡𝐨𝐮𝐭!
To make one of these raised planter boxes you are going to need six fence boards. These typically measure about 73-inches by about five 5.5 Inches and are about a half-inch thick! You are also going to need three desk balusters. These usually are about 42 inches long by 1.5 inches square. You need to do away with the pointy tip that fence boards are known to have on one end on four of the panels. The other two need to be cut into 17.75-inch sections. The deck balusters get cut in half!
With all the wood cut to size, we can move into the assembly. For the assembly of our box planter, we are going to need 1.5 to 1.625 screws. I am using Grip-Rite exterior screws in this particular build, but in the past, I have used regular galvanized drywall screws, and they have last many years. Standard drywall screw should last 3-4 growing seasons. And after 3-4 fruitful growing seasons, it will be no issue to rebuild your raised plater. By that time, it would have to pay for itself many times over.
The assembly of the raised planter box is straightforward. The only thing you need to keep in mind is that there is a left-hand and right-hand end cap. With this in mind, visually square your shortboards over your deck balusters, pre-drill them with a countersinking bit and screw it together! I used glue for my wood planter boxes. It does not add a lot of expense, and if it adds a growing season to the life of the raised planter, it is well worth it! Once you have your two end caps. We need to build our centerpiece. The only difference between this and the others is that I’ll be putting boards on both sides. That may e a little be of an over-build, but it ended up working very well! I have a little bit of an issue with the woo planter boxes I build last year, where they were bulging in the middle. Hopefully, this resolves that problem.
With the two end caps and the centerpiece pre-build, it is time to screw in place out longboards (the side panels). Mark the center of the board, install the center and work your way out. Once completed, flip it and do the other side! My friends building a raised planter box like this is your first step towards having a successful vegetable garden! My friends, I look forward to seeing you in the following video!
#RaisedPlanter #DIY #PlanterBox #HowToMake #Build #RaisedPlanterBox #RaisedPlanterBoxes


Информация по комментариям в разработке