Click for more info and reviews of this CURT Trailer Hitch:
https://www.etrailer.com/Trailer-Hitc...
https://www.etrailer.com
Don’t forget to subscribe!
/ etrailertv
Full transcript: https://www.etrailer.com/tv-install-c...
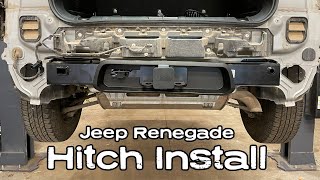
Hello neighbors, it's Brad here at etrailer, and today we're taking a look at installing the CURT Trailer Hitch Receiver on a 2023 Cadillac XT4. Now, this is what your hitch is gonna look like when it's installed, and that's the great part about this one, is it sits far enough back that when you do need to use it, you can simply twist the two plastic knobs on the cover, pull this out, and then you're ready to go, but when not in use, this panel goes back on and it's completely hidden, but taking a closer look at the hitch, it's gonna be a two inch by two inch receiver tube opening, which is pretty much the standard size for a bunch of different accessories. So if you're looking for ball mounts, bike racks or cargo carriers, there's plenty of options available for this hitch. Now, when you put those accessories in, you're gonna need a 5/8 pin and clip to allow those to stay in place and the hitch does not come with one. A lotta your accessories will come with the pin and clip, so that's something to look for, but if you wanna pick up a locking one, that way you can load your accessories up, lock it in place and know that it's not gonna walk away in the hands of someone else, then we have plenty of options available here at etrailer. Now, we do have rolled-style safety chain loops that are nice and open.
So your normal S-style hook or larger clevis-style hook will be easy to hook up when putting your trailer safety chains on. Now, speaking of towing, this has some decent ratings with a gross trailer weight rating of 4,000 pounds, and that's gonna be the weight of the trailer plus the accessories loaded onto it, and as far as tongue weight, which is gonna be the pressure that's put here on the receiver tube opening, that's gonna be a lotta your suspended accessories like your cargo carriers or bike racks. It's coming in at 400 pounds, which is pretty good. So that means you can load up some e-bike bike carriers and bolt the bikes and still be under that threshold. Now, before you hook up and tow, you do want to check the vehicle's owner's manual and see what it's capable of towing and then compare that with the numbers on the hitch, and that way, you're not overloading either one of them.
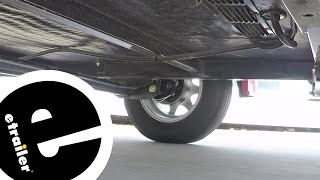
So just take the lowest number. Now let's go ahead and measure from the center of the hitch pin to the furthest point of the rear fascia, and this is gonna help determine with your folding accessories which ones you're gonna wanna pick to make sure it still has clearance, and we're coming in right at about four inches and this is also important to note for when choosing a ball mount to make sure that it sticks out far enough. That way, you can hook up your trailer and not make contact with the fascia. Now, as far as your ground clearance, measuring from the top of the receiver tube opening to the ground is coming in at 18 inches, which is a decent amount of ground clearance. It's also important to determine if you need a rise or a drop for your ball mount.
So you can measure the coupler on your trailer and then adjust accordingly to match your hitch height. Now, something to keep in mind as well is when you do have suspended accessories on here like the cargo carrier or bike rack, as you go up an incline, that is gonna wanna tilt towards the ground. So just keep that in mind when going up a big incline or maybe on some little more rougher terrain, but with 18 inches, you should clear most things. Now in terms of installation, this one's not too bad to do. The fascia portion that comes off is just gonna be this lower black plastic, and that way, you can get the bumper beam taken off and the hitch lives behind that, put the bumper beam back on and bolt it back in place, but this one did give me a little bit of issue just with some clearance.
So I did have to grind out one of the holes and you may or may not have that issue depending on the tolerance of your hitch that you get, but overall, it's not too bad to do and I'm gonna walk you through all those steps to make sure you get your hitch installed. So let's take a look at that, and our first step is gonna be taking our T15 Torx bit and heading over to each of the wheel wells to get some fasteners taken out. There's gonna be two of them that we're gonna be taking out right here. They do continue to go up, but these are gonna be the only two that we have to actually take out. So getting into these can be a little bit tricky. I'm using a small 1/4 inch ratchet with a bit, and you may have to get clever if you don't have anything that can reach in here, but I do recommend you could actually grab a ratcheting wrench that


Информация по комментариям в разработке