Today we learn step by step How to build a dutch bucket hydroponic system at home, how it works,TOP DRIP IS A HYDROPONIC growing technique can use Indoors, outdoors, or greenhouse, inexpensive and easy to build, we will leran how to grow tomates hydroponically on this system.
Subscribe for more videos: https://www.youtube.com/channel/UCmDa...
Follow my Instagram: / diy_garden_with. .
Email: [email protected]
the steps :
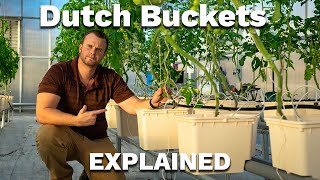
One of the more popular variations of top drip is Dutch buckets
Dutch buckets are closed-bottom pots with a single drainage site
This drainage site is slightly raised from the bottom of the bucket Size 17L capacity 30*25*23 cm (L*W*H)
Dutch buckets are commonly used for large flowering crops like hops, tomatoes, peppers, cucumbers, and eggplant.
Suitable Locations: Indoors, outdoors, or greenhouse
I bought 10 buckets, it comes one set (bucket + cover + net pot + elbow)
let’s build TOP DRIP BUCKET SYSTEM the stand I’m going to use PVC pipe joint fitting connector I recommend them they are great for DIY projects.
And I got this EXTRA HARD PVC pipe 25 mm MATERIALS & TOOLS25 mm PVC pipe 14-meter TEE 4 PCs4 way PVC corner fitting 4 way Cross PVC fitting 3 way PVC fitting*All size 25 mm Hacksaw, Screws
Drill
Start by cutting the pipes, cut 10 pipes, you need 20 PCs each 50 cm longFirst connect the pipes and make square shape.
Continue the installation of the pipes as shown in the video. Use a hammer to insert the connectors well. Next Drill all the join points.
I don’t recommend to use glue, instead use drill.
Repeat the same steps and build the other side of the stand Now cut the rest of the pipes (4 pipes), each pipe 80 cm
Next join both sides together. Et voila neat, strong stand
2- Drainage
This drainage site is slightly raised from the bottom of the bucket so it can be set up to drain into a collection pipe that directs the used nutrient solution back to the reservoir to be recirculated.
the single drainage site that connects to the collecting pipe leading back to the reservoir.
We need to connect the buckets to the collecting pipe that directs the used nutrient solution back to the reservoir to be recirculated.
Thing required: 40 mm UPVC PIPE 4 meter 50MM UPVC
END CAP 50X40MM UPVC BUSH REDUCER 40 MM UPVC
TEE 4 PCS S/STEEL U PIPE CLIP 4 PCS 40 MM UPVC ELBOW
Place the two pipes measure with the bucket, the drainage site must site on the 40 mm pipe
Now fix the pipe on the stand using the U CLIP Next close one side of the pipe, using the endcap
I couldn’t find 40 mm end cap, so I’m using 40X50 mm bush reducer and 50mm END CAP.
Push the pipe to the end, to save space. Put a mark at all the drainage site. Drill a 16 mm hole. Repeat the same process for the other side
Irrigation;
Things required: 4 mm micro tube
Dripper, 2 pcs End cup 16 mm Dripper 1 pcs TEE 16 mm 2 pcs Elbow 16mm 6 m X 16 mm poly Pipe
Puncher 4 mm hole Punch 20 pcs nipper 4 mm
Place the 16 mm Poly pipe and tie it up with the drainage pipe.I’m using cable tie. Insert the 16 mm End cap and the elbow the other side and Then connect the two Elbow to the 16 mm Tee
Water pump specification: Voltage: 220-240V Power: 45 W Max flow rate: 2500 L/H Max lift Height 2.5m Nozzle Outlet: 16 mm
Get a pump the outlet is on top, easy to connect to the system
Drill 16 mm hole for the water pump
Now cut 10 pcs from the 4 mm micro tube each pcs 50 cm long
Connect both tube ends, one side with dripper and the other nipper
Use the puncher to make a hole on the poly pipe
After that push the nipper inside the hole
Now we have finished building the system
Fill the reservoir with water.
Plug in the pump to test the irrigation and the drainage
The frame should slope toward the reservoir
Adjustable dripper is great for controlling flow when connecting many buckets to one pump
After testing the system, everything is perfect, now the system ready to use.
I’m going to make a pipes slope toward the reservoir, and more support for the buckets.
most hydroponic gardeners prefer to take full advantage of their buckets by growing large flowering crops.I’m going to grow cherry tomatoes
Germinate seeds I like to use Rockwool to germinate the seeds
They keep the moist and create a good condition for the seeds
When you see a true leaves come you start give the fertilizer
EC 0.5 Ms/cm
The best temperature is between 75 and 85 degree Fahrenheit.
Fill the net pot with clay pebbles, and gently transplant the seedling
I’m going to use this system in the balcony
Starting seeds in stone wool can be incredibly easy and involve very little effort
You need to have the proper amount of light, airflow, heat, and humidity
fill the reservoir with water (I Harvested rainwater
rainwater is the safest to use in hydroponics, if you are using tap water make sure to remove the CHLORINE / HLORAMINE
@DIYGARDENWITHBB
#hydroponic_system #dutch_bucket


Информация по комментариям в разработке