Click for more info and reviews of this CURT Custom Fit Vehicle Wiring:
https://www.etrailer.com/Custom-Fit-V...
https://www.etrailer.com
Don’t forget to subscribe!
/ etrailertv
Full transcript: https://www.etrailer.com/tv-install-t...
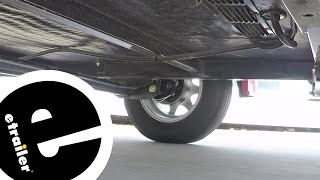
Today, on our 2006 Nissan Xterra, we're going to be taking a look at and installing the Curt T-connector vehicle wiring harness with 4-pole flat trailer connector, part number C56225. Here's what this wiring's going to look like once it's installed on the vehicle. As you can see, it's right down here, tied to our safety chain connection point, so whenever we need it, we've got nice, easy access to it. Whenever we're not using it, we can use that dust cover to tie it to that safety chain loop. This wiring harness is nice and easy to install, not terribly difficult, as it's direct plug-and-play into the factory harness. Overall, this harness will do a really good job of making sure that you have power to your trailer when you need it, but also it's easily accessible and easy to use. Here's everything that's going to come with our kit. We've got our 4-pole wiring harness with our 4-pole flat trailer connector.
Then we've got the gray connector that plugs into the factory tow harness on the vehicle. Here, we've got the portion of the tow harness that's going to go inside the vehicle. We've got our 12-prong connector here. Then we've got our 3 relays that are going to make sure that power's provided everywhere it needs to go. Over here, we've got our dust cover that's going to go on our 4-flat connector, then some zip ties and other hardware to help with the installation. Now, let's show you how to install this wiring harness.
First thing we'll need to do is, inside the passenger door here, we'll need to remove this threshold. It's held on with push pin fasteners. You can take a flat head screwdriver, or if you've got a trim panel tool, you can also use that. You just want to work your way along here and pop that up; then you'll pry outwards. As you can see, we've got some clips down here.
Then that fastener goes into that location right there. We can set that aside. Now, what we need to do is remove this little interior kick panel here, and it's got this little fastener that just screws down into place. You can just take a short, flat head screwdriver and begin to loosen that up. You can begin to pry outward on this panel. This just has a couple clip fasteners on the inside there that go right along here. Now we need to locate the 12-pin connector that we'll be using, and there it is right there.
It's down on the backside of this little module right here. Now, we can take our 12-prong connector and plug it into the existing connector on the vehicle. You want to make sure it snaps, so that you know it's going to be secure and not come apart at any point. Once that's connected, we can take our 3 relays, and we want to find a good location to tuck them away so that they're nice and secure. Take a zip tie; secure this loom of wires on our new wiring harness to an existing loom of wires that's up behind here. That's going to help keep it nice and secure and tucked away behind this kick panel down here. Now I can reinstall that kick panel. You want to be sure to line up the little clips that are over here. Now I can reinstall our threshold. Now, underneath the back of the vehicle, I've gone ahead and removed the spare tire in order to give ourselves a little extra room to work and make it easier to see where we'll be. We're going to be right over here, and this is the factory plug. Right now, it's just got a plug in the end of it so that nothing gets into this and damages the connection points inside this connector. Push down on that tab right there. If you have a hard time getting it out, you can use a screwdriver and pop it off from there. It's just kind of clipped in there. Then you can use a pair of needle-nose pliers in order to pull that plug out. Grip on the bottom, and then on top of that tab, and pull that plug right out. There's your connection, right in there. Now I'll take the gray connector that's on our 4-pole wiring, and I'll plug it into that connector that I just undid there. Once it clicks into place, I can resecure it to the side over here where I unclipped it from. Then I'll be able to wrap my wiring back to the hitch. I routed the wiring around the bracket for the shackle here, and then up along the hitch, tied a little bit of the excess up high here, and then brought it down to the hitch, secured by the dust cover. Whenever you choose to route yours, you want to be sure to avoid anything that's moving that may potentially damage the wiring, and also anything hot like the exhaust. We can now reinstall our spare tire. Now that we've got everything hooked up, let's go ahead and test the system, and we'll use part number I26 in order to do that. First, l


Информация по комментариям в разработке