In this instructional video you will see a demonstration on how to chink a square log home.
TRANSCRIPT:
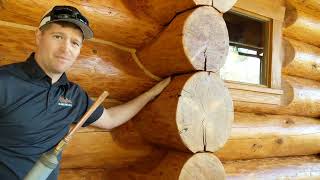
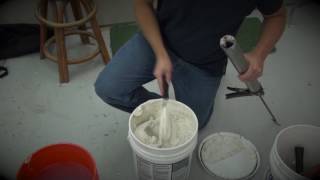
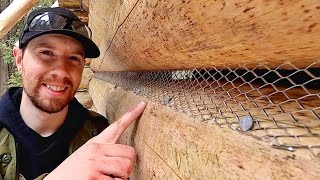
Hi. My name's Scott. I'm with Weatherall Company and I'm now going to show you how to chink a log that is a square log. Then I'm going to caulk a standard mill log that has a tongue and groove on it, and then we'll go over, and do a demonstration on chinking around logs. With the square logs, you usually get fairly large joint sizes. You can get joint sizes up to eight, nine inches, and they make backing material for that as you can see some of the backing material for Appalachian Style homes or homes with square log siding can be fairly large. What I do is I use a cone tip so I can put on a large bead instead of trying to fill this joint with chinking with a half inch nozzle.
I usually will cut this tip back to an inch or slightly over an inch. Instead of putting my material in in a zigzag pattern, I'll make two horizontal passes. What that'll do is it'll leave a seam that's joined together and then when I run my trowel over it, you won't see the seam, whereas if you run a zigzag pattern in there, it's hard to trowel out all the little seams. How I do this is I use the gun. I use my hand as a guide, and I keep the gun tip perpendicular to my work surface. I keep it about a quarter of an inch away from the material. What we're trying to do is get a quarter of an inch of material on as a chink joint and if you go too close, it's going to be too thin. Too far back is going to be too wide, so about a quarter of an inch. I usually go slightly over a quarter of an inch because when you trowel it, you're moving the material around, and it will trowel down to a quarter of an inch.
Here I go with that. I try to put it on as neatly as I can, and as I'm doing this, I'm making sure that the material, as it's moving along, is actually touching the top of the wood. It's engaging the surface. I put it on as neatly as I can because if I put it on like this, it's going to be too hard to trowel. If I can keep it on at about a quarter of an inch, and as flat as possible, it makes my troweling a lot easier. Again, I'm making sure that material is hitting the bottom of the log, attaching itself to the bottom of the log. Then when I'm done, I can release the pressure on the gun so the material doesn't go all over the place. Then I'm ready to trowel.
I have my water bottle. I have a rag here in my pocket and I have my tools. Obviously, you're looking for a trowel that'll fit the joint size. It makes it a lot easier, makes the work come out a lot nicer. If I were to try and trowel this with a three quarter inch trowel or half inch trowel, I'd be here forever. It wouldn't look very nice. How I do this is I spray the back of the trowel a little bit and I spray the material lightly. I don't over do it. I don't sit there and put a ton of water on there because what that'll do is, if it gets between the wood and the chinking, you don't get a very good bond and then a year later or so you can experience pull aways. I lightly spray the material. I lightly spray the trowel. Then I strike the top edge, and I strike the bottom edge.
What I'm doing is I'm holding my trowel. I'm not holding my trowel flat. I'm holding it at a slight angle so this top edge isn't dragging. I put that pressure down on this tip. You can see where the material is building up. I strike that edge. What I'm doing is I'm seating the material on the log. If I get any of this where I put all that water, I usually just get a paper towel and wick it up quickly. Then I'll finish this line out, but it really should be this easy. As you get going, you'll probably end up getting it done in two or three passes, three or four passes. Again, this is from where I sprayed all that material. Also what I do is, as the material starts to build up, you can see that on my trowel, it started to build it on the trowel. Wipe the excess off, spray my trowel, and then keep going.
Now, I like this method better than using foam trowels because I think you're able to press the chinking against the log a lot better. It better seats the material. It gets better adhesion against the wood. If you use the foam painting brushes, that method, what you're doing is you're dampening the foam brush, and you're loading it up, and you're putting a lot of water on your joints. You could experience a lot of pull aways. Again, if you get some areas where you might have put too much water on, just quickly take care of it that way. That's it.


Информация по комментариям в разработке