This video has subtitles in English🇬🇧, Japanese🇯🇵, German🇩🇪, and Russian🇷🇺.
Replacing the belt tensioner may not be a difficult task for a professional mechanic, but it was quite a difficult task for an amateur like me. This time, I was replacing the tensioner for the first time, so I prepared by watching various videos and online articles, but there were many details that were not covered.
When I made this video, I tried to explain it in detail from an amateur's perspective so that anyone working on it would have no trouble.
I think this video is probably the most detailed explanation in the world.
[Work procedure]
① Move the radiator fan shroud to the rear. (Pull out the left and right metal clips)
②Remove the radiator fan. (Remove the single bolt in the center of the fan)
③Remove the radiator fan shroud.
④ Record the route of the belt.
⑤ Loosen the power steering pump pulley bolt. (3 bolts)
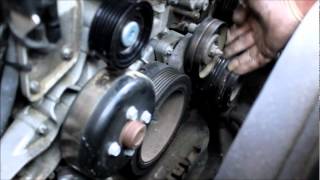
⑥ Loosen the belt tensioner. (Loosen the adjustment bolt (1) in the center of the tensioner body. It's quite hard! Then loosen the adjustment rod next to the power steering reserve tank counterclockwise.)
⑦Remove the belt. (Even if you loosen the tensioner, it won't come off easily! The only way to remove it is to pull the belt and shift it!)
⑧Check whether there are any problems with the pulley bearings of each auxiliary machine. (generator, water pump, cooler compressor, power steering pump)
⑨Remove the power steering pump pulley. (3 bolts)
⑩Remove the tensioner.
Remove the damper (one bolt) and tensioner stay (three bolts).
*The bolt on the right side of the tensioner stay needs to be removed after fixing the nut at the back. It is necessary to manually insert the socket into a very narrow space! Not possible when the engine is hot! This is the most difficult part!
Remove the tensioner from the engine.
*It is stuck to the adjustment parts on the back side of the tensioner, so it cannot be removed easily. Slide the tensioner toward you, insert a flathead screwdriver through the gap, and pry the adjustment part to remove it from the tensioner. The working posture here is also quite difficult and is bad for your back! I think people with bad backs should not do it themselves.
⑪ Prepare a new tensioner. (Assemble the damper to the tensioner. At this time, it is necessary to remove and attach the pulley attached to the tensioner.)
⑫Replace the adjustment parts.
⑬Assemble the new tensioner and damper.
Don't forget to insert the adjustment indicator part between the main body and the stay!
*It is difficult to match the female angle of the adjustment part to the male angle on the back of the tensioner! This is also difficult! Bad for your back!
⑭Install the power steering pump pulley.
⑮Wear the belt.
⑯Tighten the adjustment rod (clockwise) and tension the belt. After tensioning, tighten the adjustment fixing bolt in the center of the tensioner body.
⑰Assemble the radiator fan shroud and fan.
⑱Check the operation. If the belt is loose, loosen the adjustment bolt in the center of the tensioner body and readjust it.
*In this case, you will need to reinstall and remove the radiator fan shroud and fan.
Mercedes Benz 190E (W201) Related My Videos, BEST SELECTION
(W201-1) Investigation of the cause of poor idling of Benz W201 ~ Fuel distributor replacement, until complete recovery
• (W201-1)ベンツW201のアイドリング不調原因究明~フューエルデスビ...
(W201-3) Investigation of the cause of damage to the fuel tank of the Benz 190E (W201) ~ Repair of the purge system
• (W201-3)ベンツ190E(W201)の燃料タンク破損原因究明~パージ...
(W201-4) How to remove panorama wiper unit of Benz 190E (W201)
• (W201-4)ベンツ190E(W201)のパノラマワイパーユニット取り外し方法
(W201-8) Investigation of the cause of rain leakage and repair of Benz 190E (W201)
• (W201-8)ベンツ190E(W201)の雨漏り原因究明~修理
(W201-16) Mercedes-Benz 190E (W201) radiator sub-tank replacement method
• (W201-16)メルセデスベンツ190E(W201)のラジエーターサブタ...
(W201-32) MB 190E W201, Cleaning the throttle valve
• (W201-32)MB 190E W201, Cleaning the t...
(W201-83) Mercedes-Benz 190E (W201) Buying Guide #1
• (W201-83)メルセデスベンツ190E(W201)購入ガイド#1
(W201-84) Mercedes-Benz 190E (W201) Buying Guide #2/ What I like about 190E (W201) #Interior edition
• (W201-84)メルセデスベンツ190E(W201)購入ガイド#2/ 1...
(W201-92) Mercedes-Benz 190E (W201) Buying Guide #3/22 Report maintenance cost of Mercedes-Benz 190E (W201) for 2 years.
• (W201-92)メルセデスベンツ190E(W201)購入ガイド#3/22...
(W201-97) Mercedes-Benz 190E (W201) Buying Guide #4/190E how much are the consumable parts?
• (W201-97)メルセデスベンツ190E(W201)購入ガイド#4/19...
(W201-98) Mercedes-Benz 190E (W201) Buying Guide #5 / Exterior Edition
• (W201-98)メルセデスベンツ190E(W201)購入ガイド#5 / 外装編
(W201-100) KE Jetronic System / How to adjust air-fuel ratio. Mercedes Benz W201, etc...
• (W201-100)KE Jetronic System / How to...
(W201-109) OVP relay, fuel pump relay, ECU/ABS computer replacement procedure
• (W201-109)メルセデスベンツ190E.W201, OVPリレー、燃...
(W201-110) Mercedes-Benz 190E, W201, Symptoms when the OVP relay is broken
• (W201-110)メルセデスベンツ190E, W201, OVPリレーが...
(W201-125) Mercedes-Benz 190E, W201 oil leak point
• (W201-125)メルセデスベンツ190E,W201のオイル漏れポイント...


Информация по комментариям в разработке