Click for more info and reviews of this CURT Trailer Hitch:
https://www.etrailer.com/Trailer-Hitc...
https://www.etrailer.com
Don’t forget to subscribe!
/ etrailertv
Full transcript: https://www.etrailer.com/tv-install-t...
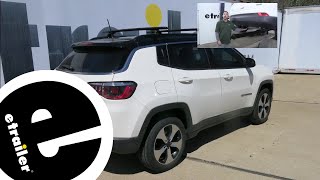
Today in our 2006 Nissan Quest, we're going to take a look at, and show you how to install Curt custom fit class 3 trailer hitch receiver. This is part #C13563. Here's what the hitch is going to look like once you get it installed. As you can see, really clean, nice looking hitch here. Just a small little taper bracket, and then your actual receiver tube opening. It's very conveniently located, flush here with the rear bumper that goes down.
Our cover's actually going to wrap around the heavy duty tube that runs across. So, you know, one of the cleanest looking hitches that your really going to find. There's nothing excess sticking out there. This is class three hitch. This is going to be great for medium, light duty towing.
Really good for all the hitch mounted bike racks, cargo carriers, things like that. Now, the hitch is going to haul for a 3500 pound gross trailer weight rating, and a 300 pound ton weight rating. If you go to weight distribution, we can up to 5000 pounds on the trailer weight, and 500 pounds on the tongue weight. Although, you will want to look into the manual of the Quest and make sure that's something it could handle. If not, just go off of whatever of those numbers are the lowest. You're going to have a 5/8 diameter hitch pin hole.
This is going to allow us to use many of the 5/8 diameter hitch pin accessories, such as your hitch pin locks, or anti rattle devices. We've got the rounded style safety chain connections on each point, or on each side rather. Be a good contact point to connect your chains, and/or any kind of straps or something that might be required for a bike rack. Now a couple of measurements that will helpful in selecting your bike rack ball mounter maybe hitch cargo carrier. These are going to be from the ground, to the inside top edge of the receiver tube opening. We've got about 10-1/4".
From the center of the hitch pin hole to the outer most edge of the bumper, it's about 5/1/4". Now for the first step in our installation, we're going to be pulling two push pin fasteners that are here on the back side of our car that kind of hold the bumper in place. As you can see, this tab is already broken. We still want to pull it down, and get it out of the way. So you want to pull the center of that fastener out first. With that center out a little bit, we should be able to work that main core out. Now let's get this exhaust down, and out of the way so we can get to our access, or our mounting location holes. There's going to be a rubber hanger, that's right here on the inside of this little piece of fender. We're going to hit that with a little bit of spray lubricant, just to kind of help that slide in and out. Right here in the middle of the vehicle, there's going to be two nuts, that stick off of studs coming out the bottom of the chassy. We're also going to put a little bit on there, just to help those come off when the time comes. Now, before we start removing anything, let's put a safety strap under the vehicle. We're just using a little cam buckle strap. Find a good connection point on each side. We want this to go right underneath the exhaust, so once we take off the hangers, it'll have something to rest on. So it's not getting undo stress up in the front area there. Now for our outside hanger, we're just going to kind of pry either the top, or the bottom of that rubber off of the metal stud that it's on there. It'll come down, there. Now let's go to the middle, and take off our two nuts. As we take this other one out, let's just kind of hold your hand under it so it doesn't, you know, fall. Very good, that'll give us some room to kind of work. As you can see that hanger that's up there supporting it pretty well. As you can see that bolt we had there broke off. Not a big deal. We'll just use a self tapping screw, and go into the metal. It'll re secure that ground. Up above there, there's also a bolt that we want to remove. It'll be right here at the other end of that strap. Got that out of the way. Let's also take off the two bolts, one here, and one up front there, holding our heat shield up. Now the heat shield and bolts, we won't be reusing. The grounding strap, we will. So, set the other things aside, but hang onto your grounding strap and your bolt. Now let's take a look at our attachment points. Here on the driver's side, we are going to be using the weld nuts are located here, here, and here. Now in each of these holes, we're going to clean them out. We use a little bit of spray lubricant, and then a nylon tube brush. Now this is part #814092. Just a little tube brush. If you don't have one, pick it up, it'll make this job easier. It's goi


Информация по комментариям в разработке