Please be reminded that this video is muted with no explanation. Please read my post: "How the Agape’s Way of Making & Caring for Kokedamas is different from the Old Way" for the detail description before or after you watch this video.
How the Agape’s Way of Making & Caring for Kokedamas is different from the Old Way?
1. Materials used
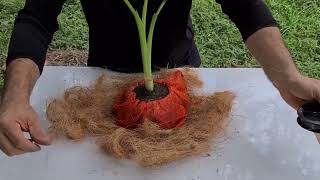
Apart from Jute Twine and Sphagnum Moss; Only Coconut Coir is needed; for any kind & every kind of plants. In particular, the Coconut Coir is relatively cheaper and is bacteria free. It’s eco-friendly and indoor friendly, better water retention, healthier for the plant and for human being.
2. The process and steps of making it
Mixing the soils:
No need to mix the soil, only uses Coconut Coir; it’s simple, neat & clean.
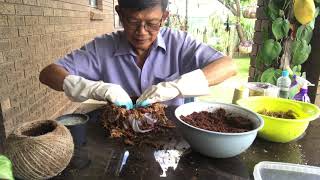
Forming the Ball:
The process is very simple. I use a sheaf or a bowl shape utensil as a tool to form the ball. The size of the ball is measured by the size of the sheaf! I could easily triple the size of what the bare hand could handle. Also, the size of the ball is consistent, could be standardized by the size of the sheaf.
Wrapping the Ball with Sphagnum Moss :
The problem is resolved simply by placing a piece of cloth over the sheaf, lay the layer of Sphagnum Moss in the sheaf, then fill in the Coir!
Planting the plant:
The process is very simple and humane; complete the Kokedama Planter Shell then plant the plant in the Shell!
Firstly, Complete the Kokedama Planter Shell
1. Fill the Coir on top of the Sphagnum Moss in the sheaf to half full.
2. Press the Coir against the Sphagnum Moss all round to create a crater.
3. Place a small pot in the crater.
4.Press the pot down tightly, fill and press in the Coir around the pot to form the upper half of the ball.
5. Tug in Sphagnum Moss around the top part of the pot. Cover the upper half of the Coir ball with Sphagnum Moss.
6.Fold up the cloth, use the cloth to tighten the ball. Unfold the cloth, use the sawing tread to secure the upper half of the ball from falling apart.
7. Hold the two side of the cloth to take out the ball.
8. Use the cloth to flip the bottom part of the ball to the upside.
9. use the sawing tread to secure the other half of the ball from falling apart. Shape the ball.
10. Twine the ball with Jute Twine in such a way to create a flat base.
11. Cut the twine, tie the knot.
12. Take out the pot inside the ball to form the Planter Shell.
Secondly, Plant the plant inside the Shell:
1. Get rid the soil of the plant as much as possible (you don’t want to bring in the dirt together with the bacteria and toxic chemicals into your home)! Wash the root part of the plant, trim away the extra roots if necessary, to fit in the size of the kokedama’s Shell.
2. Put in a soft layer of Coir in the planter shell.
3. Placed and spread nicely the root part of the plant gently into the shell.
3. Cover the roots with coir, water down the coir, allow the coir to saturate. Top up more coir to the level that there’s a crater around the plant.
4. Top up the crater with little pebbles!
Could you imagine how you feel if you are the plant when you realized that your creator hand made a Lovely Agape kokedama Planter Shell then place you gently in the Shell and allow you to continue to grow in there comfortably for many years to come.
3.Watering and Caring
Easy and preserve the original beauty.
1. Because there’s a crater created around the plant, so you could water the plant the normal way.
2. The original beauty of the kokedama is preserved.
3. Because there’s a flat crater base, it could sit stably anywhere without support!
Watering and Caring for your Agape Kokedama Plant:
1. Simply water into the crater.
2. On the average, you only need to water the kokedama’ plant once a week.
3. When you water the kokedama’ plant, you need to water it thoroughly to saturate the inner core of the ball. During the first couple of time, feel the bottom as you water, when it’s wet, means it’s too much. Water a little bit less the next time, until the bottom don't get wet!
4. Caution, you don’t water the plant a little bit a day or every day. If you do that, the roots close to the crater will rot and other part of the roots will dry up!
5. Caring: Some kind of plant may need special care. Please refer to the relevant detail instructions. In general, place the indoor plant near the window, avoid direct sunlight.
6. Fertilizing: Put slow release fertilizer around the edges of the crater once a few months.
Hope you find this helpful.
Agape Kokedamas Organic Planter Shell is a registered Trademark with Innovation Patent granted by IP Australia.


Информация по комментариям в разработке