Click for more info and reviews of this CURT Trailer Hitch:
https://www.etrailer.com/Trailer-Hitc...
https://www.etrailer.com
Don’t forget to subscribe!
/ etrailertv
Full transcript: https://www.etrailer.com/tv-install-c...
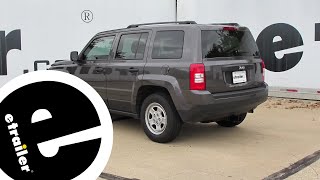
Hello neighbors, it's Brad here at etrailer. And today we're taking a look at installing the Curt Trailer Hitch Receiver on a 2019 Chrysler Pacifica. Now this is what your hitch is gonna look like when it's installed and the great part about this hitch is it is a hidden cross tube, meaning the only thing that you're gonna see once it's installed is gonna be the receiver opening and this one, being a 2" by 2" receiver tube opening, is a great size. You're gonna have tons of options available for bike racks, cargo carriers or even a ball mount if you're looking to tow. Now all of those accessories are gonna stay in place with a 5/8" pin and clip. And the hitch does not come with a pin and clip.
A lot of times when you pick up accessories, they'll come with one, if you want to pick up an extra or a locking pin clip, we actually have those available here at etrailer. I really like the locking ones, because once you put your accessory in place, you could lock it in and know that no one's gonna walk away with your accessories. Your rolled style safety chain loops mean that hooking up safety chains on a trailer are gonna be nice and easy whether it be a larger clevis style or even a standard S hook, it's nice and open. And speaking of towing, you have some decent weight capacities here. Your gross trailer weight rating is your trailer plus the accessories loaded onto it.
And this is gonna be rated at 4,000 pounds, which is pretty good. You also have a tongue weight rating of 400 pounds, which is gonna be that downward pressure that's put on the inside of the receiver tube opening, so that's gonna be your cargo carriers, your bike racks. And with that weight limit, you can really load it up. You could probably get a four bike bike rack loaded on here with no problem. Now this can be used with weight distribution hitch, and it is gonna bump those numbers up a little bit.
Your gross trailer weight rating is gonna go to 5,000 pounds and your tongue weight will be 500. Now keep in mind you want to check your vehicle's owner's manual to see what the Pacifica is actually capable of towing and then compare that with the hitch and take the lower of those two numbers so you stay safe. Few quick measurements here, from the center of the hitch pin hole to the furthest point of the rear fascia, we're looking at 6" and this is gonna be important for some of your folding accessories like your cargo carrier bike racks when they're in a stowed position, you wanna make sure they don't make contact with your rear fascia or that you can fold them up in general. So keep that in mind when choosing accessories. And we're also gonna get our ground clearance here, which comes in right at about a foot.
And that's gonna be important if you are picking up a ball mount to measure the coupler of your trailer, and with that measurement you should be able to determine if you need a rise or a drop to be able to hook up to that. Now also keep in mind, if you have a cargo carrier bike rack added on here, with that 12 inches, you do wanna be careful as you go up an incline or if you're going on any rocky or rough terrain as that will want to tilt towards the ground and it can damage your accessories while loaded, so just keep that in mind. Now as far as the installation goes, this one isn't too terrible. You do have to trim a heat shield as well as the underbody panel and lower down your exhaust to be able to get the hitch in place. But really we're gonna be just fish wiring in some hardware, lifting it up, bolting in, and getting everything back once it's all trimmed. So I'm gonna walk you through all the steps to make sure that you get your hitch installed. Let's take a look at that. Our installation is gonna begin underneath the vehicle where we are gonna be removing this large underbody panel and there's a series of three different types of tools we'll need so we'll need a 8 millimeter, a 10 millimeter as well as a flathead screwdriver to get this taken down. So I'm gonna start with my 8 millimeter. Now we're on a lift so you guys can see this at home. But again, with all of this you should be able to do this in your driveway or garage. And starting on this outside edge, you'll see that there's an 8 millimeter screw and as you work along, you should find the other ones along here. And then also once we get to this inner liner here, there's gonna be looks like two of them vertical and then one of them that's gonna be kind of in the wheel well so you may need a small ratcheting wrench or a very small ratchet to get in there as it can get a little bit tight. (tool buzzes) And


![[playlist] 뉴욕 시내 카페에서 울려퍼지는 재즈 음악이 멋진 커피 공간을 만들어줍니다 | Cafe JAZZ](https://i.ytimg.com/vi/i7RXNWB3VL8/mqdefault.jpg)
Информация по комментариям в разработке