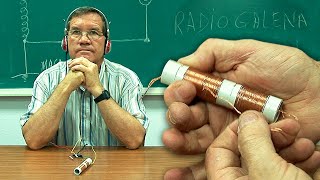
How to make a DIY crystal radio - no batteries, no external power. Step by step.
No special tools or skills. Most parts can be had from recycled things. The purchased parts run about $3. Good during power failures, when batteries are not available, for prepping, etc.
Depending on your design (coil mostly) it can receive in the AM broadcast band, approximately 535 to 1600 kHz.
See Warnings below.
Crystal Radio-Winding The Coil (ABRIDGED) • Crystal Radio-Winding The Coil (ABRID...
Crystal Radio Coil Sizing • Crystal Radio Coil Sizing (4K)
Mount Ball-Knob Handle On Steel Shaft • Mount Ball-Knob Handle On Steel Shaft
Crystal Radio Antenna • Crystal Radio Antenna (Shortwave Also)
Crystal Radio 3D Printable Parts • Crystal Radio 3D Printable Parts (4K)
My Crystal Radio Does NOT Work (FIXES for common problems) • My Crystal Radio Does NOT Work (FIXES...
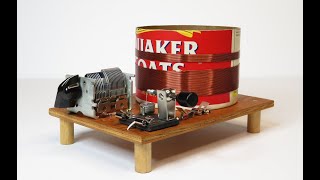
This one is loosely based on the Cub Scout / Wolf Scout / Boy Scout crystal radio design.
OPERATION TIPS & TRICKS
- A good antenna is important. Longer is usually better (see antenna warning below), a good ground is next most important.
- With some stations, you can put a finger or 2 or 3 inside the tuner coil to improve reception. Move them around for best reception.
- A finger near the coil can also improve reception. Touching the coil directly usually lowers sound volume, BUT a piece of paper or thin plastic between finger and coil often improves sound / tuning. Move finger around.
- Touching different parts of the radio or getting near them can affect performance.
TOOLS
- Screw driver
- Knife
- Sandpaper (small piece, fine)
- Saw, if you do not have the wood & tube already cut
- Hand drill for screw holes
- (Optional) Soldering iron, solder
MATERIALS
- 1 x Germanium Crystal Diode (1N34A)(bought: Amazon, Digikey, Jameco, Mouser...)
- 1 x Resistor (10k ohm)(bought: ditto)
- 1 x Crystal earphone (can NOT be other type)(bought: Amazon, Jaycar, Jameco?) MUST be like the type in the video. Regular iPod or similar will NOT work.
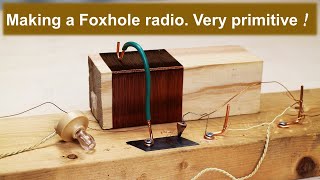
- 1 x Base 21 x 17.5 cms x 2 cms thick or more (wood scrap)
- 1 x PVC pipe 15 cms long or stiff cardboard tube x 2 inch diameter
- 1 x motorcycle / bicycle spoke, 2mm diameter or brass rod or stainless rod
- Enameled bell wire (can be from old transformer, solenoid, ...) (note: I used 0.91 mm or 19 AWG.)
- Screws, stainless or brass (6 for wire hold downs, 2+ for coil mounting),
- Fahnestock clips (2) (bought: Amazon & electrical shops). OR brass washers (13) (bought, hardware store)
- 3 stainless fender washers for wiper.
- 1 bigger, large head screw for wiper.
- 1 felt washer (chair foot floor protector. Hardware Store)
ANTENNA & GROUND
- Antenna are just a long piece of wire (I use scrap wire from old transformers). The longer the better.
- Try different lengths and orientations (vertical, horizontal)
- A good ground helps. A wire to a ground rod is good. Metal water pipes also work well.
NOTES:
- The resistor is necessary to get the best sound from these "new" crystal earphones. The new ones are piezoelectric and have lots of capacitance. Without the resistor the charge builds up then discharges so you get constant "static" sounds. The resistor bleeds off charge so you get louder, and much clearer sound.
- Also called a foxhole radio.
WARNINGS:
- Never connect radio to any source of power. Not house current, nor batteries, nothing!
- Never use the radio during lightning storms.
- Never run an antenna over or near power lines.
- Disconnect antenna and put lead outside when not in use.
- Never ground to electrical items, plugs or similar.
- If you don't know, don't do it.
INTERESTING LINKS
Air Core: http://www.circuits.dk/single-layer-a...
OTHER CRYSTAL RADIO VIDEOS
- Connect DC Amplifier to Crystal Radio • Connect DC Audio Amplifier To Your Cr...
▬ Contents of this video ▬▬▬▬▬▬▬▬▬▬
00:00 Intro
00:41 Upgrades From The Original
01:32 First The Coil!
03:43 Bases: Wood, Plastic, Hybrid
05:05 Tower
06:24 Marking The Wood Pillow Blocks
08:18 Making Wood Pillow Blocks
17:41 Coil & Tower 3D Printed
17:59 Hybrid Pillow Blocks & Tower
19:39 Coil Mounting: Wood
20:53 Coil Mounting: Wood, Measuring & Marking the Base
24:55 3D Printed Tower Mount
25:43 Wood Tower Mount
26:50 Summary of all to this point
27:13 Electrical Wiring Overview
27:53 Fahnestock Clips
28:49 Brass Washer Connectors
30:10 3D Printed Tower Wiring
33:49 Stripping Insulation From Enameled Wires
35:40 Wiring the brass washer connections
36:10 Wiring summary/testing
36:49 Wood base wiring
41:52 Wood base wiring done/review
42:49 Compare 3D base/Wood base
43:05 Make the wipers
50:15 Mount the wipers
51:26 Wiper, length & Knob
52:12 Sand Coil
54:15 Add last components
57:19 Quick Demo


Информация по комментариям в разработке