Want a Guns and Guitars shirt? buy one here: https://teespring.com/stores/guns-and...
Facebook: / gunsandguitarsofficial
Instagram @gunsandguitarsofficial
Support me on Patreon: / danthompson
*Prices mentioned in this video are subject to change without notice. Please check the links below for current pricing.
Here are the links to tools and components I mentioned:
Basic Dremel tool:
https://www.amazon.com/gp/product/B00...
Black and Decker rotary tool (better and cheaper than the dremel, I have this one too and love it):
https://www.amazon.com/gp/product/B00...
WEN brand, the cheapest and comes with flex shaft:
https://www.amazon.com/gp/product/B00...
Multi Purpose Cutting Kit (Routing kit):
https://www.amazon.com/gp/product/B00...
TRS 1/4" output jack:
https://www.amazon.com/gp/product/B00...
Here is the best deal on this preamp:
https://www.amazon.com/gp/product/B00...
These are the dpdt switches I use
https://www.amazon.com/gp/product/B01...
Full disclosure: I am an Amazon Associate, and the links in this description are affiliate links, which means that if you make a purchase, it doesn't cost you any more money, but I will earn a commission.
The easiest way to install a preamp in a bass is to install it under the pickguard, but that's not always an option. You might not have enough room under your pickguard for the extra wiring or battery, or your bass just may not have a pickguard. So to be extra thorough, I'm gonna show you a mixture of both!
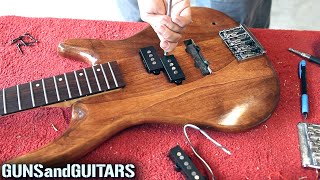
Start by planning out your installation. Choose where you want your extra knobs and switches to go. Keep in mind how much wire length you have, and where you're going to put your battery. I'm going to install the preamp and switch into the body, and the battery under the pickguard. Before I start drilling and routing, I like to cover the component cavities with tape while I'm doing this so that no unnecessary saw dust ends up in there. Now. match up your components to the appropriate size drill bit, and drill holes for your components in the place you decided for your install, either in the body, like me, or in your pickguard. If you're installing it in the body, you'll need to route out some material from the back of your bass in order to make room for all your components. Don't worry, we will make a nice cover plate to hide the new cavity later. If you are installing everything under your pickguard, you can skip this step entirely. For routing, I'm using my dremel tool with the multi purpose cutting kit just like I did for the extra pickup cavities in this bass. Dremels are not expensive, this one was only $20, and it's an awesome investment, so pick one up if you don't have a router already.. You'll get way more use out of this thing doing other tasks than you will with a standard router that costs 3-4 times the price. I put a link in the description for you. Next, drill a hole from your new cavity into the existing component cavity that houses your volume and tone controls so that you can feed wires thru between the two cavities. Last thing before we start wiring this thing together, I'm going to quickly make a cover plate. You can make this out of the placard material used for pickguards, but I like to make mine out of wood, so I picked up this small plank of 3/16 basswood from my local craft shop. Just make an eyeball measurement of how big it needs to be to cover your cavity, cut it to size, and an optional step for a cleaner look, route out a thin area the size of the cover plate so that it can mount flush with the body. Not necessary, just looks a little nicer and more professional. Last I like to paint or stain the new cover to match the body.
Okay now we can wire it up.
...continue reading the blog version at gunsandguitars.net


Информация по комментариям в разработке