How to test iStartek RFID Reader on VT200-L GPS Tracker
Hello Everybody
This is Matthew from iStartek an advanced quality manufacturer of 2G 3G 4G GPS Tracker since 2015
Today we gonna show you how to connect RFID CARD READER to VT200-L GPS Tracker at your office before you make an actual installation in your vehicle
STEP ONE: IS ABOUT TOOLS PREPARATION:
You need one COMPUTER, one Cell phone with Two Sim Card
One VT200-L GPS Tracker, you need one BUZZER, you need one relay, you can use 12v or 24v, You need USB Cable for online configurations
You need RFID CAR READER with ID CARD and you need 12V POWER SUPPLY
STEP TWO: IS ABOUT ONLINE CONFIGURATIONS
Thanks for choosing iStartek GPS Tracker, let us guide you how to configure our 4G GPS Tracker VT200-L and our 2G GPS Tracker VT200.
-After you receive samples, please contact iStartek to get password to download User Manual and software from our official website.
Please find the USB driver for computer with Windows system, and install it. If your computer is using MAC or Vista system, please contact us for other USB driver. And then install iStartek Parameter Editor, and open it.
Now Please connect your GPS Tracker to Parameter Editor by iStartek USB cable, and then now you can choose the right COM PORT, and click “OPEN”, now let us switch on the GPS Tracker, and you see the two LED will be fixed, and here shows connected. Now let us click “read all” , so we can see the tracker information, such as SN, IMEI and firmware. Click “GPRS”, we can see it support 2 GPRS servers, so we can set server IP, Port here. After we configure it, please click “write” to save all the configurations.
If you want to enable GPRS/SMS alarm, you can directly set in Parameter Editor. GPRS 1 means server 1, GPRS 2 means server 2, authorized number1, 2, 3 are for phone numbers to receive SMS alarms. And also you can enable GPRS event to trigger output 1 and output 2. For example, if you want to set authorized ID to control car ignition ON/OFF, you can enable GPRS event 53 right here and its OUTPUT 1. and after you make all the configurations please click “write” to save your configurations.
STEP THREE : IS ABOUT MAKING WIRE CONNECTION
We use a buzzer alarm to remind the relay status.
You connect RFID to RS232 port from GPS Tracker
There are two red wires and two black wire from our VT200-L GPS Tracker, so please find the right red wire and black wire for power supply, and you connect to 12V, and you connect the black wire to GND.
Yellow wire which is output 1 from GPS Tracker is to be connected to the relay yellow wire from relay.
Relay white wire should be connected to 12V power supply.
as you can see we have 2 green wires 87A and 30, the two wires shall be connected to the power supply for fuel tank, so it can control the power supply for the fuel tank.
The ORANGE wire from GPS Tracker which is Input 2, should be connected to ACC wire.
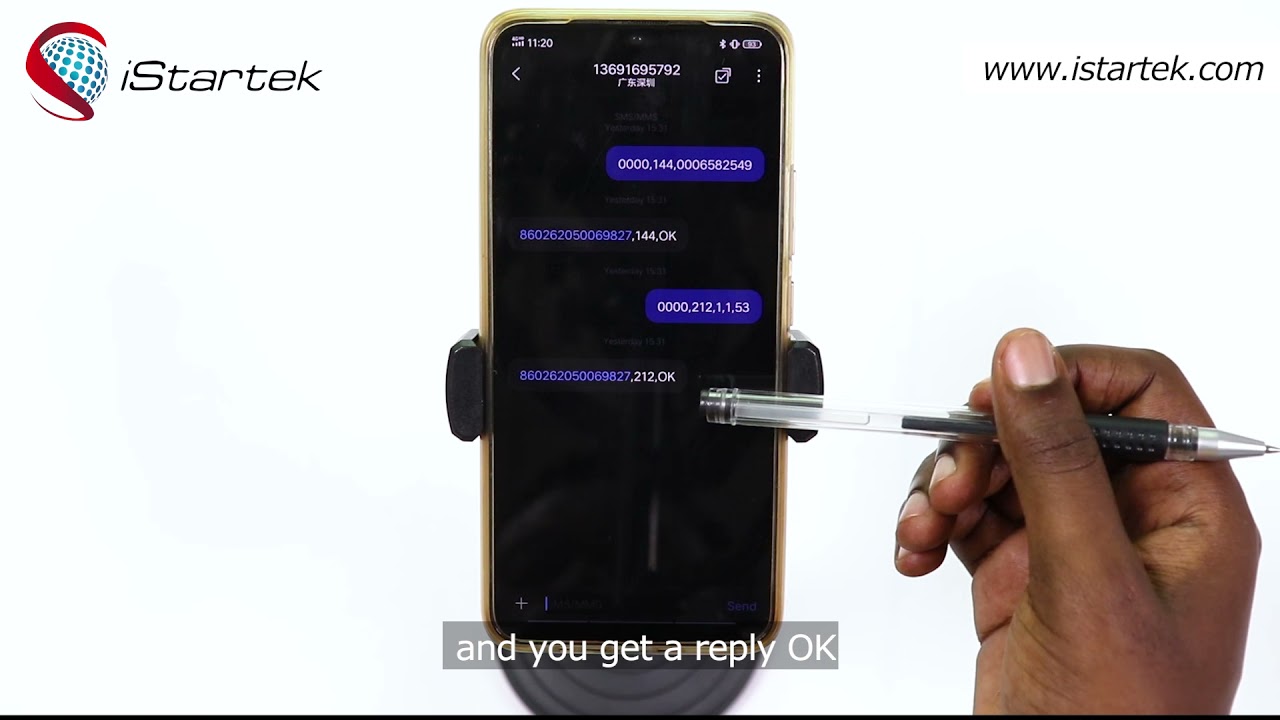
If you want to use RFID Reader to control your car ignition power supply, then we shall set the SMS command. Firstly, we shall set the authorized ID number, so we use 144 SMS command to configure the ID number as the authorized one, you send this SMS command format to GPS Tracker Sim card and the reply will be OK, means that it has been authorized and then we use 212 SMS command to set the OUTPUT1 to control the vehicle power supply by the authorized ID number, and ou send this SMS command format to GPS Tracker Sim card and you get a reply OK.
LAST STEP: IS ABOUT TO TEST OUR RFID WORKING PRINCIPLE
After the SMS configuration, We have to connect 12V to our GPS Tracker power wire, and the buzzer will start alarming immediately to remind you that the wires connections have been done properly. After that, we shall connect the 12V power to the orange wire which is Input 2 from GPS Tracker and the buzzer will stop alarming, meaning that ignition ON, so in this way you need swipe the authorized card to recover the power supply. Now let us do some testing. Connect 12V to the wires from GPS Tracker and you connect Input 2 now you need swipe the ID card to recover the power.
It’s our pleasure to have you in istartek family, for more information you may visit our website: www.istartek.com, thank you for watching, see you next time.
http://www.car-gpstrackers.com
http://www.istartek.com/
Contact Information
Call us:+86-755-85241929
Mail:[email protected]
Phone:+86-13302926991

Информация по комментариям в разработке