Watch the new video course 1C Development basics
• 1C Development Basics. Junior Course
In this part, we will discuss the items we have not covered in the main part on the DCS, and I will show you some useful things that are not obvious at first glance.
So, let us create a small report to display data from the tabular section in document Purchases
Here we take two tables to be used in the query plus all the fields of the tabular section in document Purchases. On tab Joins, we define how tables relate to each other
But why add table Purchases and set up an internal join? In tab Order, we set the order of fields to be displayed. And it is the reason we need the above-mentioned join
And now we are getting to the new cool stuff. One of the functions of tab Data composition is to indicate optional conditions and tables. Let us see how it works
In tab Conditions, we add field Date and manually set up the conditions as follows. By using parameters for attribute Date, we can select documents within the date range
Still, I hope you remember that previously we added parameters in a different tab. What is the difference? Let us take a closer look at the text of our query
Note the curly brackets. They enclose optional parts of the query. For example, if we do not specify any parameter, the final query in the DCS should look like this
There are no parameters, and there is nothing to process. If you specify only one parameter, the query turns into this
Note that in the main report, we used parentheses to mark conditions. Thus, these conditions are independent of each other. Should we remove the parentheses and add service words AND or OR, we get a single complex condition. The system returns an error if we try to specify only one parameter.
Optional joins for tables work the same way. For example, if some table fields are not used anywhere (in SELECT or ORDER BY, or anywhere else), the platform ignores this link, and the query becomes something like this
As we no longer use the second table with ORDER BY or WHERE there is no need for a join anymore.
So, we have completed the query part and learned something new about tab Data composition and about how to mark optional parts in queries.
Time to go to the data composition schema. Here we define resource Amount for calculating the total amount spent
One more helpful thing. There are two parameters in tab Parameters of the data composition schema. When using the report, developers or users must specify period start and end dates. To make their lives easier, we create a new parameter that is not present in the query
So, what have we got? Instead of two parameters, StartDate and EndDate, in the report, we need to specify only one parameter, namely a period of type StandardPeriod. The platform calculates the query parameters based on parameter Period utilizing functions BeginOfPeriod and EndOfPeriod we know so well, and also properties of type StandardPeriod, namely EndDate and StartDate
You will learn more about the advantages of this data type as we proceed, and now we go to the last tab, where we want to configure the report layout.
Things here are not as straightforward as they might seem. Instead of using the settings wizard, we do everything manually. We start with creating groups
We need this group for grouping data by documents, while the next group Detailed records should help with grouping and displaying the remaining fields
Our next step is to assign names to our groups. It should help when we proceed to create our template. Right-click the desired group and select Set name. Group Ref gets Document for the name, and Detailed records gets Row
Now let us add fields to our groups. For reference, this should be field Ref
Uncheck Auto to prevent auto-filling this group with fields.
And for Detailed records, the fields can be anything we want
And the final touch is to go to tab Parameters and grant users the right to change this parameter
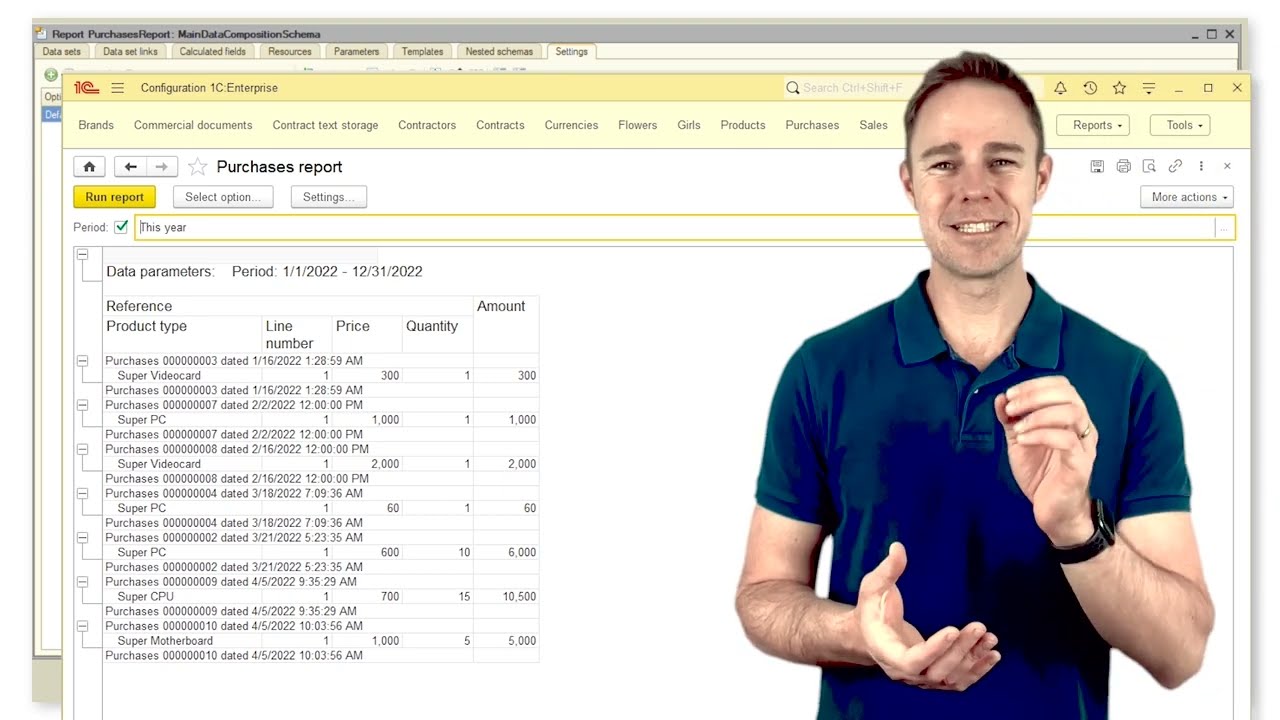
Time to check what we get in 1C:Enterprise mode
The thing that strikes the eye is that since parameter Period is optional, we can skip it and get all documents Purchases in the report. Second, if we still want to specify a period, the platform opens a dedicated form where we can do it
Here, we can specify the period’s beginning and end or select months and years with a mouse. And by clicking the button Show standard periods, we get a whole list of standard periods to choose from
This is the advantage of type StandardPeriod.

Информация по комментариям в разработке