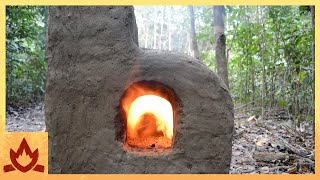
On the New Moon of February 9th, 2024, I fired up my very own small scale wood fired kiln!
It's been a long held dream of 35 years and, when I finally got up the gumption to go for it, it took almost a full 2 years to collect all the materials, get the pole barn built and to finally construct the kiln.
I was first introduced to wood fired kilns back in the spring of 1989 when we were living in Davenport, CA. I got invited to participate in the firing of pottery legend Daniel Rhodes' two chamber Noborigama. For a variety of reasons, that firing turned out to be a life changing event, establishing my love of wood fired pots and setting me onto the creative, Tending a Handmade Life path I travel today.
The seed was planted ... so I waited and waited and knew when we bought our current little cabin and 7 acres in the mountains of Western North Carolina, this would be the place for my wood fired kiln dreams to come true.
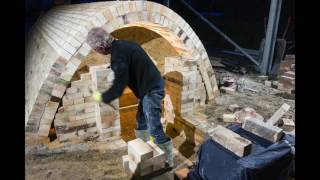
But what would that kiln look like? Pretty much everything I could find online or in books revolved around complex designs and construction. About 3 years ago, I found a link to plans for a small scale wood fired kiln called the Backyard Kiln, designed by the late Steve Mills. Also known as the Philosopher's Kiln, it's a top loading/coffin style, designed to be easily and inexpensively constructed with regular house bricks and to be fired in one day with one or two people.
Amazingly, there was a free PDF with very precise details including a thorough materials list. Turns out the PDF had been turned into a little book as well. Here are links for both:
Free PDF: https://stevemillsmudslinger.weebly.c...
Book with better pictures and easy to use layout: https://tinyurl.com/yc6kuvkh
I very much wanted to build my kiln on the cheap, but was reluctant to use house bricks. New fire bricks for even such a small kiln would have run close to $2500 for just the bricks; shipping or driving hours to pick them up added even more to the cost. Feeling like a blessing from the Universe, I am fortunate enough to have a potter friend/benefactor/mentor gift me with all the bricks, a combination of hard and soft brick in a variety of sizes and shapes, as well as the kiln door plus several cordierite shelves for the damper and extra insulation inside the chamber.
The next big hurdle was getting a pole barn constructed. Thankfully, my husband Dave is a pretty decent carpenter. He retired from his full-time job last spring and we finally got to work on the barn last summer. A bigger challenge was finding budget silicon carbide kiln shelves. New ones in the size I needed run about $150 each plus shipping, which is a dicey proposition and very expensive. I scoured FB Marketplace, Craigslist and all other avenues I could think of. I finally connected with a regional FaceBook clay group and found my budget shelves for inside the kiln chamber, the lid and fire box lintels.
With my hodge-podge of bricks and materials, it took quite a bit of trial and error and a lot of angle-grinder cutting to make the best use of everything and configure how to use the handmade kiln door. I got started on building the kiln in mid-December and, after holiday and weather delays, finished the first week of February.
The dimensions from angle iron to angle iron of my little kiln:
68" long x 38" wide (includes 5" of insulating bricks) x 44" tall (from base layer to top of chamber)
Chimney is 78" from base of chamber to top which rises 13" above the metal roof and is approximately 7" above the tallest point of the roofline.
Chamber dimensions: 45" long, 32" shelf space with 13" opening at end for air, 16" wide x 16" deep. Works out to about 4.7 cu/ft of loading space.
For those of you looking for a lot more specific information, here's the link to Part 2, • Part 2, Building a Small Scale Wood F... . The video is short and most of the specific info is in the written description, but you get a better look at how I put it all together.
There were quite a few other components and expenses involved. In Part 2 of this video series, I have more deets on bricks, shelves, miscellaneous materials and costs, design changes and other specifics to help the next person build their own small scale wood fired Backyard Kiln.
Be sure to check out the great Philosopher's Kiln build, part 2, the details!
. . . . . . . . . . . . . . . . .
#woodfiredkiln #wildclay #womenwhowoodfire


Информация по комментариям в разработке