Click for more info and reviews of this BAK Industries Tonneau Covers:
https://www.etrailer.com/Tonneau-Cove...
Check out some similar Tonneau Covers options:
https://www.etrailer.com/fitguidetonn...
Search for other popular Toyota Tundra parts and accessories:
https://www.etrailer.com/vehicle/2014...
https://www.etrailer.com
Don’t forget to subscribe!
/ etrailertv
Full transcript: https://www.etrailer.com/tv-install-b...
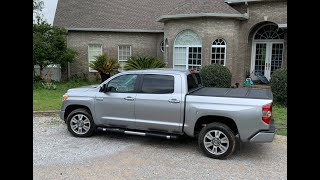
Today on our 2014 Toyota Tundra, we'll be taking a look at and installing the Bakflip G2 Hard Tonneau Cover, part number BAK26410T. The Bakflip G2 is the right solution for covering your cargo in the back of your pickup. This aero-dynamic, low profile cover is an easy, no drill installation. It simply uses clamps and secures up underneath our raised truck bed side rails. The four panels have an insulated core to add strength, and have a black paint UV-resistant finish, so it's going to stand up to the elements. It features matte black rubber seals around the surrounding edge to help keep out water.
It can be folded and stowed three ways, and even propped up against your cab while you're on the road. It uses prop rods to keep it in place up against the cab, which can be stored away in these clips here when not in use. It uses an integrated draining system to help direct the water away from inside the bed. Now that we've got all the features, I'll go ahead and show you how to get it installed. Now our Tundra here comes with a pre-existing rail system as you see here. First thing we do is get that taken off.
Now we're just going to be removing the two side rails on the walls of the truck. We're not going to touch the one in the bulk head. We've got six bolts in each one, let's go ahead and get started. Now with all the bolts removed, it appears that our rail is still being held in place by a push-pin fastener, so we're just going to pull it off nice and easy. We're going to set that aside, along with our hardware, because we're going to reuse it. Now keep in mind everything we do here, we're just going to repeat the same process on the other wall.
With both rails removed, the next step is to get our brackets installed on the rails, so it's going to be easiest to just go ahead and remove these anchor points here. We'll make sure that they're unscrewed, we'll push in, and slide them off the rail. Once we get to the end we can just take off the end cap. We can also take off the push-pin fasteners, because we won't be needing them. Slide them to the side and take them off. Let's go ahead and put on our six brackets.
We'll start with one bracket. We're going to grab our bolt, put on our washer- Then we can grab our bracket, put our bolt with our washer through, and we'll grab our rail. We're going to go through our first hole just like that. We're going to turn it over and put on our lock nut. All right, now let's go ahead and loosely install the other five. Now with all the brackets loosely installed, let's go ahead and tighten them down. We're going to need a 7/16ths wrench, and a 7/16ths socket. We'll use the wrench on the underside to hold that in place, and we'll take our socket on top. Now when tightening these down, it's important to make sure that your bracket stays up vertical as you see here. Seems pretty good, now we'll just work our way up. Now with all of our brackets tightened down, let's go ahead and take off our end cap and put our tie-downs back on. The reason why we're going to do this now is because it might be kind of difficult to put them on once we have our rail back where it needs to be. We're going to put this one on, we're going to send it all the way down, and then we'll put on our other one. Put our end cap back on. We'll lift up the rail, with the brackets, and we'll line up our old holes. We're going to start right here in the center. We'll take our old hardware, and thread that through. Now with our rail hand-tightened, let's go ahead and snug it up. You can use a socket wrench to do so. I'm using a T30 torque bit, and I'm using a screw gun at a low torque setting, that way I can ensure I don't strip it out. Great, now all we've got to do is repeat that same process on the other side. With both of our rails reinstalled with our brackets, we can go ahead and proceed with the installation of our Bakflip Tonneau cover. Next we'll get our weather strip installed on our front bulkhead. If your drop-in bed liner covers this, you don't have to use it. We'll first clean it off with some alcohol. Now we can grab our weather stripping and we're going to cut it to fit at our bulkhead here. We'll start right here, make sure it's in position, and bring it on over. There we go, so I'm going to cut it right there. We'll just check it and make sure it fits. I'd say we're good, let's go ahead and pull that back, and then we'll put it in pl


Информация по комментариям в разработке