This is a 5-day compilation of timelapse videos taken during the replacement of my driveway, including the install of 13 pex loops for radiant snow melt. Each individual day can also be viewed in separate videos with more detail and walkthrough's by clicking the links below:
Chapters:
00:00 - Time-lapse Day 1 - Demo & Remove Old Driveway
Day 1 Full Video: • How to Remove a Concrete Driveway - M...
Day 1 involved drilling 12" diameter holes 48" deep for a future deck, followed by removing the existing driveway (partial concrete, partial asphalt), as well as removing the existing concrete sidewalks, walkways, and aprons. In order to get the PEX into the basement, we had to expose an existing 6" PVC pipe containing the existing PEX lines from the garage floor. I installed (2) 4" saddle wye's onto this pipe.
Actual Day 2 was not shown in this video, since there was no time-lapse and just a walkthrough. You can watch the full overview of Day 2 here:
Day 2 Full video: • New Concrete Heated Driveway (Setting...
01:04 - Time-lapse Day 2 (Actual Day 3) - Set Trench Drains, Form & Prep Base, Start Installation of 2" Foam Board Insulation
Day 3 Full video: • Finish the Forms & Install Insulation...
Day 3 involved pitching and tamping the entire base, followed by setting the 2x8 forms. Next we pitched and pinned the trench drains along the house. Then a lighter stone was brought in to help properly pitch the 2" rigid foam board, and before blocking access to the back yard with the foam board, we poured the sonotubes for the future deck.
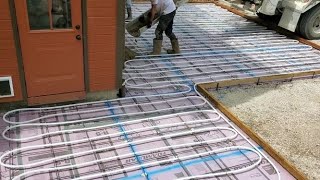
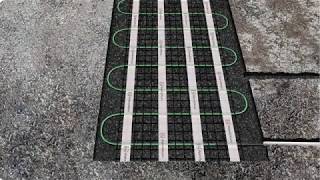
01:31 - Time-lapse Day 3 (Actual Day 4) - Finish Installing Foam Board Insulation, Install 6x6 Wire Mesh, Begin Installation of Snowmelt Loops
Day 4 Full video: • Layout & Installation of the PEX Loop...
Day 4 Started with finishing the foam board and wrapping up some misc items such as expansion joint, etc. We then installed flat 6x6 wire mesh so that I could zip tie the PEX down. The 4" PVC pipes leading down to the 6" pipe and into the basement were cut flush with the top of the foam board insulation. I started installing the PEX loops.
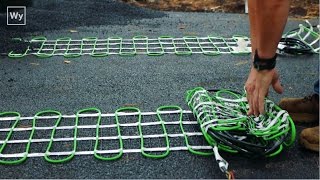
02:43 - Time-lapse Day 4 (Actual Day 5) - Finish Installing Snowmelt Loops
Day 5 Full video: • Finish Installing Pex Snow Melt Loops...
Day 5 Consisted of finishing all of the Snowmelt loops for the heated driveway. Total there are 13 loops of 5/8" PEX, at approximately 225' each. I also installed conduit to bring power to the opposite side of the driveway for any future needs, as well as the Tekmar sensor socket for future automation of the system if desired. In the basement, I connected all 13 loops together, and pressurized the entire system to 80 psi.
03:26 - Time-lapse Day 5 (Actual Day 6) - Pour New 5" Thick Heated Concrete Driveway
Day 6 Full video: • How to pour a Heated Concrete Drivewa...
Day 6 was pour day. To start I checked the pressure gauge from overnight. It did not loose even 1 psi. The pressure was reduced to 60 psi for the pour. We laid down several sheets of 3/4" plywood over the pex, to prevent the motorized power buggies from damaging it. Throughout the pour, I continuously checked the pressure gauge. It did not move. The concrete is 5" thick above the insulation, and 7" thick along the outside edges. The small pieces of foam seen in the video between the forms were removed as the concrete was poured. The concrete included fiber mesh, and the expansion joints were hand tooled in rather than saw cut, to prevent accidentally hitting a lifted PEX pipe. A 12" border was stamped with a slate pattern from the sidewalk back, antiqued gray, and the entire driveway was sealed.
Below are links to several items that I used to build the system. As an Amazon Associate I earn from qualifying purchases.
Products:
-Takagi T-H3-DV-N Tankless Water Heaters (2): https://amzn.to/3Fe6nbu
-3" Diversitech Concentric Vent Kits (2): https://amzn.to/32ja8h2
-Taco 0013-SF3 Circulator Pump Stainless Steel (3): https://amzn.to/3yVwtOh
-100 Plate Flat Plate Heat Exchanger 400,000 BTU's: https://amzn.to/3pbMlsE
-Enbrighten Z-Wave Plus Smart Light Switch with SimpleWire (2): https://amzn.to/3sj3p1G
-Wayne PC4 1/2 HP Cast Iron Pump for Filling: https://amzn.to/32L4Xqk
-Ranco ETC-111000 Digital Temperature Controls (5): https://amzn.to/3HknvNj
-Rubber Washing Machine Fill Hoses, 3/4 inch FHT, 8 Ft: https://amzn.to/3mGUzXZ
Tools:
-12" Adjustable Wrenches (2): https://amzn.to/3HhAzTF
-Rectorseal No. 5 Pipe Thread Sealant: https://amzn.to/3HiR0Px
-High Intensity Trigger Start Mapp Gas Torch Head: https://amzn.to/3z6l0LE
-14.1 oz Bernzomatic Pre-Filled MAP-Pro Gas Torch Style Cylinders (2): https://amzn.to/3EEA1FM
-Oatey 29025 Safe-Flo Wire Solder, 1 Lb Bulk, Solid, Gray, Silver: https://amzn.to/3z6PWLI
-9'' x 12'' Welding Pad Protector, Carbon Felt Torch Soldering Heat Shield, High Temp Flame--Resistant Fabric, Plumbers Pad: https://amzn.to/3Hk9y22
My Heated Driveway / Snowmelt playlist: • Heated Driveway / Snow Melt System De...
#heateddriveway #snowmelt #buffalo #timelapse


Информация по комментариям в разработке