Where to Buy: http://bit.ly/18RAM1500
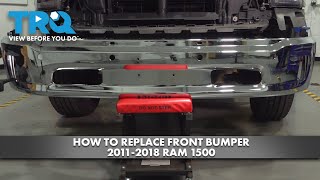
Let's do it! Learn how to replace your 14-18 Dodge Ram front bumper cover with our complete easy step-by-step guide. We provide brand new painted auto parts shipped straight to you!
0:00 Start
0:05 Intro
0:12 Tools needed
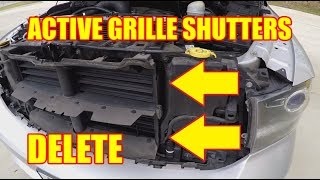
0:35 Remove the radiator cover
1:42 Remove the front grille
3:24 Remove the clips/bolts near the wheel well
8:10 Remove the bottom bumper bolts
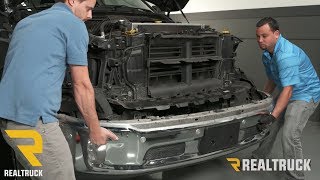
8:55 Dismount the bumper
9:35 Disconnect the fog lights & wire harness
11:00 Remove the lower bumper valance
14:09 Take off the lower grille
14:31 Remove the parking sensors
15:58 Install the lower bumper grille
17:05 Insert the lower valance (use rivets)
19:24 Pop in the sensors
21:37 Plug the harness back to the sensors
24:11 Mount the bumper
25:26 Insert the bolts along with the wheel well
28:28 Insert the top grille
29:52 Install the radiator cover
30:44 Secure the lower bumper
31:27 Outro
Fits the following:
2014-2018 Dodge Pickup 1500 Series
2019-2023 Dodge Pickup 1500 Series - Classic Style
TOOLS NEEDED:
Plastic Trim Remover or Flat-head screwdriver, Socket wrench with 8mm, 10mm sockets, short extension (if needed), a drill, a rivet tool with 2 rivets.
INSTRUCTIONS:
There are four bolts to remove with a 10mm socket. The grille is also secured by four small prongs or pins that lock it into place. Just evenly pull each side of the grille to remove unlock them. The next, step is to remove the bolts near the wheel well. Using your 8mm socket, remove two bolts and two plastic push pins. Under the wheel well, where the fender and bumper meet, there are two bolts. One is secured from the bumper to the fender and vice versa. Repeat the process on the corresponding side. There are a few more bolts on the bottom of the bumper. Once all the bolts are removed, you can remove the front bumper starting from one end to the other. There are two prongs from the bumper inserted into the fender that needs to be pulled down then out. If your bumper has fog lights or sensors, do not let the bumper drop. Remove all necessary connections from the bumper.
BUMPER ACCESSORIES:
There are 7 plastic push pins and 2 rivets on each end. Removing a rivet, you have to drill it out. Be careful, and do not drill through your valance. Remove the lower valance by pushing the tabs down and pulling the valance off. Second, we have the lower grille, which is removed by pulling it up on the tabs. Next are the 6 bumper sensors, remove by wedging the tabs outwards. Make sure to not lose the rubber washer. It is also important to notice the directions of the sensors. If they are facing another way, the wire harness may not reach the plug. You'll see, that we installed 3 sensors facing the wrong direction. Just work in reverse when installing the parts you just removed. Be sure to line up all the tabs/prongs before you start forcing the parts in. Installing the lower valance is much easier with the bumper face up. Just firmly press the valance down. Installing the rivet is very simple. Be sure to use the correct size rivet. Simply snap the sensors on in the correct direction. The 3 sensors on the passenger side should be pointed towards the passenger side.
INSTALLATION:
Connect the wire harness to the sensors. As I mentioned before, we put 3 sensors facing the wrong direction. Set the bumper cover on the (real) bumper or bumper support does not fall. Once the prongs are inserted on each side, the bumper should slide itself underneath the headlight. Make sure the bumper is flush and you have no alignment issues. Again, work your way backward and insert the bolts. Attach the wheel well to the bumper with the 8mm bolts and the plastic pins. Repeat the process on the corresponding side. Attaching the grille is even easier than removing it. Snap it on and secure it with the four bolts. Put the heat shield back on and secure it with the push pins. Lastly, secure the lower valance underneath the bumper.
Source: https://www.revemoto.com
Follow Us on
FB: / revemoto
IG: / revemoto
Twitter: https://twitter.com/revemoto?lang=en
________________________________________________________
#DodgeRam #revemoto #paintedautoparts #RAM #highquality #DIY #HowTo #RamTruck
DISCLAIMER: While ReveMoto tries to make the information in this video as accurate as possible, we make no claims, promises, or guarantees about the accuracy, completeness, or applicability of the content. No information contained in this video shall create any expressed or implied warranty or guarantee of any particular result. All do-it-yourself (DIY) projects entail some risk. It is the sole responsibility of the viewer to assume this risk. ReveMoto is not responsible or liable for any loss, damage (including, but not limited to, actual, consequential, or punitive), liability, claim, or any other injury or cause related to or resulting from any information posted in this video.


Информация по комментариям в разработке