Read description first
The queen herself awaits her intruders...
Oh, hi, James.
Key Notes:
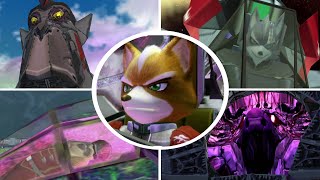
FINAL BOSS: Aparoid Queen (1st Phase)
- The queen has three phases. The first one has her cover her frontal weak point with a pretty dress of silver leaves. Right when you start, you can undress her skirt and reveal the weak point, though she'll then start to spin right 'round to keep you from hurting her. Then she comes to a stop to fire a charging laser blow. When this is done, she regenerates her dress and repeats the cycle.
- Some gross caterpillar bugs will float around as a really meager way of annoyance meant to hurt you. There is a very slight chance taking some of these down drop Silver Rings.
- In general, your party members aren't in immediate danger.
TRUE FINAL BOSS: Aparoid Queen (2nd Phase)
- But then this phase rolls around and most likely ends up being a headache. Now you fight her rear side, which has four pink spheres that must be struck down until every one of them is closed shut, revealing the inner snake inside. While you take these orbs down, the four sides like to toss some homing and non-homing bugs for obstacles. There will almost always be an extra item to get from destroying many of these bugs: Smart Bombs, Silver Rings, or Laser Upgrades (but the red strong one).
- The weak point is the forehead of the snake itself, but you must first destroy a helmet that will never regenerate once taken down. When it first comes out, the snake does the following:
1) Barfs trails of poison bubbles all over. Yes, she is loosely trying to hit you.
2) Swings her snake body twice across the whole screen. This one can be hard to dodge, but remember that she is pursuing you, so when you dodge the first blow, move over to the opposite direction to dodge the second one.
3) Deploys dozens of explosive mines, which forces a teammate from your side to uselessly try to weaken her when in fact you're forced to cover their stupid-ass weak shots by destroying the hard-to-pinpoint mines (easier to deal with if you just shoot everything around their ships while dodging the mines that get to your side). This is the part I was talking about in the previous video. It takes three explosive mines to the face or less to get shot down, and it will only ever be less if you let them take damage from the small parts you had to keep them safe from enemies. If you fail, they won't aid you (which is in hindsight better for you but nasty for your score). If you succeed in keeping them safe, they will give you a free Silver Ring...that you can easily miss if they so happen to drop it in the middle of explosive mines and thus makes it risky for you. (Food for thought: this is probably the reason why they should NEVER face off against final bosses in these games...)
- The process rinses and repeats from there, though if you waste time trying to close the four spheres, the queen will pull back and suddenly cover her path with a myriad of red lightning bolts. These are easier to dodge if you can fly around the edges.
- There's no shame in losing lives here (I lost freaking NINE lives). The score will remain intact and your teammates' HP will fully be restored (though losing the potential of using the blue lasers is a big loss in itself, much more so if you aren't lucky enough to get another upgrade).
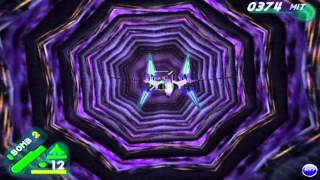
SERIOUSLY, TRUE FINAL BOSS: Dying Aparoid Queen (3rd Phase)
- And now comes the most bulls**t phase of them all. The queen frantically flies around while keeping a lock on you. She only has two attacks, but both are WAY too nasty and can take you down in four hits at maximum or less. Worse yet, there is NO pattern. She chooses which one to use in no order and may even repeat it.
1) Fires off a laser blast similar to Pigma's Aparoid form. This is the attack that wasn't just properly programmed in this game because its range is extremely deceiving. When you first hear it going off is also the time you must NEVER stand in front of her. The blast may not even be close to you, but it will hurt you anyway the moment it goes off. Cheap. You must dodge this by flying to the sides.
2) A screaming tunnel of crystals. This is the attack that forces you to stare directly at her and stay inside the tunnel unless you want to die by bumping into those shards. She does this attack several times, but it's very hard to dodge it. You have a chance at dodging it completely by flying out to the corners, but its range is pretty big that is still risky.
- As you can plainly see, the problem with these two attacks is that there is absolutely no way to predict avoiding the first hit. Good luck! And don't be joking around.
Watch, enjoy, and comment, everyone.


Информация по комментариям в разработке