#Lightree #fandelier
Straightforward installation, bright light and fan with decent airflow. Adjustable color, brightness, speed, and fan direction. Amazon Affiliate Product Link: https://geni.us/zCZw
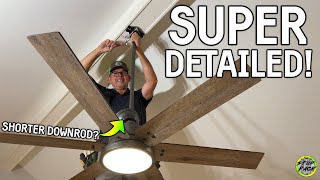
You’ll receive the fan motor body, lampshade diffuser, decorative bottom cup, decorative canopy cup, an 8 inch down rod and optional 4 inch down rod, hanging bracket, a pack of mounting hardware, a pair of white gloves, remote controller signal receiver, remote controller with wall holster, hanging hardware and instructions, and an installation manual. On the front of the manual is a QR code to a brief installation video from the manufacturer, but it's fairly light on actual instruction, so in my video I go into more detail and walk you through the entire process step-by-step.
The main body of the fan has four translucent dark brown plastic blades which extend out when the fan is on and are hidden above the light fixture when the fan is off. For the 42” version of this fan, the diameter of the light fixture in the middle will be 19” inches. This fan is also available in a 36” overall width (w/16"" diameter light fixture) for smaller spaces. The housing is made from a lightweight metal with a matte black finish. On the underside, the spiral shaped LED strip is pre-installed. What I like about this design is that the light panel is easily replaced by simply disconnecting the connector towards the center and removing a few screws that hold it in. The lampshade is made from a translucent white, lightweight plastic with metal accent bands and has the appearance of three tiers of light, thanks to a translucent side ring.
The installation height with the 4 inch rod will be 13” below your ceiling and 17” with the 8 inch rod; note that the bottom of the fan after installation should be no lower than 7 feet above the floor. When installing the hanging on your ceiling, it’s a good idea to pre-loosen the pair of screws that you plan to use for securing the canopy cup, as it's a little more difficult after the fan is hung. The bracket is cushioned to avoid scratching your ceiling and absorbs vibrations from the fan.
I installed my fan on a ceiling fan-rated pancake junction box that sits flush to my ceiling’s surface. If mounting directly to a wooden ceiling, batten, or support beam, you can use the included six wood screws, or optionally these four expansion screws for a concrete ceiling. The instructions recommend installing the lampshade prior to attaching the motor to the hanger, but I actually did it at the end for practical reasons. When connecting the signal receiver's power to your home’s main power, you can either use the push pin wire connector or the included wire nuts. In either case, you’ll want to match the black wire from the controller to you live power line and the white wire to your neutral. The shade fits a bit loosely but this doesn't affect operation.
The remote is required to change the fan's setting and uses 2 AAA batteries which are not included. If the fan is connected to a wall switch, make sure you set the switch to the on position. Pressing the ‘F’ fan button starts the fins in a forward rotation, extending them out, which pushes air down from the ceiling for faster cooling during warm weather. At the slowest speed, 1, the fan is virtually silent save for a very slight metallic hum. Even at the highest speed of 6, most of the noise you’ll hear will be from moving air rather than any motor noise from the fan. The ‘R’ button, or reverse mode, spins the fins in the opposite direction, causing cool air to move upward and redistributing any heat that may be accumulating near the ceiling during colder weather.
The 'K' button cycles between a cool white, neutral white, and warm white and the nightlight mode is a warm, but dim light mode. You can incrementally change the brightness in 10 stages at any color temperature, and also change the color temperature in 12 stages at any brightness. When switching the light off and on again using the remote, the fan will remember the last settings for the color and brightness. However, if you turn the main power off at the wall switch and turn it on again, the light settings will reset.
Overall, this ceiling fan with light is pretty straightforward to assemble, install, and use. The amount of airflow that I get from this 42” diameter unit is adequate for the size room I have it in, about 150 sq ft. At moderate to low speeds it’s virtually silent during operation. The light is moderately bright on its own but complements my existing ceiling lights well, and I love that the light’s brightness and color are customizable and that I don’t need to go up to the unit to change the rotational direction with the changing seasons, since it can be done right on the remote.
Amazon Affiliate Product Link: https://geni.us/zCZw


![[Problem Solved] Fandelier 36](https://i.ytimg.com/vi/h2hC0lQ9wtg/mqdefault.jpg)


Информация по комментариям в разработке