Click for more info and reviews of this CURT Trailer Hitch:
https://www.etrailer.com/Trailer-Hitc...
https://www.etrailer.com
Don’t forget to subscribe!
/ etrailertv
Full transcript: https://www.etrailer.com/tv-install-t...
Today on our 2012 Land Rover Evoke, we'll be installing the CURT hitch, part number C13128. This is what our hitch will look like once it's installed. Next we'll go ahead and give you a couple measurements to assist you selecting accessories for your new hitch. From the center of the hitch pin hole to the outermost edge of the bumper is 5 inches. From the top of the receiver tube opening to the ground is 12 and 3/4 inches. This will assist you selecting accessories such as a ball mount, bike rack, or cargo carrier.
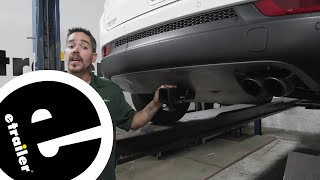
Now let's go ahead with installation. To being our install, we'll first need to lower the exhaust. To safely lower the exhaust, we'll put a safety strap underneath to help support the weight once we remove the hangers. We'll have a total of 3 hangers to remove. The rear hanger here on the passenger side has a bolt that holds the metal hanger to the frame, so we can go ahead and remove the bolt, and then the hanger, as we'll rotate it down out of the way. Then the forward hanger on the passenger side, which will be identical on the drivers side, will be rubber isolators that we'll remove from the metal hangers. To remove these rubber isolators, we'll simply use some spray lubricant and our pry bar to remove them.
Once removed, we can then use the safety strap to safely lower the weight of the exhaust. With the exhaust and muffler down out of the way, you can see it gives us access to the frame rails and our attachment points. We'll have a total of five attachment points, two on the drivers side, which our forward attachment point will be a well nut in the frame, and then we'll be using a carriage bolt and block for the rear attachment point. Over on the passengers side, we'll use the three well nuts in the frame. Now we're ready to go ahead and clean out our attachment points for the well nuts in the frame. We'll spray each on with some spray lubricant, and then use our half inch nylon tube brush, part number 814092, to thoroughly clean them out.
Then we'll go ahead and take one of the new fasteners and trudge it into the well nut to make sure it will go nice and easily. Before we can put our hitch in place, we'll first need to remove the rear exhaust heat shield. To remove the rear heat shield, we'll need to remove the four hex bolts going across the top and the eight torx bolts that secure it. Once we remove the hardware, we'll go ahead and set it aside and then remove the heat shield. Now with the heat shield removed, going by the measurements per the instructions, we're going to go ahead and find our center line of our cutout, and then trim as necessary. Note I'll be trimming slightly larger than the cutout for the lower fascia.
Now with the heat shield center cut out, we'll also need to cut off the corners to make room for the hitch. Quick tech tip, to make it easier to cut out the corner pieces, I recommend you get an extra set of hands to help hold the hitch in place and mark the cutouts, and then trim as necessary. Once we have the corners cut off, we'll set the heat shield aside for re-installation later. Now to mark the fascia, once again, we're going to use an extra set of hands to help hold the hitch in place, and using a paint marker, mark the cutouts that will be necessary to go around the hitch receiver tube. Then using a tape measure, we'll mark our depth, draw our lines, and using a rotary tool, cut it out. Note, you'll also need to cutout the inner fascia bracket that is a support for the outer bumper fascia. Once we have both of these cutout, we'll go ahead and re-install the heat shield. Now with our heat shield re-installed, we're ready to go ahead and install the hitch. On the drivers side, our forward fastener will be a 14mm bolt and conical tooth washer. The teeth of the washer will face the hitch. The rear attachment point on the drivers side will be our half inch carriage bolt and block, conical tooth washer and half inch nut. Note, we'll be using the half inch pull wire provided with our install kit to get the carriage bolt and block into the frame. We'll slide the block on to the pull wire, then thread on the bolt. We'll feed the bolt up into the frame attachment point, followed by the block. Then we'll pull them both back down into position. We'll leave the pull wire on as it will make it easier to get our hitch back up into place without pushing to hardware into the frame. Then on the passenger side, here we will use the 12mm bolts provided with the install kit to secure the hitch. Once again, it's a good idea to get an extra set of hands to help you hold the hitch while you install the fasteners. Now with all our fasteners installed finger ti


Информация по комментариям в разработке