How to install weatherproof connectors. Weatherproof connectors are the same style that is used on your vehicle, these are intended to keep any moisture or dirt out of a connection, things that cause electrical faults. I bought these online, I have the cheap versions which work good but there are higher quality versions available too for more money. These come in a single, two, three, four, and up pin connectors, there is a wide variety depending on your application.
Amazon links for various products used in the video for both USA and Canada:
USA
Weatherproof 2 pin connectors: https://amzn.to/3trlwAy
Weatherproof connector kit: https://amzn.to/2YHK9ep
Crimping tool with interchangeable jaws: https://amzn.to/3jksbYY
Canada
Weatherproof 2 pin connectors: https://amzn.to/3oOxssE
Weatherproof connector kit: https://amzn.to/3pRi7J8
Crimping tool with interchangeable jaws: https://amzn.to/3tsFHOQ
Website: http://4diyers.com
Patreon: / 4diyers
Facebook: / 4diyers
Twitter: / 4diyers
Instagram: / 4diyers
Tumblr: / 4diyers
Pintrest: / 4diyers
Tools/Supplies Needed:
-weatherproof connector kits
-wire strippers
-wire crimpers
Procedure:
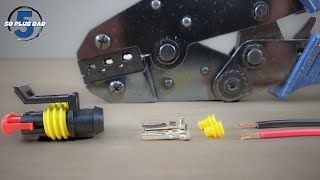
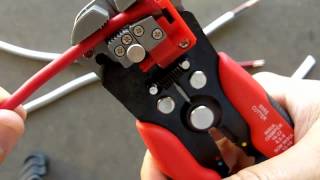
Strip and twist the conductor so the strands are tied together. With the weatherproof connectors, these will come with rubber seals for each wire. Install these onto each wire, this will fit on top of the insulation, the base should be even with the exposed conductor.
Included with the connectors will also be the pins, both male and female ends. To crimp on the terminals, you will need a special tool. They typically have interchangeable jaws and you’ll need to pick the correct jaws for the application. The terminals have two sections to crimp, one goes over the conductor and the other goes over the rubber gasket, gripping onto the wire’s insulation. The jaws are divided into segments too, the larger tabs will be installed in the larger half of the jaw and the segment that crimps onto the conductor goes into the smaller half.
The terminal will need to be insert in the correct sized jaw where it’s a sung fit and will provide a proper crimp. What I like to do first, making the installation a little easier. Install the terminal in the crimper first, the jaws do lock so I can apply some pressure to the terminal so it stays into place. Then insert the wire, only up to the smooth portion on the rubber gasket.
Tighten the crimpers, they have a ratcheting style locking mechanism, when they get tightened so far, they’ll automatically release. Once they release and the connection is crimped, you’re done with this terminal.
Install the terminal into the crimper, make sure you are using the same terminal which will be on the one side of the plug. If a mistake is made during the crimping process, the only way to remove the crimped connection is cutting off the wire unfortunately.
Install the plastic connector, the terminals install in one orientation. There can sometimes be a double locking system, one will be a barb type tab on the terminals where they lock into the plastic case. Then there will be another separate plastic locking clip, this would be the red clip I have here.
Make sure both terminals are seated, always give them the pull test so you know they’re seated and you have a good connection. Snap the clip into place.
Install the rubber gaskets. These style of connectors are specific to the wire gauge, there will be various sizes available on the market. Too small or large of wire gauges won’t allow you the create a proper crimp, the seal won’t fit correctly, you may have fitment issues in the plastic casing, and most important, if you’re installing a connector which is rated for a low amperage on a high amperage circuit, this can potentially cause a fire.
This side will have a different style terminal, do the same process as previously. Place the terminal in the crimper, apply light tension to keep it in place, insert the wire, and then crimp the connection. For this side of the connector, it’s doesn’t have a retaining clip that is required to be installed after. Once snapped into place, give the pull test and this connector is done. When plugging in the wires, to keep everything fairly easy to follow, the terminals are numbered on each of the plugs so you can mixed up the wiring.
Finally is plugging in the connections, then your circuit is ready to power up.
Thank you to all those who watch my videos and support my content. Don't forget to subscribe to my channel for future tutorial videos and like my video if you found it helpful. New videos are always being uploaded every week!
© 4DIYers 2013
All Rights Reserved
No part of this video or any of its contents may be reproduced, copied, modified or adapted, without the prior written consent of the author.


Информация по комментариям в разработке