Dneska si ukážeme efektní a přitom jednoduchou techniku, která je známá v grafice a tisku, ale tentokrát ji budeme aplikovat na polymerové hmoty. Dneska se totiž vrhneme na sítotisk.
Článek o sítotisku na blogu - http://bit.ly/SilkscreenTechnique
Potřebovat budete akrylové barvy v různých odstínech a stěrku na jejich rozetření, sítotiskové šablony, které se prodávají v různých vzorech, polymerovou hmotu, inkoustové polštářky, váleček a řezák. Sítotisk moc hezky vypadá na blendovaných plátech, pokud stále nevíte jak na ně, koukněte na další videa, kde je detailněji popisuji. Moje blendy jsou pro dnešek úplně jednoduché. Nakombinovala jsem dílky polymerových kostiček a pospolu je rovnou bez propracování nablendovala ve strojku.
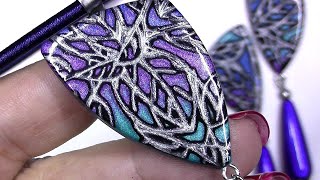
Když máte plát připravený, položte na něj libovolnou šablonu a podle ní plát okrojte řezákem. Bude se vám s ním pak lépe manipulovat. Stejným způsobem si můžete vytvořit podklady pro sítotisk v různě barevných variantách. Celý princip sítotiskové techniky je nesmírně jednoduchý. Na blendovaný plát položte vybranou sítotiskovou šablonu, zaválejte ji válečkem, aby přilnula, a na kraj naneste trošičku akrylové barvy. Následně ji rozetřete stěrkou, já používám starší plastové kartičky. Teď už jen opatrně sundejte šablonu z plátu, na který se přenesl celý vzor, který nechte chvíli zaschnout a je to!
Co je ale důležité, po každém použití šablony jí rychle namočte do misky s vodou, aby barva nezaschla. Poté ji umyjte s trochou mýdla a po uschnutí jí můžete opět používat. Takto připravené pláty se dále hodí na další použití, můžete z nich vyrobit v podstatě cokoliv. V příštím videu z nich ale budu vyrábět nějaký pěkný šperk, tak se máte na co těšit.
---
Hello, today we´ll show an effective and simple technique, which is known in the graphics art and printing, but this time we´ll apply to the polymer clay. Today we´ll actually set to the silkscreen.
Read a blog post about silkscreen - http://bit.ly/SilkscreenTechnique
You´ll need acrylic paints in various shades and a squeegee for its spreading, silkscreen stencils, which are sold in various patterns, the polymer clay, inkpads, a paint roller and a cutter. The silkscreen looks very nice on blended layers, if you still don´t know how to work with them, look at other videos, in which I describe them in detail. My skinner blends are quite simple today. I combined parts of the small polymer cubes and I blended them all together in the machine without any kneading.
When the layer is prepared, put on it any stencil, and on its base cut the layer by the cutter. It will help you to manipulate with it better. In the same way, you can create bases for the silkscreen in different colors. The whole principle of the silkscreen technique is extremely simple, so go for it! Put a chosen silkscreen stencil on the blended layer, roll it into the layer with the roller, and apply a bit of acrylic paint on the edge. Then spread the paint by the squeegee, I use old plastic cards. Now just remove the stencil from the layer, onto which the entire pattern was transferred, leave it to dry and that´s it!
What is important, after every use of the stencil, wet it quickly into the bowl with water to let the paint dry up. Then you wash it with soap and after drying up, you can use it again. Thus prepared layers are suitable for other use, you can create anything from it. In the next video, I will create some nice jewel from it, so see you again! Have a nice day!
Web: http://www.lucystruncova.com/
FB: / atelier.lucy
LC Machine - http://www.lucyclaytools.com/machine/
Music in video: http://bit.ly/2bPv70e


Информация по комментариям в разработке