Click for more info and reviews of this CURT Trailer Hitch:
https://www.etrailer.com/Trailer-Hitc...
https://www.etrailer.com
Don’t forget to subscribe!
/ etrailertv
Full transcript: https://www.etrailer.com/tv-install-c...
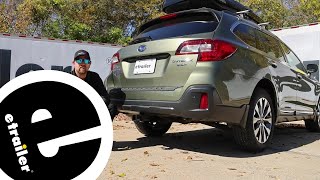
Ryan: Hey everybody, Ryan here at etrailer.com. Today on our 2018 Subaru Outback wagon, we're going to be taking a look at, and showing you how to install the Curt Class III 2" Trailer Hitch Receiver.Now, one of my favorite things about this hitch is that it's going to be completely hidden, which will maintain that factory look. The only thing you're going to see is the receiver tube opening, and it's still going to be really easy to use, getting our accessories on and off, because how open it is.Now our hitch is going to give us plenty of clearance. The end of our receiver tube is going to be just about flush with our back bumper, and that's going to work really well with those folding accessories. Now with our hitch being a Class III and having that 2" by 2" receiver tube opening, the options for hitch-mounted accessories are more or less endless. So whether it be a ball mount, or a bike rack, you're going to be able to find pretty much any accessory that you need.Now the hitch's pinhole is going to be the standard 5/8 size.
I do want to point out that it does not come included with the pin and clip, however if you need one you can find it here at Etrailer. It's going to have loop-style safety chain openings, which are big enough and nothing's really blocking them, so we're going to be able to use any size hook that we might have. The hitch is going to have a gloss black powder coat finish, which is going to keep it in good shape and last a long time.Now when it comes to weight capacities, our hitch is going to have a 600 pound maximum gross tongue weight rating. That's going to be the amount of weight pushing down on our hitch, and that's a pretty impressive number. That's going to allow you to use just about any cargo carrier or bike rack on the market.
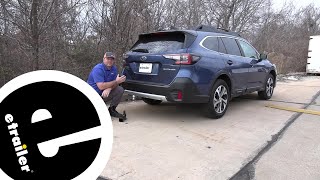
Now when it comes to the maximum gross trailer weight rating, it's going to be 4,000 pounds, the amount of weight pulling on our hitch. That's the weight of your trailer plus anything you might have on it. Now I do want to point out, it is always a good idea to check with your Outback's owner's manual to make sure your Subaru can pull that much weight.Now I'm going to give you a couple of measurements. You're going to use these to help figure out which hitch mount and accessories to get. From the ground to the top inside edge of the receiver tube opening, it's going to be about 15-1/2".
You're going to use that to figure out if you need to get a ball mount with either a drop or a rise. From the center of the hitch pinhole to the edge of our rear bumper, that's about 3". You're going to use that to figure out if any folding accessories you might have can be stored in the upright position without contacting the bumper. Now if you do plan on doing a little bit of towing, I would recommend picking up some trailer wiring. That way you can be safe and legal.Now since our hitch is hidden, the installation is going to be a little more involved, but it's really not that bad.
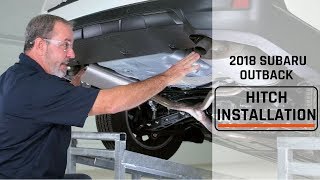
Speaking of which, let's go ahead and do it together now.To begin our installation, we're going to need to remove our taillights, so we'll first start by opening up our hatch. To remove our taillight, we're going to first start by undoing these two plastic screws. So you can just gently take a Philips screwdriver, and back it off a little bit. It'll kind of unseat; you can just grab it, and pull the whole clip out. With our fasteners removed, you can now take this plastic panel off and kind of just peel the corner back. Push out to unseat that clip, just set it off to the side.Now we're going to have two 10 millimeter bolts we're going to need to take out. Now we can remove our taillight. Just pull back, and then we're going to unplug all of our lights and connections to get our lights out. This one here, we're going to have to spin it, pull it out. Same thing with this one. Spin it, pull it out, and as far as the clip goes. On the bottom side, there'll be a small tab in the center. Push that down, and work that connector off the taillight. Now the other side is set up the exact same way, so just repeat that process.Underneath each one of our taillights we're going to have a small cap here. To pop this open, we've got a small flathead, get behind it, and pull it out. And that will reveal another 10 millimeter bolt. And we're going to do this to both sides, and from this point on anything we do to one side, we're going to do to the other.Now we'll come over to our wheel wells, and we're going to have three Philips head screws that we're going to take out. Now we're going to have a couple of pushpin fasteners that we're going to need to r


Информация по комментариям в разработке