Click for more info and reviews of this Yakima Car Awning:
https://www.etrailer.com/Car-Awning/Y...
Check out some similar Car Awning options:
https://www.etrailer.com/dept-pg-Car_...
Search for other popular GMC Acadia parts and accessories:
https://www.etrailer.com/vehicle/2022...
https://www.etrailer.com
Don’t forget to subscribe!
/ etrailertv
Full transcript: https://www.etrailer.com/tv-install-y...
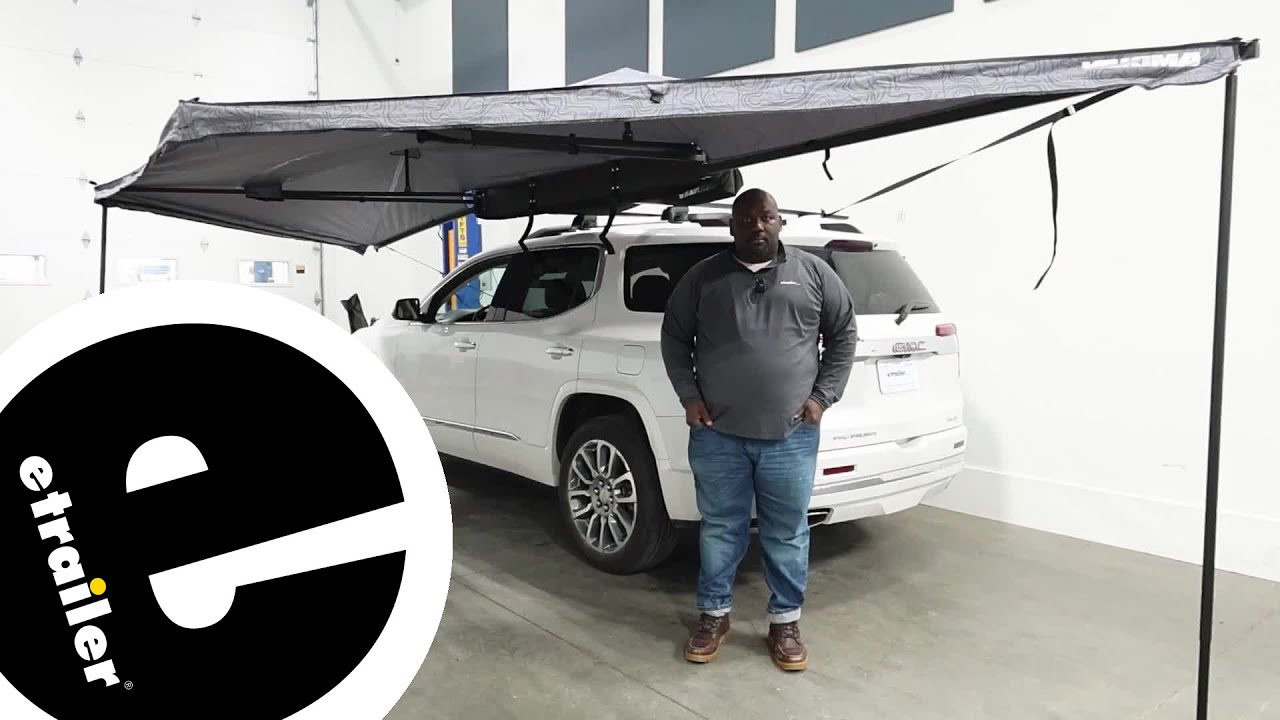
How's it going, neighbors This is Ed here with etrailer.com., and today we're gonna check out the Yakima OverNOut 180 on our 2023 GMC Acadia. Now adding a awning to your vehicle is gonna allow you to have plenty of shade and coverage from the elements, while still being able to minimize how much you have to pack with you. So let's take a closer look at the OverNOut 180 and see how well it fits on our Acadia. Now, as far as the way this guy fits on our crossbars, I have the Yakima JetStream. I chose the 60 inch bars just to get that additional space and hangover, but this is gonna go right down your channel. And you can see from how your bars mount to your raised rails that you're not really having to worry about anything south of your crossbars.
Now, if you wanted to flip these guys over into the drop, it's gonna put you right into this space, and it may require you to come out a little farther. But it the setup I have here in the rise with the brackets, I think it's gonna give you the most amount of usable area. What holds the OverNOut in place is actually the tension from the strap system that you have. You're gonna have a buckle clamp here that are gonna have two hooks, and you're also gonna get a packet of guy wires and stakes that'll attached to the outside. So in windy environments, you can get your poles down and tie it down.
Well, if it's a nicer, less breezier day, you can remove your legs all together, and take advantage of the fact that the sky is freestanding as well. Another real cool feature about that is the fact that if you wanted to add a little bit more, I guess, structure to it, you could add exterior walls that are just gonna zip along the outside. The OverNOut is super versatile. So you can set it up on the driver's side like we have now, or you can throw it over on the passenger side and it's gonna allow you to set it up either way. If you go with the 270 OverNOut, that's going to be specific for a driver's side or passenger side, so just pay attention when you're placing your order.
Having an awning like this is gonna help solve the issue of just making sure you have a comfortable spot to sit back and make memories, because that's why we do all of this stuff, to make memories. And we would love for you to send a photo of your setup and how you're using the OverNOut. Now as far as installation, it's super easy. I'm gonna walk you through it. Let's go ahead.
We're gonna start our installation at our crossbars. First, you're gonna grab your tape measure and get your crossbar spread for your T channel on the top of your bars. This is only gonna work out the box with T channel roof racks, and you're gonna need a roof rack in order to set it up. So from here I'm gonna show you how to set the hardware on the back of the OverNOut, and we'll move to the next step. Here's the track I was talking about right here. And you're gonna have two rubber stoppers right at the end. You can just work that out with a tool. It's just a little rubber stopper. Then you're gonna take your hex head bolts, and you're gonna have two on the top channel, two on the bottom channel. The cool thing about the bracket is the fact that you can set it for a drop or a rise, depending on how you would like it to attach to your bars, but the setup on the Acadia is actually best to just go ahead and have it where it's rising upward. So we're gonna line this up with our nuts. Well, I'm sorry, our bolts. And we're gonna get our washer, and then our nylock nuts. Now at this point, I'm just gonna hand tighten while I put the bracket together. And then I can space it for the spread that I came up with. And right now the crossbars I have on my JetStream is right at 29 inches. So now we're gonna take our Allen head bolt, our thick washer, and our T slot bolt, and we're just gonna feed that through. You're gonna have one on the top and one on the bottom. You just wanna give yourself just enough to let it grip and still have space. So we're gonna go up and down right there. So now that we have our hardware put together, we're gonna go with our Allen head bolt, our thick washer, and our T track bolt. We're just gonna get the thread started just enough to hold on, but giving us enough space to slide down our track. Now once we get all of our hardware put together, we'll go ahead and measure our


Информация по комментариям в разработке