Click for more info and reviews of this CURT Trailer Hitch:
https://www.etrailer.com/Trailer-Hitc...
Check out some similar Trailer Hitch options:
https://www.etrailer.com/fitguide.htm
Search for other popular Toyota Highlander parts and accessories:
https://www.etrailer.com/vehicle/2015...
https://www.etrailer.com
Don’t forget to subscribe!
/ etrailertv
Full transcript: https://www.etrailer.com/tv-install-t...
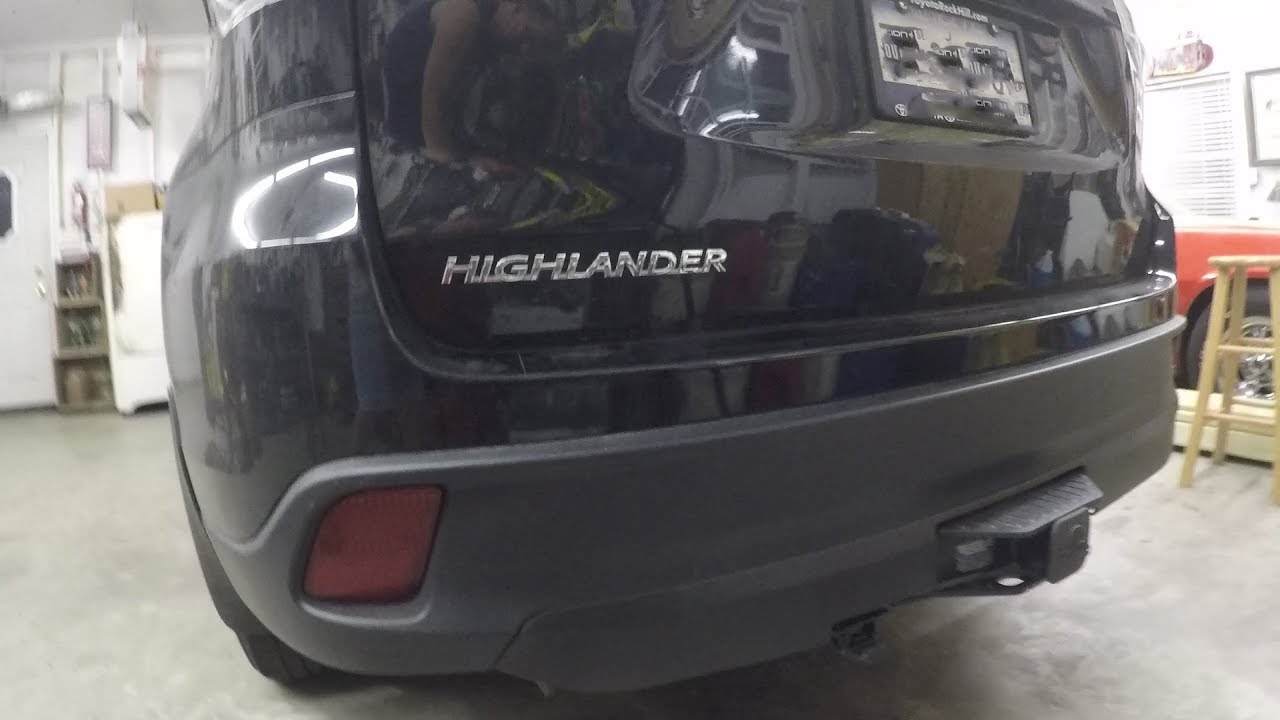
Today on our 2015 Toyota Highlander, we're going to take a look at and then show you how to install the CURT custom-fit class three tailer hitch receiver. This offers a two-inch opening. It's part number is C13200. Here's what the CURT hitch is going to look like when you get it installed. You can see it tapers up right up underneath the rear valence. You're only going to have a short length of visible tube here.
It's the rounded style, so it gives it a nice, soft look. It's not so bold and so squared off there. Heavy-duty safety chain cables are going to give you a nice, wide hole here, so we're going to be able to connect safety chains from our tailer, things such as that, but also a lot of the other accessories if they've got anything that needs to be connected there. No problem getting that done. The hitch is an easy install to do, really. You've got three bolts on the left.
Three bolts on the right. You pull down a fascia panel under here. You'll see in the video. We trimmed ours to re-position it. That's optional.
Really, any trimming except for a small cut right here is going to be an optional thing for you to do. No drilling required, so pretty easy to get it in place. The hitch is going to offer a 5/8 pin hole, so a 5/8 pin and clips, anti-rattle bolts, anything like that are going to work great with it. It offers us a 6,000-pound gross tailer weight rating, and a 900-pound maximum tongue weight rating. If we switch into weight distribution, we can raise the tailer weight rating all the way up to 8,000 pounds while the tongue weight will stay the same. You do want to look in the owner's manual of your Toyota.
Make sure the Highlander can handle those kind of loads. If not, go off whatever the owner's manual says or whichever is the lowest of these numbers. Now a couple of measurements that will be helpful in selecting your ball mount, bike rack, or maybe hitch cargo carrier. It's going to be from the ground to the inside top edge of the receiver tube opening. We've got about 16 inches. From the center of our hitch pin hole to the outer edge of our bumper, it's only about 2. Now to begin our installation, we're going to remove the panel that kind of comes around here in this rear fender panel. We're going to have five bolts that we're taking out. One, two, three, then right up along this edge, we've got four and five. Right up here and here. Then we're also going to take out the push-pin fasteners located here and here. Start with our bolts. Now for your steel bolts on the outside, that's going to take a 10 mm socket. For the two plastic caps here, we'll need a 12. All right. Let's get those push-pin fasteners out, and we can remove it. For this, you use like a little screwdriver. I've got a pick here. We'll pull the center out and then the outside. All right, now let's wiggle our panel around here a little bit, and get it removed. Now it's time for us to remove a few caps here. These two, we're going to just remove these. Those are just going to pull right out. The other ones are kind of like threaded caps, so we'll use a screwdriver and then just kind of start unthreading them there. See that exposes our weld nuts that are located in our frame rails there. Perfect. Now here on the passenger side, it's a little different set-up. Everything is exactly the same as far as our connection points. We've got one here and here. These two bolts are holding our toe loop in. We're not going to need that once we get our hitch installed, so we'll be returning that to our customer as well as the two bolts here, and then up here, there's also a small little tab that comes over to hold our fascia up in place at this corner. We're going to be removing that bolt, this bolt, and that tab. We'll give those back to our customer as well. To make it a little bit easier to work, and make it easier to see for you, we're going to drop this rear tailpipe down just a little bit. It's not something required in the instructions, and really you can access all of our mounting locations without doing it. We just thought maybe it would be a little easier to see if we do. That will give us a little bit of room. Maybe you can get a little better view there. There's an exhaust hanger right here that's going to provide the support we need while it's stationary and sitting here. We will re-connect our exhaust hanger of course to give it full support when operational. We'll use our 10 mm for the small b


Информация по комментариям в разработке