This video provides a detailed, step-by-step guide for postgraduate medical doctors, particularly those with an FCPS qualification, on how to approach and manage a critically ill pediatric patient. We move beyond basic life support to a systematic framework designed for the high-pressure environment of the emergency room or critical care unit.
00:00 – Intro & سلام
00:26 – Objectives (respiratory failure, shock types, PEWS, ABCDE, sepsis)
00:54 – What Is a Critically Ill Child? (WHO definition)
01:31 – Acute Pediatric Critical Illness: Tier 1 vs Tier 2
03:10 – Rapid Assessment Overview (ABCDE)
03:25 – Pediatric Early Warning Score (PEWS)
05:08 – Rapid Assessment Principles: D-I-R-E-C-T framework
05:52 – General Assessment: appearance, CV & respiratory focus
06:35 – Respiratory Signs & AVPU vs GCS (age-based cut-offs)
08:22 – Pediatric Assessment Triangle (appearance, work of breathing, circulation)
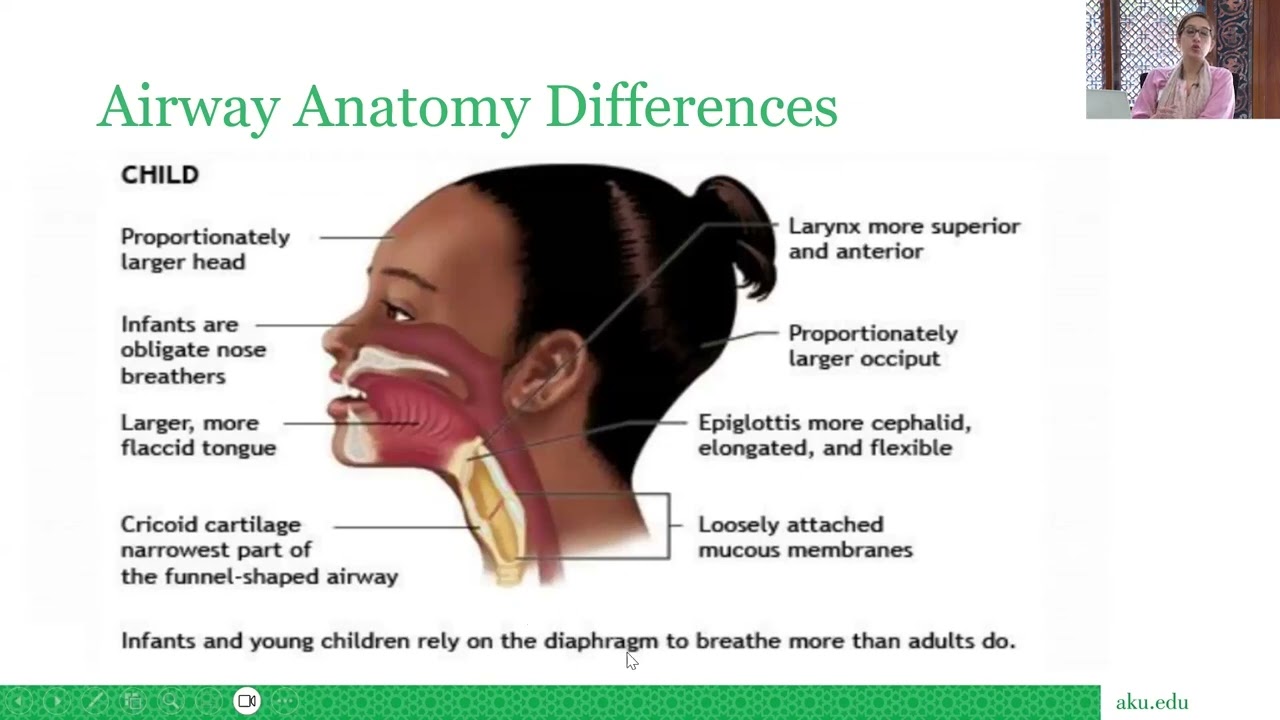
09:11 – Primary Assessment: A – Pediatric airway differences & positioning
11:19 – Airway Obstruction: Stridor vs Wheeze (upper vs lower)
12:00 – Respiratory Failure by Age + Ancillary Tests (ABG, SpO₂, CXR, capnography)
12:57 – Circulation Assessment: The 5 Ps (pulse, perfusion, preload, BP, …)
14:17 – Pediatric Vitals & BP Rule (SBP ≈ 70 + 2×age); compensation
16:02 – Shock: definition, compensated vs decompensated; key types
17:36 – Cardiovascular Monitoring & Labs (lactate, CO₂, ECG, art line, CVP)
18:04 – Checklist: PAT → ABCDE → SAMPLE → Secondary survey
19:03 – Key Takeaways & Wrap-Up
19:40 – Thanks & End
Initial Approach and Rapid Assessment
The initial moments are critical. Your goal is to rapidly identify and address life-threatening conditions while simultaneously forming a differential diagnosis.
1. The "Look and Act" Approach (Initial 30 Seconds)
Appearance: Does the child look sick? Are they agitated, lethargic, or unresponsive? Assess their level of consciousness using the AVPU scale (Alert, Verbal, Pain, Unresponsive).
Work of Breathing: Observe for signs of respiratory distress: nasal flaring, grunting, retractions and tachypnea.
Circulation to Skin: Check for pallor, mottling, or cyanosis. This can be a quick indicator of poor perfusion.
2. The Pediatric Assessment Triangle (PAT)
The PAT is a rapid, non-invasive tool to assess the severity of a child's illness and prioritize interventions. It focuses on:
Appearance: Reflects the central nervous system's function and overall perfusion. This includes tone, interactiveness, consolability, look/gaze, and speech/cry.
Work of Breathing: Indicates the adequacy of oxygenation and ventilation.
Circulation to Skin: Provides a quick assessment of cardiac output and end-organ perfusion.
3. Primary Survey (A-B-C-D-E)
This is a structured, hands-on approach to identify and manage immediate life threats.
A: Airway:
Assess for patency. Is it clear or obstructed?
Signs of obstruction: Stridor (upper airway), wheezing (lower airway), drooling (epiglottitis), or gurgling.
Management:
Position the airway (e.g., sniffing position).
Clear secretions (suctioning).
Consider airway adjuncts (oral or nasal airway) or definitive airway management (intubation) if necessary.
B: Breathing:
Assess respiratory rate, effort, breath sounds (auscultation), and oxygen saturation (SpO 2
C: Circulation:
Assess heart rate, capillary refill time (CRT), blood pressure, and peripheral pulses.
Management:
Secure intravenous (IV) or intraosseous (IO) access.
Administer a fluid bolus (e.g., 20 mL/kg of normal saline or Ringer's lactate) for hypovolemic shock. Repeat up to three times.
Initiate inotropic/vasopressor support if the patient remains hypotensive after fluid resuscitation.
Consider the cause (e.g., hemorrhagic shock, septic shock, cardiogenic shock).
D: Disability (Neurological Assessment):
Assess level of consciousness (AVPU or GCS), pupillary response, and motor function.
Check for signs of increased intracranial pressure (ICP)
Management:
Consider a bedside glucose check to rule out hypoglycemia.
Address seizures (e.g., with benzodiazepines).
E: Exposure and Environment:
Expose the patient to perform a full head-to-toe examination.
Management:
Prevent hypothermia. Cover the child with a blanket after the examination.
Secondary Survey and Detailed History
Once the patient is stabilized, proceed with a more detailed assessment.
1. History Taking (AMPLE)
Gather a focused history from the parents or caregivers.
Allergies
Medications
Past medical history, including immunizations and hospitalizations
Last meal/Last oral intake
Events leading to the illness or injury
2. Head-to-Toe Examination
Head/Face: Look for trauma, signs of abuse, fontanelle fullness.
Eyes: Pupillary response, signs of periorbital ecchymosis.
Ears/Nose/Mouth: Nasal flaring, secretions, oral mucosa for hydration.
Neck: Neck stiffness, JVP.
Chest: Chest wall symmetry, crepitus, auscultation.
Abdomen: Tenderness, distension, bowel sounds.

Информация по комментариям в разработке