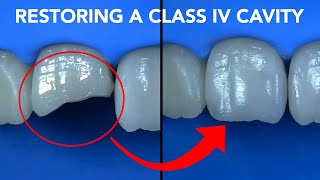
Class IV resin-based composite restoration on a mandibular incisor (#21) using the free-hand technique (2)
- To learn about resin-based composite cavity preparation & restoration instruments and tools setup (introduction), watch the video: • Resin composite cavity preparation & ...
- To learn about class IV cavity preparation, explaining beveling (why, how, when) and resin-based composite restoration on a mandibular incisor (#42) using the free-hand technique (1) • Class IV preparation, beveling, and r...
- To learn about class IV cavity preparation, explaining beveling (why, how, when) on a maxillary central incisor (#21), watch the video: • Class IV preparation and beveling – M...
- To learn about the celluloid matrix strip application & Removal, watch the video: • Celluloid matrix strip application & ...
- To learn about enamel & dentin bonding/adhesive systems (3-step, 2-step, all in one) & application, watch the video: • Enamel & dentin bonding / adhesive sy...
- To learn about the correct light-curing technique (1) and cleaning the light-guide tip, watch the video: • Light-curing technique (1) & cleaning...
- To learn about the correct light-curing technique (2), watch the video: • Light-curing technique (2) steps
- To learn about the correct light-curing technique (3) and the effect of incorrect curing using an educational tool, watch the video: • Light-curing technique (3) & the effe...
- To learn about the finishing & polishing tools & application (2): Class III, IV, V composite restorations, watch the video: • Finishing & polishing tools & applica...
- To learn about how to check occlusion after restoring a cavity preparation, watch the video: • How to check the occlusion? - Arabic ...
Subscribe for more Preclinical Operative Dentistry videos: / @drafnanoalzain
Music: https://www.bensound.com
--- Contents of this video ---
00:00 – Introduction
00:15 – Title: Class IV resin-based composite restoration using Free-hand technique (2)
00:23 – Class IV resin-based composite restoration on a maxillary central incisor
00:31 – Place the celluloid matrix strip & wedge
02:16 – Apply the adhesive system (one-step self-etch system): Selective etch technique
02:25 – Apply the adhesive system (one-step self-etch system): Selective etch technique: 1. Acid etch enamel
03:53 – Apply the adhesive system (one-step self-etch system): Selective etch technique: 2. One-step self-etch (all-in-one) adhesive
04:21 – Apply the adhesive system (one-step self-etch system): Selective etch technique: Light-cure the adhesive
04:42 – Place, adapt, shape & contour the composite material increment
05:12 – Place, adapt, shape & contour the composite material increment. Make sure you view from all surfaces (facial, lingual, incisal & interproximal)
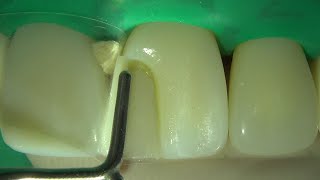
06:27 – Remove proximal excess using the tip of the dental explorer held at 45 degrees
06:58 – Place, adapt, shape & contour the composite material increment. Palatal surface: Ball burnisher
07:16 – Light-cure
07:28 – Place, adapt, shape & contour the composite material increment
07:47 – Place, adapt, shape & contour the composite material increment. Make sure you view from all surfaces (facial, lingual, incisal & interproximal)
08:16 – Remove proximal excess using the tip of the dental explorer held at 45 degrees
08:54 – Place, adapt, shape & contour the composite material increment. Make sure you view from all surfaces (facial, lingual, incisal & interproximal)
09:33 – Light-cure
09:41 – Remove the celluloid matrix strip & wedge
09:57 – Restoration evaluation: Check margins for gaps, ditches, excess & overhang. Check anatomy & contour
10:10 – Finishing & polishing
10:16 – Finishing & polishing: All surfaces: Finishing & polishing discs
10:25 – Finishing & polishing: Finishing: Palatal surface: Football diamond point or finishing & polishing discs
10:31 – Finishing & polishing: All surfaces: Finishing & polishing discs
11:51 – Restoration evaluation: Check margins for gaps, ditches, excess & overhang. Check anatomy & contour
12:09 – Finishing & polishing: All surfaces: Finishing & polishing discs
13:21 – Restoration evaluation: Check margins for gaps, ditches, excess & overhang. Check anatomy & contour
13:33 – Finishing and Polishing: Polishing: Rubber points
14:24 – Restoration evaluation: Check margins for gaps, ditches, excess & overhang. Check anatomy & contour
14:38 – Restoration evaluation: Check contact
14:41 – Restoration evaluation: Check for overhang
14:44 – Check occlusion
Instagram: @afnanalzain
Twitter: @afnanalzain
Email: [email protected]


Информация по комментариям в разработке