Full Playlist here: • Horizon Forbidden West - Ultra Hard (...
It all comes down to this. This challenge is harder than anything else in the Arena, and ridiculously accounts for 131 Arena Medals by itself, nearly an entire Legendary armor and weapon. If you're not a perfectionist, here is what I recommend: defeat all other Arena challenges for a total of 368 Medals. Then purchase the following:
Death-Seeker's Shadow: 80 Medals
Forgefall: 80 Medals
The Blast Forge: 80 Medals
Nora Thunder Warrior: 54 Medals
Tenakth Vanquisher: 54 Medals
Instant Brittle Chance +3%: 16 Medals
For a total of 364 Medals. By doing this you'll miss out on the Carja Stalker Elite, which has the Skilled Salvager +2 and Resilient Trapper +2 Weaves. You'll also miss the Coils Instant Burning +4%, Instant Explosion Chance +2%, and Instant Plasma Blast Chance +4%. You don't really need any of those. This will allow you to complete the vast majority of the Arena and get the important rewards without this mission.
However if you're a completionist and insist on slogging through this mission on Ultra Hard New Game, come along with me...
I start off by crafting 5 Elite Acid Traps, 4 Advanced Purgewater Traps (for the Scorcher), and 3 additional Advanced Blast Traps (although I only use 2 extra here, so I made one too many). This is all done with purpose. I want to use a combination of 2 Elite Acid Traps and then 2 Advanced Blast Traps to wear down the Thunderjaw. Unfortunately I can only do this twice, so at the end I use a single Elite Acid Trap and 3 Advanced Blast Traps. There's probably some optimization to be done here. The 4 Advanced Purgewater Traps are to kill the Scorcher swiftly, as Purgewater is the only thing Apex Scorchers are weak to. I also take this opportunity to switch my Sharpshot Bow to Braced Shot, as I'll be using it as my weapon skill.
After the crafting phase is complete the next goal is to tie down the Thunderjaw. I saw this from another player (MrPantsFancy on YouTube) and at first didn't understand it. You can actually use Penetrating Rope with the Elite Canister Ropecaster to tie an enemy down even though you don't have traditional ropes available. Neat trick! Unfortunately you can only use 3 Penetrating Ropes with your initial Stamina bar here and it takes 4 to tie down the Thunderjaw, so you'll have to splice in a Smoke Bomb and Stamina Potion. This is probably the hardest part of the challenge, so expect to fail here repeatedly before a successful attempt.
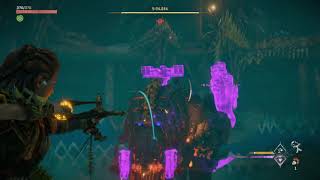
1:10 Once the Thunderjaw is tied down, the next goal is to get a knockdown on the Apex Scorcher. To do this I hit him with one Braced Shot then spam Advanced Explosive Bombs. Once the Scorcher goes down, I lay my four Advanced Purgewater Traps near him for a neat 3645 damage. Another Advanced Explosive Bomb finishes him off at this point.
1:55 Now the hardest part of the challenge is over and it's time to go one on one with the Apex Thunderjaw (without dying). While I've got him tied down I lay a pair of Elite Acid Traps, then a pair of Advanced Explosive Traps a few steps away. Then I use a pair of Tearblast Arrows to remove one of his Disc Launchers. By doing this the Thunderjaw dashes through the Elite Acid Traps, then the Advanced Blast Traps, for a cumulative damage of around 3000.
2:40 After the traps I drop my final Smoke Bomb, then unleash the Disc Launcher on the Thunderjaw while he's Corroding. I miss a shot here but still get 1500 damage from the Disc Launcher.
2:50 At this point I begin spamming the remainder of my Advanced Explosion Bombs, Explosive Bombs, and Braced Shots until I trigger another knockdown. This is the point of the battle where the fight becomes extremely dangerous (note I nearly die at 3:30), so don't forget to make use of your Large Health Potions and Overshield Valor Surge.
3:45 Once I knock the Thunderjaw down again I set up a pair of Elite Acid Traps followed by a pair of Advanced Blast Traps (this time they hit for a whopping 5500 damage, not sure why the difference, probably better spacing).
4:20 I activate Overshield and continue to spam Explosive Bombs. Once I get my final knockdown I place my final Elite Acid Trap, and then 3 Advanced Blast Traps. Thankfully this is enough to end the battle.
A lot of players like to utilize the Acid Canisters and Blaze Canisters on the Thunderjaw's back and stomach to milk out extra damage and speed things along, but as I show this isn't necessary. I still had over 3 minutes left on the clock while using only a few rudimentary strategies for my damage, which is a lot easier to keep track of than trying to learn everything at once. If you're playing for Leaderboard status you'll need to develop a more sophisticated strategy, but if your only goal is to get the Arena Medals so you can complete the game, then take your time and wear the Thunderjaw down as I do.


Информация по комментариям в разработке