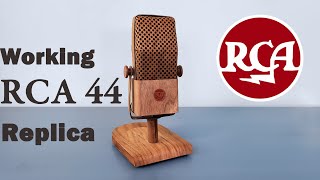
How to make a DIY microphone. I used wood, aluminum foil, CA glue and magnets. It's based on the classic RCA 44 ribbon mic. ➤Please subscribe to my channel!! https://goo.gl/p1xmZJ
By request, some affiliate links to some items to make your own ribbon mic:
🧲Magnets: https://amzn.to/2Fn658s Be careful, they are fragile!
🔩Neutrik Male Connector: https://amzn.to/2DUpnBr
🪒Ribbon foil: https://amzn.to/2LCErHP Select the thickest, heaviest sheets from the pad for ribbon use
🔧Tools: https://amzn.to/3RTsCMw Xacto https://amzn.to/2PBobZi
🎄Wood Veneer, Single Ply: https://amzn.to/3RBWhse Took about 3 5x8 sheets of walnut
🖨Cricut Maker: https://amzn.to/4atwjQr
Ribbon mic and mixer:
🎙 https://amzn.to/41xQKre
🎛 https://amzn.to/31mii4H 👈This is the one I used to narrate the video.
(👆I make a small commission when you purchase)
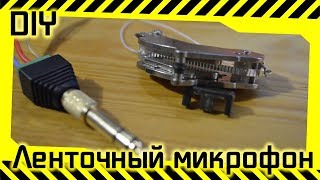
In the video I do the following: build the ribbon motor body, glue up the magnets, add mounting brackets, install a ribbon element, check ribbon resonance, make mic baffles, install microphone transformer and test the microphone by narrating the video with it! Any questions or comments, please feel free! Thanks for watching!
To begin, I started by mocking up the design in photoshop. I devised measurements by how thick and long I wanted the ribbon to be. After designing the parts, I cut the parts out of paper(with the cricut), to be sure the sizes would fit the magnets properly. Satisfied that it would fit together, I began cutting the parts out of single ply walnut veneer. I used the cricut maker for this part as well. I didn't show much of the cricut cutting footage, because I suspect most people would skip right past it. If there's interest, I'll do a video about cutting wood with the cricut maker. In my opinion the Cricut instructions skip some important steps, and I feel their recommendations of using a high strength mat is an exercise in frustration. It took me about a year of experimenting with different materials and settings to get this quality of cuts from the cricut.
One important thing about this first cutting step: The parts are cut from 2 different sheets of veneer, each cut with the grain perpendicular to the other. That way, the parts become a stronger "plywood" after being glued up. The issue here is the parts cut from single ply with cross grain are quite delicate. Many won't come out in one piece, so you must be careful to keep the parts organized for proper glue up. I "tacked" the parts together until the motor was fully assembled, then I added CA from the sides to "wick" into the center of the structure and quickly clamped it down for 1 minute by hand. The motor chassis is rock solid and ready to be sanded into shape.
After sanding into shape, I made sure the magnet mounts were parallel to each other, and then glued in the magnets.
Then, I assembled the cross members, mounting plates and contacts. Here, parts can be glued up a bit more easily, lining the holes up is the most important thing.
After another good sanding with 150, 220, and 400 grit sandpapers, the parts are ready to be assembled.
I used a little drill bit to clean out and straighten the holes by hand(no electric drills, you'll probably make the hole to big unless you use a drill press).
After adding a copper tape strip to the mounting plates, a solid core wire is soldered in surrounding the ribbon path.
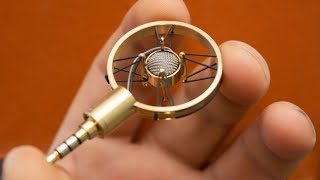
The aluminum Ribbon can now be cut with a fresh Xacto blade and fitted to the motor.
The ribbon can be sourced by finding the thickest sheets from a stack of aluminum signwriters leaf. Or you can spend the big bucks and buy the proper ribbon material from various online vendors.
Using a light box, I carefully make sure the ribbon is not touching the magnets. That's very important.
Also important is the ribbon tension. You can eyeball the tension, and as long as the ribbon isn't sagging or very tight it's probably fine. You don't want it too tight, or the bass frequency will suffer. After some experience, you'll get a good idea of how tight is too tight.
If you want, you can hook it up as I have, to a headphone output of a signal generator and check the "resonance" of the ribbon to be sure it will hit the frequencies you require. This step is really optional for a single mic, in my opinion. Just make sure it isn't too tight, nor too loose(looking saggy) and you'll be fine. Most importantly, listen to the mic. Does it have a funny sound? That might be because it's too tight or too loose. Adjust accordingly.
Don't forget to make a blast shield of some kind, Or you'll be re-ribboning your mic in short order!
Attach your transformer of choice and wire it up to an XLR. You're ready to mount it in your choice of enclosure and take the podcasting world by storm!
This is a medium to advanced level cricut maker project.


Информация по комментариям в разработке